Thursday, July 2, 2020

A Door, Some Windows and More


Happy July, everyone!  We continue to shelter in place, enjoying our back deck, Zooming with our friends, wearing masks and practicing safe social distancing.  I am grateful that I can work from home and that I’ve figured out how to balance work and my mini time, but I will be very glad when this is all over.

This update doesn’t have as much eye candy, because I am doing basic components—windows and doors.

To start with, I made the door.  I wanted to do a three-diamond door for some visual interest. (Inspiration here.) There are, of course, no doors like that for sale in half-scale, and I wanted windows, so I used my tried-and-true method of cutting multiple layers with my Silhouette Cameo II.  It can’t cut wood, but it can cut wood veneer.  So I used wood veneer (thanks, Carrie!) for the outer layers, and three layers of the chipboard the Cameo can cut for the core. 


The three layers of chipboard turned out to be the exact thickness of the clear styrene I wanted to use for the panes, so that worked out well.  You can see that the diamonds for the core are a bit bigger than the diamonds for the exterior layers, so that the exterior layers will hold the styrene in place.  I don’t have sophisticated software for designing, so I generally create my designs in PowerPoint, save the slide as a JPEG file, import it into my Silhouette software, and trace the image.  Works like a charm.  After painting, staining, and varnishing (as appropriate), I glued everything together.  The diamonds looked a bit unfinished, so I framed them out with some HO 1x4 lumber.  I built the doorframe from 1/8” x 1/32” strip wood and used this tutorial to make the hinges.  In retrospect, I could have gone with a bit thicker wire for the hinges, but they work OK.  Added some door hardware and framed it with 3/16” x 1/32” strip wood, and I had a door!  I’m really pleased with the way it turned out.


I used more 1/8” x 1/32” strip wood and more railroad lumber to create my windows, then framed them with 3/16” x 1/32” strip wood.  One edge was always left open to insert the styrene.  I used a thinner styrene for the windows than I had for the door because the windows’ slots were necessarily narrower, and I needed to accommodate the mullions.


I used the HO 1x4 lumber for my mullions and pre-painted them white.  Then I used the incredibly high-tech method of printing out templates for my windows, taping the styrene over the templates, and gluing the mullions on with tiny dots of glue along the edges.  It took a bit of trying to get the templates for the mullions to line up with the stripes I had painted.  (You can see where I had cut out one of the templates to test.) 


On my first attempt, I added two vertical mullions to the front windows.  After looking at it in place, I decided it made each of the individual panes too small and made the window look too conventional.  Unfortunately, I didn’t take a picture.  I just pulled it out, pulled off the mullions, and tried again.  I like the single centered mullion much better. 


I edged the side windows with additional strips of the HO lumber—one going right along the edge, and one going at a right angle to the styrene to cover the open side.  There is a slight gap where the two side windows meet.  I was going to use a thicker strip of wood along the left-hand window to cover that up, but it ended up looking too bulky.  I lost the “lightness” of the wrap-around window.  I guess I’ll live with the little gap.  😊


With the windows glued in place, the first floor is really starting to look finished. (Keep in mind that the "roof" and second floor are still the original foam core and not glued in place.)  Now, of course, I still have to do that curved window. I have an idea; we’ll see next time if it worked.  


Because I find making components a bit of a slog, I’ve also been working on more mini books.  I realized when I was looking at books for my art deco cabinet that some of Agatha Christie’s and Dorothy L. Sayers’ books are in the public domain now.  [An aside:  First of all, I am shocked that none of those books made the best-seller lists or “most significant” books list provided by UC Berkeley.  Seriously??  Our introduction to Lord Peter?  The debut of Hercule Poirot? Sacrilege, I tell you!  😉 Second, did you know that many more books, films and musical compositions are entering the public domain in the U.S. each year, now that the copyright extensions are finally expiring?  I always thought of the copyright extensions as “Mickey Mouse laws,” because I know Disney really wanted to extend its protection of Mickey; I had no idea the Gershwin Family Trust was also instrumental (forgive the pun) in getting these extensions passed.]  Anyway, I was able to get the .mobi files from Project Gutenberg and put them on my Kindle.  So now I have free books to read, and I have started writing summaries to use in my mini books.  The first book I did was Whose Body?, by Dorothy L. Sayers.  I like to set them up in both 1:24 and 1:12 scale while I’m at it.  Here you can see the comparison in size. 


The 1:12 book has a separate dust jacket; the 1:24 version does not, but I tried to simulate the look.  And, of course, my little homeowner now has the 1:24 scale version on her bedside table, ready for a little bedtime reading.


That’s all for now.  Hope every stays safe and healthy!  Thanks for stopping by!

Monday, June 15, 2020

A Teeny, Tiny Dining Room and More


Hello!  Hope you have all been doing well and staying healthy. I’ve been thoroughly enjoying the projects that many of you have been working on.  I am not quite as productive, but the art deco house is moving along steadily, if slowly.

My first little project was filling the refrigerator/icebox in the kitchen.  I couldn’t have a refrigerator that opened and not put something inside.  ðŸ˜Š  So now it holds milk, butter, something wrapped in brown paper from the butcher, and some eggs and carrots that Effie brought from the Fairfield’s kitchen garden and hen house.  I couldn’t find milk bottles in half scale, so this is one of my 3-D printed wine bottles, with the neck mostly cut off and a bead glued on top.  Painted, it doesn’t look too bad.  Now my little resident will have fresh food on hand.
Next, I started work on the dining room.  This is another small room, but it holds what I need, even if it is a smidge crowded.  

The drinks cart has been updated with lots of lovely new glassware.  

I still need an ice bucket for the bottom shelf, but haven’t found one yet (or rather, I haven’t found the perfect little bottle cap to repurpose as an ice bucket).  My original plan was to make the room black, white and gold, with light gray silk on the chair cushions, but the thought of another gray and black room was a little depressing.  I looked through my stash and found a swatch of some gorgeous blue silk charmeuse from Mood.  Then, looking on the Internet for some wall ideas, I saw peacocks.  The idea for a peacock-inspired dining room was born.  I know that peacocks are more art nouveau than art deco, but my little home-owner is fine with mixing styles. 
I started with the walls.  After spending way too much time trying different wallpaper designs, I ended up using the same white scrapbook paper I used on some of the walls in the living room.  It’s such a tiny room that anything too colorful or busy would just be a distraction. Plus, I plan on making a rug with a peacock feather design and a base color that matches the chair cushions.  That will be colorful enough.  The scrapbook paper does have a nice art deco design embossed in it, but it is subtle.  There is no room for a hinged door between the kitchen and dining room, and I am not as talented as Brae at making pocket doors.  I may hang a curtain of beads in the doorway, or I may add a little hardware to make it look like there’s a pocket door there.  It’s all smoke and mirrors anyway.  ðŸ˜‰


The table and chairs are from Red Cottage Miniatures, and, as usual, went together with ease.  The chairs are black with that lovely blue satin used for the cushions.  I couldn’t stand the thought of covering up that beautiful table with a table cloth, so I came up with the idea of a diamond-shaped runner.  It is made from some bits of left-over white silk (two layers, because it is thin), and some fairy lace.  I plan on having short-stands of “crystals” hanging from each point, but the beads I have ordered have not yet arrived.  I designed the plates to look as though they are part of the same set used on the breakfast tray in the bedroom, but have added a peacock silhouette to the center of each plate.  The napkin rings are crimp beads.  The candles are made from thread and polymer clay, painted with some blue metallic paint I had; their holders are just beads.  All glassware by Linden Swiss from the Virtual Dollhouse; the lovely flatware is from My Favorite Dollhouse.

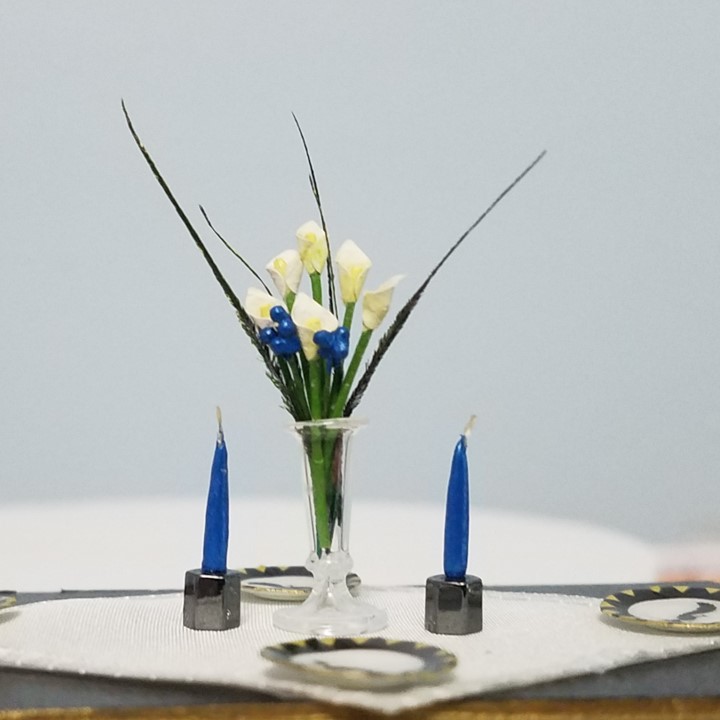
The centerpiece is calla lilies and spikes of real peacock feathers (inspiration photo).  

The calla lilies were super easy to make—just dip the tip of some green floral wire in yellow paint, let dry, and wrap an upside-down heart around it.  I used tissue paper painted warm white on both sides and a punch that I had picked up from Daiso to make the hearts. 

I did use a tiny bit of yellow and green pastels around the base of each flower, and shaped them a little on my craft foam with my ball tools.  I would dearly love to have used actual tiny peacock feathers in the centerpiece, but I was unable to find any in half-scale, and didn’t want to try making my own; the peacock spikes will have to do, and I do like the way they look.  I added a peacock painting to the wall, and the room is essentially done.  


As I was working on the dining room, I thought of how beautifully the Fiesta Ware had popped in my glass-fronted cabinet in the kitchen.  Then I realized (duh) that it was up against a creamy white background.  I took my lovely art deco cabinet from the living room, gently and carefully pried off the front piece (whew! no damage at all!), and painted the inside back the same white I had used on the kitchen cabinets.  While the front was off, I took the time to fill it.  I already had my black “ceramic” panther, but I really wanted to make some books for it.  No dollhouse is complete without a few books for the occupant to enjoy!  With the help of UC Berkeley’s “Books of the Century” to pick some period-appropriate reading material and Facsimile Dust Jackets, which provides dust jacket art by both title and year, I was able to make up a nice selection of 1920’s books.  


The only things I changed were the spines, to ensure that the titles would be readable, even when the books were on the shelves.  Then I use two N-scale swimming figures, some matboard, cardstock, and bronze paint to make my little art deco bookends.  

I am extremely happy with how they turned out.  I have included an original swimmer in my picture.  (I have no idea what he is supposed to be doing.  Maybe lolling in an inner tube?)  From cheap plastic to upscale bookends, with just a bit of paint.  ðŸ˜Š  They make up a nice row on the center shelf of the cabinet.  I added a couple of bead “vases” and a bronze and gold elephant (a Peruvian ceramic bead I painted), and glued the cabinet front back on.  This time I put the door pulls at the top, where they belong—another benefit of having redone the cabinet.  ðŸ™„  See how much easier it is to see inside now?

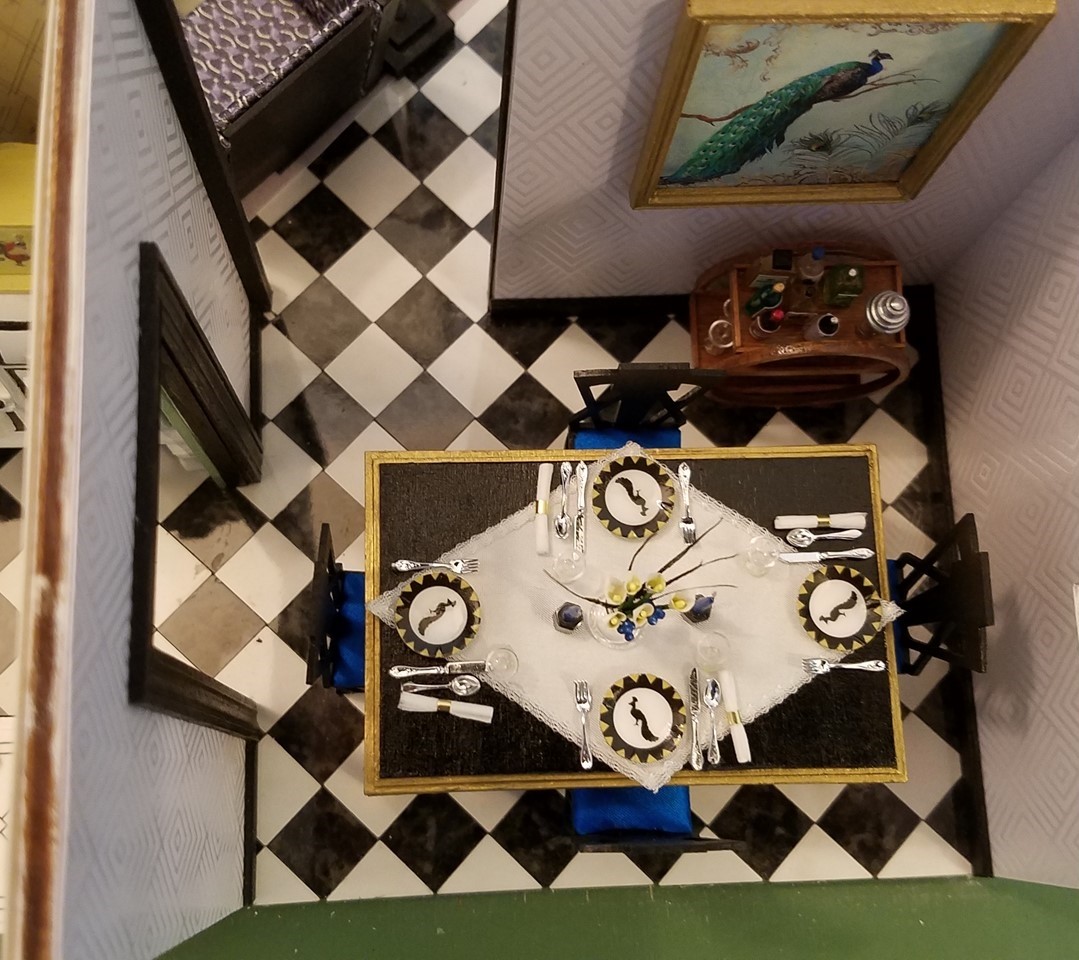
Here is a top-down shot of the first floor.  

I’m still pondering the living room rug; one reader suggested including a bronzy green.  I love that idea, but don’t have anything like it in my stash (*sigh*).  I still have plants to make and doors and windows to do, and I am planning a ceiling fixture for the dining room.  Then it will be time to put the roof/ceiling on and start on the second floor!

Monday, May 25, 2020

A Teeny, Tiny Kitchen


It’s been a long time since I posted.  Sheltering in place has really upended my schedule.  It seems to take more time and effort now to make sure that I maintain “face-to-face” contact with friends and co-workers.   Every Saturday, we host a Zoom party, where we play games and take virtual “trips” with our friends.  For anyone who enjoys escape rooms, I strongly recommend the Palace of Destiny from Palace Games.  It’s free, but, if you are able, a donation would be nice.  We’ve been playing it together as a team, and there are times we need every brain we can get!  I also spent several Sundays, early on, making face masks.  All of this was further complicated by the fact that I have a hereditary problem with my thumb joints, which was exacerbated by a less-than-optimal set-up for working from home.   A set-up that works for the occasional day of working remotely does not necessarily work as well over weeks or months.  I have done some tinkering with my set-up, and it is now much more ergonomic, and my thumbs are feeling much better.  We’ve also been told we will likely be working from home for the rest of the year, so it’s time I got back in the groove!

So, on to something more interesting—miniatures!  Over the past month or so, I have been slowly working on the kitchen in the art deco house.  It is a teeny, tiny kitchen.   I added some space onto the Popular Mechanics’ plans to make the kitchen 4” x 4¼” (which, in real life, would be 8’ x 8½’).  I can’t imagine how I could have fit anything in if I had stuck with the original dimensions of 3” by 3”!  As it is, everything is a pretty tight fit.

The walls have been papered with a vintage wallpaper from Bradbury & Bradbury.  I wanted beadboard on the bottom half of the walls, but the miniature beadboard I had was so thick, I was afraid it would take up too much space, which was already at a premium.  To solve the problem, I printed out a beadboard pattern on paper (to ensure that I could keep things straight and to try to maintain even spacing), then glued HO-scale 1x6 lumber strips directly onto it.  


I’m not sure how well you can see the difference between the standard mini beadboard on the left and my home-made beadboard on the right, but mine is much, much thinner!  The top and bottom were trimmed with more HO lumber.  (The color, by the way, is Wedgewood Green, lightened with a bit of white.  I honestly don’t know why greens always show up so minty in all my pictures.)


The refrigerator was a find on eBay.  It was a metal kit in not very good condition.  The metal was extremely uneven.  It took a lot of filing, as well as some Green Stuff to smooth it out.  Here you can see it partway through the filing process.  In addition, the body was made in two parts—one designed to fit inside the other.  More lumpiness inside the exterior portion had to be filed down so that the interior piece could be glued in straight and even.  You can see the angle it was at originally.  The door, which I didn’t photograph, was unaccountably painted brown.


After filing, gluing, filling in the gaps with more Green Stuff, and giving it a couple of coats of gloss white spray paint, it doesn’t look too bad.


The door still opens, and I intend to put some food items inside—maybe some milk, eggs and butter.

The stove is an Acme magnet.  This is not the exact magnet I got; mine was missing the cat, but it had the platform underneath and the yellowing around the joints. 


I was able to pry the front two feet off cleanly, but the back two suffered a bit of damage when I removed the platform.  I filled in the missing bits with yet more Green Stuff, then covered the stove area and gave the entire thing a coat of gloss white spray paint.  I then had to repaint the black and silver parts.  I don’t have the steadiest hand, but it doesn’t look too bad in person.


The sink is from a kit by Red Cottage Miniatures.  The original sink I had purchased was too large for the space, but the Red Cottage sink fits perfectly.   The base is painted the same green as the beadboard.  The faucet is simply wire with some small beads for the handles.  I was able to bend the wires at crisp right angles by using a pliers set I got from Micro Mark.  The drain pipe is a large paperclip, and the little dish drainer (as well as the clock and the breadbox) are also from a Red Cottage Miniatures kit.


The small worktable I covered in a previous post.  It’s unfortunate that it has to face in, so that you can’t see the drawers and door, but at least you can see the enamel top.


There isn’t much room for cupboards, but I put in what I could.  They are made from strip wood and some thin styrene for the glass.  The kitchen needed a bit more color, so I used the glass-front cupboard to showcase some “Fiesta Ware” plates I had.  (Unfortunately, I broke the green dinner plate.)  I added a metal vase and a 3-D printed butter dish, painted to match.  (The yellow bowl and red-and-white "enamel" saucepan were also 3-D printed.)


Because the cabinets are a bit high, there is a working stepladder tucked behind the refrigerator.


And that’s the tiny kitchen!


Effie came over from the Fairfield to try it out for me.  She said it was the most efficient kitchen she’d ever worked in—no more than two steps in any direction to get where she needed to go.  And she was pretty much guaranteed to be the only cook in the kitchen!


I'll try not to take so long before my next post.  I'm already excited to start work on the dining room.

Hope everyone is staying safe, healthy, and (relatively) sane.  I'm looking forward to catching up on all the posts I've missed!

Friday, April 17, 2020

A Staircase


I’ve been trying to get back into working on my art deco house.   I’m still having difficulty finding the energy and inclination to work on it, and I’m not sure why.  Work has been very busy, which I know is a good thing, but I actually seem to have less time for minis, not more, despite the fact that I have eliminated my commute.

Anyway, you may remember from the mock-up that to fit a proper rise and run on the staircase, I decided to have it turn at the bottom.


I took this pattern and cut the stringers from matboard, and the risers and treads from 1/32” thick strip wood.  After consideration, the original turned steps looked too insubstantial to support the remaining stairs, so I broadened them to fit completely beneath the bottom step of the main flight.  It didn’t look right to have a solid white chunk next to the steps, though, so I broadened the treads, and allowed the top of the landing to extend a bit beyond the stringer.  I also added some wood along the side of the bottom step and sanded it into a curve, then curved the edges of the treads, too. 


I contemplated adding some detail to the stringer.  This seems a bit much, and I would want to tone down the color if I add it.


While I debated additional decoration on the stairs, I worked on a stair rail.  The original plans call for dowels with wire strung between them.


This would have been OK, but I felt the living room was heading in a slightly more elegant direction.  I ended up falling in love with an art deco staircase rail from Finelli Ironworks:  https://finelliironworks.com/portfolio-items/art-deco-railing/?portfolioID=4321

I can’t make miniature wrought iron, but I used railroad lumber successfully to make the railings I wanted in the Merrimack, so I tried the same technique for this railing.  The larger circles are made from thicker florists’ wire; the smaller circles are jump rings.  It’s not a perfect match to the original, but I like it in this room.


I’m trying a simple cherry bannister, as in the original, but I’d love to figure out a way to make the bannister curve around like this:  http://photographersdirect.com/buyers/stockphoto.php?image=2233604 


By the way, the railing is not glued in place—it just balances nicely and stays upright for my photos.  😊  It’s too delicate for me to glue in place at this time.

Because it’s easier for me to work on furniture right now, I also made up the art deco cabinet from Red Cottage Miniatures and the art deco sofa and coffee table from SDK Miniatures.

I really like the cabinet, but I am bummed that, with the doors closed, you can’t really see inside.  I have great ideas for using more of my N scale swimmers for art deco bookends.


For some reason, I thought the SDK coffee table was an oval, but it is round.  Oval works better for me, so I cut down the top piece to an oval shape and gave it a faux marble finish.  The book on top is a coffee table version of A Note of Explanation, complete with most of the text and about half the illustrations.


The rug is not quite right.  It is only a print-out at this point, while I try to decide on the colors.  It doesn’t help that I am trying to recreate embroidery floss colors with my printer, but they are fairly close.  I think the purple, in addition to being a bit off, is too much of a muchness.  I think I need another color to warm the room up.  Below you can see the rug printout against the wallcovering with the actual embroidery floss I am contemplating.


I love the purple walls with the upholstery, but the room, while having the elegance I like, is feeling a bit cold.  I know accessories will help, but I think it needs more than that.


By the way, the photo on the left wall is “Chez Mondrian” by André Kertész.  It is from 1926, so perfect for the era of this house, and is one of my favorite pieces by him.  We have a print of it hanging in our bedroom.

Other than that, we are staying safe and relatively sane here.  We have had a birthday party on Zoom (that included an online museum scavenger hunt game).  The unexpected upside was that a friend who moved to another state a few years ago was able to attend, because on Zoom it doesn't matter where you live.  Unsolicited plug for Wicked Good Cupcakes, which got awesomely delicious cupcakes in a jar to all the party attendees in time for us to have birthday cake together while apart.  We are also planning a game night using JackBox games.  We will get through this.

Hope you are all staying safe and healthy, and that you are able to connect with loved ones near and far.