Thursday, August 22, 2019

Throwback Thursday: The Merrimack (Part 2)


We left off with Jim's study.  To the left of his study is the central landing, which has a
a chair based on a pair of chairs owned by my brother.  I loved the curved shape and asymmetric back. This was my fifth try on making this chair.  It's not perfect, but I figured it was the best I was ever going to do.


On the wall, I added some mid-century cat art (painted charms) to go with the Orla Kiely-inspired feature wallpaper.


The open staircase to the third floor, and its railing, are scratch built.  I had purchased a G-scale open staircase, only to find that it was too wide to fit the opening!  Strip wood and model railroad lumber to the rescue.


The railing that surrounds the second-floor opening was one of the first things I ever cut with my Silhouette Cameo.  I never would have been able to cut all those shapes to evenly and cleanly by hand.


The room to the left of the landing is the bedroom, which is based very much on my grandparents' master bedroom, with its floral wallpaper and George-and-Martha Washington bedspread.


The bedspread is a combination of the Sara Pittman coverlet from June Grigg’s pamphlet, “More Charted Designs for Miniatures,” and the Floral bedspread from Needlework Designs for Miniature Projects: 64 Charts for Counted Cross by Eileen Folk.  It was worked on 36-count Evenweave, and I nearly went blind doing the white-on-white, particularly on those occasions where I miscounted and had to rip out.  Aaaggghh!


Most of the furniture in this room is made from the kits for the Heywood Wakefield bedroom set by SDK Miniatures.  The art work includes ballet prints (my parents had a similar set hanging in their bedroom), and, over the dresser, my mother's wedding portrait.


On the dresser, there is a memento from Jim and Margot's travels in Denmark, as well as a little  caddy for Jim's change, cufflinks and watch.


What books are on the nightstands?  Jim has Catch-22.  Margot has Peyton Place.  The working lamps on the nightstands are made from beads.


You can see that they have clothing set out for a cocktail party, and on the bed, where Margot has left them after just returning from shopping, are the wonderful leather shoes that were a gift from Samantha.


In behind the landing is the bathroom, which has a removable roof for easier access.  This room is based on my grandparents' guest bath—complete with pink fixtures and a corner tub.  The walls of their bathroom had pink wallpaper with gold cherubs, but I just  . . . couldn't.  😊  I went with a mid-century poodle print instead.  The bathtub and toilet are Marx furniture.  They, the sink and the tile were given a unifying coat of pink spray paint (the kind that sticks to plastic). 


The vanity was scratch built, and, yes, that's a little doll toilet paper cover on the back of the toilet.  Very mid-century!  (The "doll" is an HO-scale girl figurine.)


The room at the top of the house I decided to model after my grandparents' basement rec room.  I think this room is my family's favorite, probably because it is the most recognizable to them.

Here are some pictures of the original, this one from New Year's 1961.  (Mom and Dad are on the right.)
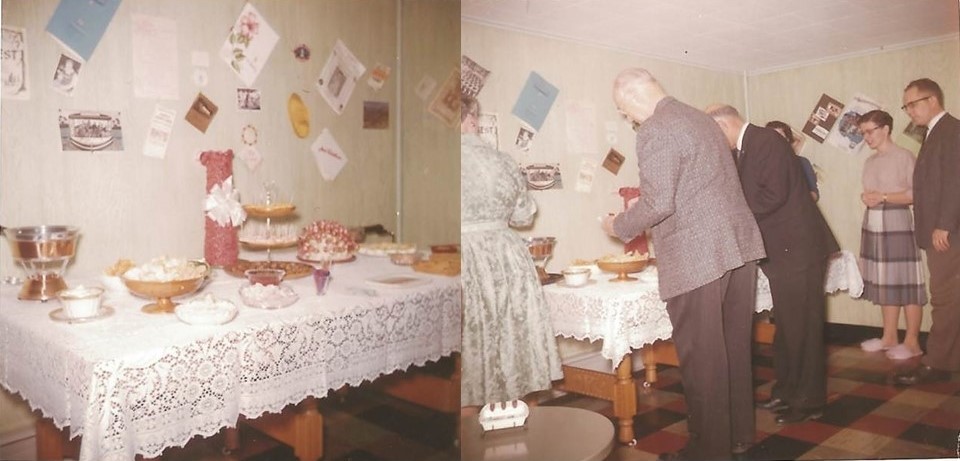

The walls of their rec room had pale green paneling with a very soft texture that allowed my grandparents to use it as a bulletin board—pinning up pictures, napkins, menus, playbills and a whole host of souvenirs from their travels, including a sandalwood fan and a pair of black lacy panties from a stripper in New Orleans. (!) And here is the room's counterpart in the Merrimack.


Their rec room had a little wet bar area with refrigerator and sink, fronted by a padded red leather bar.  Unfortunately, I couldn't fit all that into this room, but I did make a bar from a tutorial by One-Inch Minis.  Here it is, complete with the Bols Ballerina Bottle music box my grandparents had.  (This one was made from a microbead, wire, tissue paper, the end of a clear pen, a bead, and the top of a 1:24 scale liquor bottle.)


There was no sailfish in my grandparents' rec room.  The funny thing was, when I started planning the Merrimack, I had a very strong memory of a mounted sailfish over the sofa.  At the same time, I was pretty sure I remembered a photograph there.  I asked my mother, who told me that my grandfather has always wanted a mounted sailfish and had even gone on a special fishing trip to catch one, but he was unsuccessful.  I don't know whether I was remembering an alternative reality or receiving a message from the beyond 😉, but I decided to give him his sailfish.  It's just a simple $5 gold-tone broach off eBay, with some paint.


If you look closely in the picture above, you can see a picture of my mother, holding up two large salmon that she caught.  😊  Grandma and Grandpa are in the photo to the left of the sailfish.

Another One-Inch Minis project was the plaid chair.  My grandparents' rec room had two of these, but I could only fit one.  I ended up printing the fabric myself because I could not find the plaid I needed in a small enough scale.


I also made Mitchy-Moo's modern sofa (modified to half scale, of course) using some wonderful textured fabric from a necktie.  The round pillows are really covered buttons.


And here's the modification I made to the house—a trap door!  It drove me crazy that the stairway ended smack in the middle of the room.  The room is small enough that I didn't want to lose more prime real estate.   My first thought was to move the stairwell opening, but wherever I looked at moving it, it interfered with a doorway.  Then my brother had the brilliant idea of installing a trapdoor.


When they're up in the room, Margot and Jim can cover it up with their alpaca rug, which (you guessed it) is modeled on one my grandparents owned. 


 On the guitar pick coffee table (made from a real guitar pick) sits a bowl of Chex mix.  The "Chex" are made from a fine lawn handkerchief that had been given a wash of color in "wheat" and "corn."  It was then snipped into squares 4-5 threads wide.  The "peanuts" are microbeads covered in paint, and the "pretzels" are fine-gauge brown floral wire coated with fine sand.


Across from the sofa there is a TV which started life as a magnet. 

The original room had both a television and a fireplace, but I couldn't fit both.

Here is the original fireplace. I'm the one in the very lady-like pose. 🙄

I do have a fireplace cut to fit, although it's not yet painted.  I've considered the option of swapping it and the TV in and out as the fancy takes me.


Finally, the exterior.  The kit came with wood strips and the Magic Stone, which was a lot of fun to work with.  There's a long roll of stencil stickers you apply to the painted wood to create the "grout"; the stone itself is a paste you mix up and apply.  My only issue was the little cut-out bits (spaces for the stones) from the stencil, which were supposed to stick nicely to the original paper backing, but instead stuck to everything in my work space, including me.  You can color the stone paste before application; however, since I wanted a variety of colors to my stone, I chose to paint them individually after the paste had dried. The wood, which was applied both vertically and diagonally, took around three weekends to complete.  The strips were stained and sealed with a natural finish to allow the inherent variation in color to come through.


The roof is made from simple, natural shakes.


Because no steps came with the kit, I built a deck off the back door.  It is furnished with an Acme magnet gas grill and some furniture I got at a local miniature show.


I of course had to make room for a hot tub, made from an aluminum can, wood scrapbook paper and some railroad lumber.


The bubbles in the water were a complete accident.  They formed as the resin was curing.  I'm not exactly sure why, but I can't say I'm sorry it happened.  😊


There are balconies off the bedroom and living room.  The basic structure for these did come with the kit.  The railing I chose was "Glenda" from Heritage Laser Works.  (I did add hardware to the lower set of doors after this picture was taken.)


For the front door (which is off to the side, but leads to the foyer), I created "cement" steps and as close to wrought-iron railing as I could using railroad lumber. 


The doors are the same as all the other exterior doors in the house, but I thought clear glass doors seemed strange for a front door, so I added some strip wood to make them more mid-century.


And there you have it.  The complete tour of the Merrimack.  I hope you enjoyed it.  I know I certainly enjoyed building and decorating it!  And Margot says you're welcome to come by for cocktails any time!  😉


Thursday, August 15, 2019

Throwback Thursday: The Merrimack (Part 1)


This is my mid-century modern house--the half-scale Merrimack by Earth & Tree.  After the Fairfield, it was a delight to build.  The pieces were cut so well I almost didn't even need tape when doing the dry fit.  I made almost no changes to the layout, except for one tiny change on the third floor which you'll see later.  It doesn't use traditional siding; instead, it uses diagonal and vertical cedar strips and magic stone stencils. Plus, the two halves of the roof are so straight and uncomplicated that shingling was a breeze.  😊  I loved this house for many reasons—I really like mid-century modern, I used my grandparents' home as inspiration for several of the rooms, and I got a chance to spread my wings on scratch building furniture.

If half scale furniture is hard to find (and it is), modern half scale furniture is even harder.  Most of the furniture made by higher-end manufacturers like Bespaq and JBM Miniatures has a distinctly Victorian look to it.  This meant I was thrown on my own resources even more with this build.  I used a variety of sources to furnish it—magnets, that wonderful molded plastic furniture from the Marx tin dollhouses, the few kits I could find, a lot of scratch building, and some 3-D printed pieces.

One option for modern miniature furniture is 3-D printing.  Shapeways has hundreds of 1:24 furniture items for sale at reasonable prices.  Printing and materials are getting more sophisticated, too.  It used to be that items were only available in "versatile" plastic—a white plastic with a grainy texture.  The graininess keeps the pieces from looking like real wood or metal (I have never been able to sand things quite smooth enough to suit me), although it can look quite good as fabric once painted.  Now items can be printed in a variety of colors and a much smoother texture.  I used several 3-D printed pieces in the Merrimack.

What was immensely fun for me in this build, though, was the scratch pieces.  I learned I could find a piece of furniture I liked and shrink it down to fit my house.  The cost of the 1:1 item didn't matter (and as one user on Greenleaf commented, I can have very expensive taste 😊).  My little 1:24 copies cost only a few dollars, if that. 

Let's start with the kitchen on the split-level first floor.  The stove and dishwasher are Acme magnets.  The kitchen cabinets, sink and refrigerator are all kits from MiniEtchers.  Shellie made the cabinet to the left of the doors to my specifications.  I love the half-round shelves (not to mention how it prevents the homeowners from falling off the edge of the kitchen floor).


I made my own counter top for the base cabinets.  It fits over the top of the dishwasher (which was cut down just slightly) for an uninterrupted work surface.  I printed out some Skylark (Boomerang) Formica on soft gloss photo paper.  The boomerangs are a little large for half scale, but I wanted them to be visible.  The percolator, dish washing liquid and cookie jar were just made from beads.


The little dish drainer is made from card stock, with cross-stitch perforated paper for the mat.


I had so much fun filling the kitchen—boxes and jars in the cupboard, magnets and notes on the refrigerator, a retro radio I made from mat board, and a clock made from a bead.


Plus, I received a wonderful real leather purse from Samantha.  It now sits on the side counter, next to the homeowner's keys.


The Eero Saarinen tulip table and chairs are from Shapeways.  The table is set for lunch—macaroni and cheese, my favorite!  The mac and cheese casserole was made by Jan Patrie of Autumn Leaf Studios. The dishes on the table and in the corner cupboard are metal miniatures that I painted.


But, of course, we need some veggies, so there is a can of green beans heating on the stove.  The teeny, tiny can opener (as well as the flatware on the table and the spatula in the dish drainer) come from a set of etched metal miniatures.


Just off the kitchen are the stairs to the second floor.  The plans for the Merrimack show a spiral staircase, but it doesn't come with the kit.  I ended up buying one from Shapeways, painting it, and covering the stairs with velvet paper.  This one turned out to be a perfect fit.


The dining room table and chairs were scratch built, based on a Heywood-Wakefield set.  I got a bit over-enthusiastic when sanding the edges on the first dog-bone chair, but otherwise I think they're a fairly good match.  The legs on the table were suggested by Carrie.  The original table had these rather bizarre legs that made my miniature version look like a cockroach. The new legs are a big improvement!


Behind the staircase is the foyer, with a light fixture made from a bead cage, stone-look "linoleum," and a scratch-built credenza.


The martinis are also from Autumn Leaf Studios and were picked up by my brother at a miniature show near where he lives.


I received a wonderful aquarium in a half-scale swap, and I have added it to the foyer.


The art over the aquarium is also from a half-scale swap.  The plants (rubber tree and heart-leaf philodendron) are from kits by SDK miniatures.  If you look very closely in the picture above, you can see a little green frog on the edge of the planter.  It is the bullfrog from Mini-Gems.  He's meant to be a decorative ceramic frog, not a real one!


The sandstone fireplace (made from egg carton) with floating shelves and end planter was one aspect based directly on my grandparents' home.  Here you can see a picture from their living room.  Sorry it's not the best.  I believe it was taken around Christmas, shortly after they moved in in the mid-50's, and the chairs are squished to the left, probably to accommodate the Christmas tree.


The end planter was not part of the original Merrimack kit, but I wanted one just like my grandparents'.  😊  On the floating shelves, I have a "ceramic" panther (painted charm) and tiny bonsai mud men that I also painted.  My grandparents had a Hakata figurine on their shelves, and, after a full year of looking, I was thrilled to find the little bonsai duo to mimic them.


The rug in the living room is, once again, based on a real-life rug, cross-stitched on 28-count Evenweave.


Everything else is the living room (except for the hi-fi, which is a magnet) was scratch built, and includes an Adrian Pearsall boomerang sofa (with casters that really work!)


The lamp in the far corner works; the three-light lamp does not.  Its lights are made from pen tips, which made an incredible, inky mess when I sawed them off.  But they look great now!


Upstairs, we start on the right with the utility room.  This was such a tiny room, I really couldn't find any other purpose for it, and in some builds I've seen, it's just joined with the room to its left.  The dryer is an Acme magnet, the washer is from a Marx tin dollhouse (sadly, not mine), and I made the utility table and ironing board from scratch.  Oh, look! Margot is getting ready to vacuum!


Just kidding.  I sometimes amused myself by Photo-Shopping a mid-century woman into my pictures.  For some reason, I have named the mini occupants of this house Margot and Jim.  No idea where those names came from; they just popped into my head.  Here is the utility room without Margot.


The laundry basket and "metal" chair came from Shapeways, and the sewing machine is a painted charm.  Here I've turned the table sideways so that you can get a better view.  It's an old metal topped table, a bit chipped and rusted in places.  


I made the little retro canister vacuum cleaner from mat board, beads and ponytail holders.


Next to it is Jim's study.  So many of the rooms in the house have a feminine feel to them that Jim really needed a more masculine place to escape to.


His desk is another favorite piece in this build; it's the Kai Christensen kidney desk with built-in bar.  It was the first piece of furniture I made for the Merrimack.  The drawers don't open, and the proportions on the bar area aren't perfect, but I love it.  The office chair is from Shapeways.


The study has a cork floor (remember those?) and another cross-stitched rug.  


The wonderful little settee is from a kit by SDK Miniatures (unfortunately, she no longer sells it).  The fabulous modern fabric is Prints Charming 17846, which comes in several colorways; the print is so small that it works quite well in miniature, even half-scale miniature. The file cabinet is also from a kit, with industrial staples for the drawer pulls.  Here you can see it with a painted metal mini of a model ship; in the picture above, you can see that ship replaced with a beautiful model ship that was a gift from Samantha.


Other scratch pieces in the study include the very simple coffee table and corner end table, as well as the tansu chest.


Like my grandparents, the occupants of the Merrimack are world travelers, and there are National Geographics on the end table, travel brochures on the desk, and a map of the United States on the wall, with pins (microbeads) for all the places they have visited.  My grandparents had a similar map in their basement.


And since this is now getting rather long, I'm going to stop with the first half of the tour. Hope you enjoyed it.  Until next time!