Friday, November 16, 2018

The Fiddle Back Rocking Chair


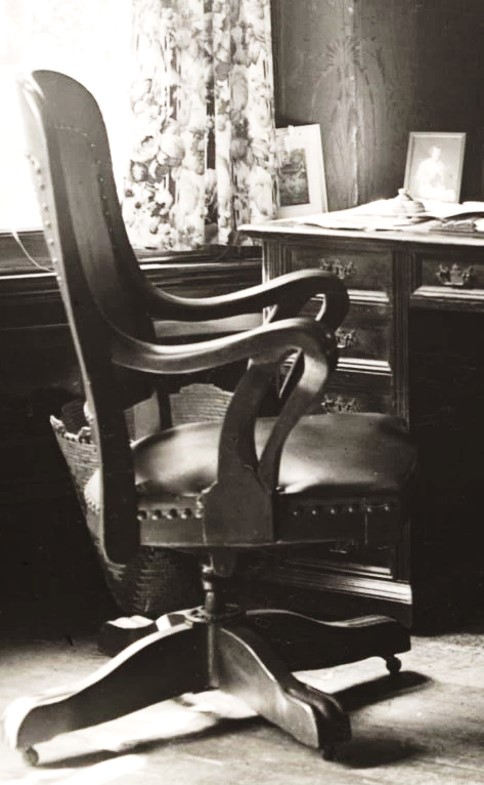
Among the chairs in the library is a fiddle back rocking chair.  (I am learning new furniture terms on this build, too.) 


My original plan was to ask a woman who has previously created some custom, laser-cut, half-scale kits for me to create a kit for a fiddle-back rocker.  [Carrie sent me a very interesting article on creating kits yourself and having them laser cut by a service, but I got the article after finishing the chair.  Keeping it in mind for the future.]  Anyway, flush with success from the desk chair, I decided to use my Silhouette Cameo and my sandwich method (two layers of chipboard and two layers of wood scrapbooking paper glued together, with the edges coated with stainable wood putty) for those elements that could not easily be cut from strip wood.  I made the fiddle back, curved arm supports and rockers using this method; the rest is simple strip wood of various widths and thicknesses.  Aside from that, I simply stained, sanded, glued and varnished (kind of boring), so I didn't take pictures of the process. Here is the finished chair.

I think it looks OK, and it actually rocks!  I had a little video of it rocking, but for some reason it will not upload.

Here it is, next to the desk.  I have put down a temporary rug (I will be cross-stitching a rug once I find a pattern I like) so that you can see the chair, because the dark furniture tends to disappear against the dark floor.


Speaking of rugs, I am still working on the rug that will go under the zebra skin.  It is being worked with one strand of DMC floss on 36-count Evenweave.  For some reason, I have really hated doing the outer border, so I keep finding excuses not to work on it.  That part is finally done though, so I just need to finish a bit of the inner border and fill in the middle, which I hope will go faster.  Below is my progress so far under the "zebra skin" I printed on velvet paper.  I will be trimming that out a bit with embroidery floss to give it a mane.

There will likely be no update next week, as I will be busy preparing for Thanksgiving this week and next, and won't have time to work on the library.   There are still a few chairs left to build, but I plan to go back to finishing the lighting and woodwork, get a ceiling in place, and fill those bookshelves!!  I'll also be working on a few more smaller elements for the room. 

As always, thanks for stopping by, and for those of you in the U.S., best wishes for a very happy Thanksgiving!


Thursday, November 8, 2018

The Desk Chair


Roosevelt's desk chair is a wonderful chair.  Forgive the black and white photo, but it was the clearest picture I could find of it.


The obvious challenge on this one is its beautiful arms.  I started by using Word's "remove background" feature to remove all of the picture except for the arm in the foreground.  I then set the picture color to the heaviest "black and white" color setting I could to turn it into a solid black image and sized it to fit my chair back.


I had the delightful delusion that I would just cut out the back as one piece.  Ha! Failing that, I was going to cut the arms separately from 1/16" bass wood.  Ha!, again.  Below you can see my efforts.  The arms are so small and fiddly, and my skill with a utility knife so lacking, that this was completely non-workable.  The same with my efforts (on the left) to try to reconstruct the arms out of strip wood.


If I had a laser cutter, I could probably have done it, but they are too expensive and would take up too much room in my workspace.  What I finally ended up doing for the arms and the "spokes" of the base was to cut them using my Cameo Silhouette.  Since it can't handle bass wood like this, I cut each piece from two layers of the thin chipboard it likes and two layers of wood scrapbook paper, then sandwiched them all together with tacky glue and skim coated the edges with stainable wood putty.  When the putty was dry, I sanded to get it as smooth as possible.  This made for some surprisingly sturdy pieces about the thickness of my original bass wood.


I did cut the back and seat from bass wood.  The back was soaked in boiling water before being shaped around a glue stick.  The top of the seat was cut from mat board.  I put one layer of batting on, then glued some fabulous lightweight stretch black vinyl from Joann's around the edges and trimmed it flush with the bottom of the mat board.  I finished with some black marker around the bottom edge of the mat board, to ensure a unified look.  I used the same vinyl on the seat back.


To make the base, I aligned my legs on the star pattern I had created and glued them to a piece of pared-down dowel left over from the Windsor chair.  That was by far the trickiest part, as the legs wanted to move around as I was trying to attach them.  Although it doesn't look like it from the picture, that piece of dowel is a nice, tight fit within the piece of hollow metal tubing I cut.  The "wheels" are size 15 brass beads glued to the bottom of the legs with some JB Kwik Weld (my favorite glue for gluing metal to wood).  To attach the base to the chair seat, I used my needle-nose pliers to flatten out the edges of a standard metal eyelet.  That was then glued to the bottom of the chair, also with JB Kwik Weld.  It fits perfectly over the metal tubing.


After I glued the vinyl to the (now stained) seat back, I had to recreate the nail head trim.  I considered micro beads but was afraid they would stick out too much.  I could have used tiny punched circles shaped on my craft foam, the way I do buttons, but my tiniest circle punch is way too big.  I finally decided to just dot on gold paint with the tip of a toothpick.  Not perfect, but it will do.   I glued the seat back to the seat, added the arms, and glued my eyelet to the bottom.


When the chair is in place on top of its base, it can actually swivel!  (However, you have to be careful in picking it up, or you pick up just the chair top without the base.  😊)


Now, Mr. Roosevelt can sit at his desk and do important government work.  (If you look very closely, you can see the tiny eyeglasses I added.)


Thursday, November 1, 2018

The Sofa/Settee


For the sofa, I knew the difficulty would once again be the fabric.  There was no way I was ever going to find this in half scale:


I did try, though.  I kept checking Joann's, and I searched the Internet for tie-dye, stylized sunflowers, floral wreaths, batik and mandalas.  Finally, I found an image with "tribal circles" that I felt was close enough.  The image was black and white, so after tiling it, I played around with the recolor, color tone, saturation, brightness and contrast in Word, and even added a layer of semi-transparent color, trying to get the color I wanted.  My furniture always seems to look lighter in the pictures than it is in real life, but I was pretty happy with the final result on the fabric.  I printed it on a very finely woven white fabric that I had ironed onto freezer paper.

Then, as always for upholstered pieces, I used One Inch Minis tutorials as my starting point for the pattern and construction.  My sofa is really more of a settee than a sofa.  I felt the room was starting to look a bit crowded, and I needed room for the desk chair.


I actually have a few photos of construction this time!


Here you can see the basic structure.    The base is one layer of foam core and one layer of mat board, glued together.  I have added a strip of card stock along the edge, because foam core will look very odd if you try to glue fabric directly to it.  The back is cardboard, and the arms are 3/16" dowels.


Here I've added stacks of narrow strips of foam core between the base and the dowels, then covered the arms with more card stock to smooth everything out.


Base and arms covered in fabric.  The right arm shows how it is supposed to look.  Something went a little wonky on the left-hand side, but once the back rest is on, it will be covered up.


And then I got excited and just finished the whole thing.  The back rest is a layer of card stock with four layers of batting, cut according to Kris's instructions.  The seat is a layer of mat board with two layers of batting, and the back is just card stock covered in fabric.  The legs are my favorite fancy toothpicks.

Now did you really think I made something I was happy with on the very first try?  Of course not!  😊  This was try number one:


Too narrow, seat not deep enough, base too thick, arms too wide, back lumpy (!); it looked out of proportion and just not right.  For this try, I had printed my fabric pattern on silk.  While silk is super easy to work with, I thought the colors came out a little light, and I think that's also what accounted for some of the lumpiness on the back.  What did work incredibly well with the silk were my throw pillows, which were a burgundy paisley printed at the same time I printed my sofa fabric.  They are stuffed with fine sand, and the edges are all glued with Fabric Tack, to hold the sand in.  The combination of the silk and sand made the pillows nice and squishable!

Here is my settee in the room, with the real thing for comparison.


That's it for this week, and as always, thanks for checking out my blog!  I really appreciate the feedback I get.