I
did try, though. I kept checking
Joann's, and I searched the Internet for tie-dye, stylized sunflowers, floral
wreaths, batik and mandalas. Finally, I
found an image with "tribal circles" that I felt was close
enough. The image was black and white,
so after tiling it, I played around with the recolor, color tone, saturation,
brightness and contrast in Word, and even added a layer of semi-transparent
color, trying to get the color I wanted.
My furniture always seems to look lighter in the pictures than it is in
real life, but I was pretty happy with the final result on the fabric. I printed it on a very finely woven white
fabric that I had ironed onto freezer paper.
Then,
as always for upholstered pieces, I used One
Inch Minis tutorials as my starting point for the pattern and construction. My sofa is really more of a settee than a
sofa. I felt the room was starting to
look a bit crowded, and I needed room for the desk chair.
I
actually have a few photos of construction this time!
Here
you can see the basic structure. The
base is one layer of foam core and one layer of mat board, glued together. I have added a strip of card stock along the
edge, because foam core will look very odd if you try to glue fabric directly
to it. The back is cardboard, and the
arms are 3/16" dowels.
Here
I've added stacks of narrow strips of foam core between the base and the
dowels, then covered the arms with more card stock to smooth everything out.
Base
and arms covered in fabric. The right arm shows how it is supposed to look. Something
went a little wonky on the left-hand side, but once the back rest is on, it
will be covered up.
And
then I got excited and just finished the whole thing. The back rest is a layer of card stock with
four layers of batting, cut according to Kris's instructions. The seat is a layer of mat board with two
layers of batting, and the back is just card stock covered in fabric. The legs are my favorite fancy toothpicks.
Now
did you really think I made something I was happy with on the very first
try? Of course not! 😊 This was try number one:
Too
narrow, seat not deep enough, base too thick, arms too wide, back lumpy (!); it
looked out of proportion and just not right.
For this try, I had printed my fabric pattern on silk. While silk is super easy to work with, I
thought the colors came out a little light, and I think that's also what
accounted for some of the lumpiness on the back. What did
work incredibly well with the silk were my throw pillows, which were a burgundy
paisley printed at the same time I printed my sofa fabric. They are stuffed with fine sand, and the
edges are all glued with Fabric Tack, to hold the sand in. The combination of the silk and sand made the
pillows nice and squishable!
Here
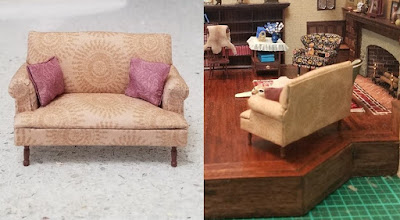
is my settee in the room, with the real thing for comparison.
That's it for this week, and as always, thanks for checking out my blog! I really appreciate the feedback I get.


Wow that looks really good!
ReplyDeleteThank you!
DeleteThe sofa and pillows look great, and again, I admire your diligence in getting it just right! The fabric is such a close match, and I bet it took a good bit of playing to get it there. The side by side photos are fun to look at, especially when you imagine that they are only 1/24th the original size! I hope you plan to send photos to the curator of the Roosevelt house when you have it completed!
ReplyDeleteThanks, Jodi! I'm not sure that the curator of the Roosevelt house would know what to make of a miniature version of the library. As you pointed out in your blog, people either get our passion or they don't. :-) I'm just glad to have an online community that gets it and understands the joy of creating tiny things!
DeleteYour dedication to getting it RIGHT has really paid off! The settee looks Wonderful and the pattern appears to be a near perfect match to the Original. I love the way you've upholstered the arms of the sofa; very clean and tight finish. I've never done it this way before but after seeing your results I'm sold!
ReplyDeleteThank you so much! I really love the way Kris does her upholstery, so I admit I've stolen her technique whenever I have to upholster a chair or sofa. Her instructions are very clear and complete, and I've always had good results (with a bit of practice).
DeleteThis is so awesome. Watching the little room become the big room is amazing! :D
ReplyDelete