Sunday, July 19, 2020

Curved Windows and Ceiling

Hope you’ve all been doing well.  I had a week of vacation the week before last.  You might not think that would be all that much fun, given that we couldn’t really go anywhere.  However, it was lovely not having to work.  I was able to spend time on my art deco house, sew two shirts, and plan the 65th birthday party for my better half.  For over 25 years, we have celebrated with a themed barbecue, which obviously wasn’t possible this year.  However, I was able to put together a treasure hunt that involved calling/texting/e-mailing our friends to get clues, a video retrospective of past barbecues that I showed during our Zoom party, and the return of Traffic Symbol Bingo from birthday 55.  All of this, including getting cake, candles, party hats and noisemakers to all our friends, was a complete surprise, which I think was fairly amazing given the fact that we are living on top of each other pretty much 24/7.  It definitely required some creative excuses for why the door to my craft room/office had to be closed for extended periods of time.  😁


Back to miniatures.  As you can see, the curved window is done, and it turned out to be much easier than I thought it would be.  Both the styrene and the wood strips I was already using for the other windows were so thin and flexible, I was able to use them for the curved window as well!  What was a little more difficult for the curved window was the frame.   For the sides of the frame, I used the same strip wood and railroad lumber I had used for the other windows.  However, they were definitely not flexible enough for the top and bottom.  For those, I used one of the disks I had purchased to make the floors.  I traced around it for the interior curve, and then drew a second curved line ~3/32” outside that.  Since I forgot to take pictures, I made a representational drawing.


I cut two of these very slender arcs from poster board.  I then cut narrow strips of poster board (again, about 3/32 of an inch wide), curled them by sliding them between my finger and the handle of a paintbrush (almost the way you would curl ribbon for a package), and glued them carefully along the inside and outside edges of both arcs.  I glued the frame’s side pieces to the bottom arc.  I placed the  window frame within the window opening and secured it with painter’s tape while it was drying to be sure I got the right shape.  When making the grids and gluing them to the window, I didn’t leave my template flat; I taped it around the curved section of the second floor.  That way, the grids and window were already being trained to curve, and the grids wouldn’t just pop off the instant I started bending the styrene.  When the glue was dry, I carefully fitted the window into the frame I had made.  Instead of leaving the top open, as I had with the other windows, I glued the second arced piece I had made over the top edge of the window.  Finally, I glued the whole assembly into the window slot and trimmed it, both inside and out, with casings made from painted poster board.  To my astonishment, it worked!  Unfortunately, I was so focused on whether it would turn out as planned that I neglected to take pictures.  I will try to do a better job of documenting the process when I do the curved window on the upper floor.


To finish things off, I curved a length of 18 gauge wire and glued the ends into some pre-drilled bits of wood using JB KwikWeld.  I painted my wood bits silver, then glued them to the outside of my interior window casings.  To this “curtain rod” I glued some white shantung silk that I had pleated using my Pretty Pleater.  (The top and bottom hems were finished using Stitch Witchery.)  You won’t see much of the drapes once the roof is on, but I think they add just a bit of elegance to that section of the room.


I still needed something for over the fireplace.  I had bought a lovely, beveled-edge, octagonal mirror, but it was so thick it looked totally out of scale.  *sigh*  I tested out other art work for the space and ultimately kind of fell in love with a painting by Sally Rockefeller.  She is a contemporary artist, so technically this painting wouldn’t have existed at the time of this house, but I loved the flapper woman and the palm trees.  The painting has a bit of the purple that is on the walls, but, more importantly, it has other colors that give the room some much-needed warmth.  It’s only on temporarily, in case I change my mind, but I’m really liking it so far.


During my week off, I got brave and cut the roof/ceiling for the first floor.  I had originally planned for it to be ¼” thick, which is why I didn’t have it laser cut along with the rest of my pieces.  He has a limit for cutting thickness of 1/8 inch.  The biggest issue, though, was the lighting.  How was I going to cut channels for the wires when both the top and bottom of the kitchen/dining area were going to be open?  I pondered this a lot, and finally decided to cut my roof/ceiling from 1/8” plywood. I’ll cut my channels on the top, and then add another layer over it.  I was thinking mat board, because that would make the floor the exact thickness I would like, but I’m not sure how well it would hold up.  I may use wood veneer—not quite as thick as I would like, but would be essentially like wallpapering over a channel cut in a wall, and has the advantage of being actual wood.  

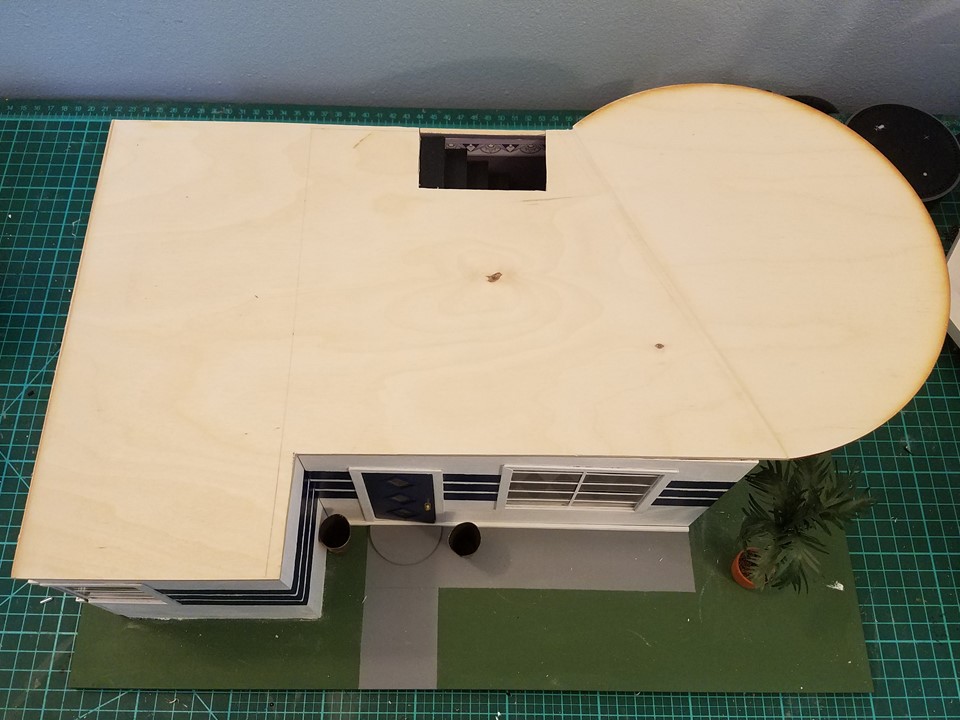
Anyway, I used my table saw to cut the plywood.  I had some 1/8” thick circles of the exact side I needed, but I needed to be able to attach them to the main part of the roof.  To simplify this process, I cut the joining edges of both on the same diagonal, then glued them together, puttied and sanded.  You can see the line in the photo, but it will be covered by the veneer, and I don’t think would have shown once painted anyway.  It works pretty well, I think. 


With the roof made (although not yet glued on), I could play around with dry-fitting my upper-story pieces.  That was a lot of fun.  😊  What do you think of think of the wallpaper for the bedroom?  I am thinking the bedroom floor will be a diamond pattern, similar to the first floor, but made of two tones of wood.  I’m hoping I’ll be able to get my Silhouette Cameo to cut the squares of veneer.  I’d go with a deep plum for the rug, to match the throw pillows on the bed.  The drapes would be the same very pale pink shantung silk used in the second set of pillows. 


And, yes, Jodi, just for you the little mock-up of where my railing pieces will go.  😉  I need to get a few more of those metal washers, as they are just the right size to hold the dowels.  If you’re wondering what that paper cut-out in the curved part of the bedroom is, it’s the footprint of the art deco desk I hope to make. 


I spent this weekend working on a chandelier for the dining room, but haven’t had much success.  Plus, there is something funky going on with the electrical strip, so I have to diagnose that and figure out how to fix it.  *sigh*  This is why I hate electrical so much.  😣

Hope you all have a wonderful week.  Thanks for stopping by!

Thursday, July 2, 2020

A Door, Some Windows and More


Happy July, everyone!  We continue to shelter in place, enjoying our back deck, Zooming with our friends, wearing masks and practicing safe social distancing.  I am grateful that I can work from home and that I’ve figured out how to balance work and my mini time, but I will be very glad when this is all over.

This update doesn’t have as much eye candy, because I am doing basic components—windows and doors.

To start with, I made the door.  I wanted to do a three-diamond door for some visual interest. (Inspiration here.) There are, of course, no doors like that for sale in half-scale, and I wanted windows, so I used my tried-and-true method of cutting multiple layers with my Silhouette Cameo II.  It can’t cut wood, but it can cut wood veneer.  So I used wood veneer (thanks, Carrie!) for the outer layers, and three layers of the chipboard the Cameo can cut for the core. 


The three layers of chipboard turned out to be the exact thickness of the clear styrene I wanted to use for the panes, so that worked out well.  You can see that the diamonds for the core are a bit bigger than the diamonds for the exterior layers, so that the exterior layers will hold the styrene in place.  I don’t have sophisticated software for designing, so I generally create my designs in PowerPoint, save the slide as a JPEG file, import it into my Silhouette software, and trace the image.  Works like a charm.  After painting, staining, and varnishing (as appropriate), I glued everything together.  The diamonds looked a bit unfinished, so I framed them out with some HO 1x4 lumber.  I built the doorframe from 1/8” x 1/32” strip wood and used this tutorial to make the hinges.  In retrospect, I could have gone with a bit thicker wire for the hinges, but they work OK.  Added some door hardware and framed it with 3/16” x 1/32” strip wood, and I had a door!  I’m really pleased with the way it turned out.


I used more 1/8” x 1/32” strip wood and more railroad lumber to create my windows, then framed them with 3/16” x 1/32” strip wood.  One edge was always left open to insert the styrene.  I used a thinner styrene for the windows than I had for the door because the windows’ slots were necessarily narrower, and I needed to accommodate the mullions.


I used the HO 1x4 lumber for my mullions and pre-painted them white.  Then I used the incredibly high-tech method of printing out templates for my windows, taping the styrene over the templates, and gluing the mullions on with tiny dots of glue along the edges.  It took a bit of trying to get the templates for the mullions to line up with the stripes I had painted.  (You can see where I had cut out one of the templates to test.) 


On my first attempt, I added two vertical mullions to the front windows.  After looking at it in place, I decided it made each of the individual panes too small and made the window look too conventional.  Unfortunately, I didn’t take a picture.  I just pulled it out, pulled off the mullions, and tried again.  I like the single centered mullion much better. 


I edged the side windows with additional strips of the HO lumber—one going right along the edge, and one going at a right angle to the styrene to cover the open side.  There is a slight gap where the two side windows meet.  I was going to use a thicker strip of wood along the left-hand window to cover that up, but it ended up looking too bulky.  I lost the “lightness” of the wrap-around window.  I guess I’ll live with the little gap.  😊


With the windows glued in place, the first floor is really starting to look finished. (Keep in mind that the "roof" and second floor are still the original foam core and not glued in place.)  Now, of course, I still have to do that curved window. I have an idea; we’ll see next time if it worked.  


Because I find making components a bit of a slog, I’ve also been working on more mini books.  I realized when I was looking at books for my art deco cabinet that some of Agatha Christie’s and Dorothy L. Sayers’ books are in the public domain now.  [An aside:  First of all, I am shocked that none of those books made the best-seller lists or “most significant” books list provided by UC Berkeley.  Seriously??  Our introduction to Lord Peter?  The debut of Hercule Poirot? Sacrilege, I tell you!  😉 Second, did you know that many more books, films and musical compositions are entering the public domain in the U.S. each year, now that the copyright extensions are finally expiring?  I always thought of the copyright extensions as “Mickey Mouse laws,” because I know Disney really wanted to extend its protection of Mickey; I had no idea the Gershwin Family Trust was also instrumental (forgive the pun) in getting these extensions passed.]  Anyway, I was able to get the .mobi files from Project Gutenberg and put them on my Kindle.  So now I have free books to read, and I have started writing summaries to use in my mini books.  The first book I did was Whose Body?, by Dorothy L. Sayers.  I like to set them up in both 1:24 and 1:12 scale while I’m at it.  Here you can see the comparison in size. 


The 1:12 book has a separate dust jacket; the 1:24 version does not, but I tried to simulate the look.  And, of course, my little homeowner now has the 1:24 scale version on her bedside table, ready for a little bedtime reading.


That’s all for now.  Hope every stays safe and healthy!  Thanks for stopping by!