Saturday, August 22, 2020

First Floor Finished!

In my last blog entry about the art deco house, I was having electrical issues and was trying to create a chandelier for the dining room.  It turned out that my electrical strip had a short in it.  I purchased a new one, and my lights are working!

For the chandelier, I was really trying to create one that looked something like this:  https://www.studioitalia.com.au/minneapolis-chandelier.html  However, the beads I had bought, which I thought were bugle beads, were not.  They were some weird double-barreled beads.  While waiting for my new bugle beads to get here, I experimented with them anyway, just to get a sense of how my idea would work.  This was my first try:

No.  Just . . . no.  When the bugle beads arrived, I tried again.  I was using super glue to attach them to the Woodsie circle and the small plastic washer I was using for the second tier.  No matter how careful I tried to be, the super glue made the beads all cloudy.  Plus, the unevenness of the beads made for a very funky outcome.  Here is try number two:

Again, no.

For my third try, I borrowed a tip from Emily Morganti of the Den of Slack, who had made wind chimes with bugle beads and eye pins.  I reasoned that if I could set up a series of cut-off pins around the outside edge of my Woodsie, I had a much better chance of getting a nice, even ring of beads.  I am no good at all at figuring out how to do the math to divide up the circle evenly, so I let Excel do it for me.  I counted the number of beads on try two, then I set up an Excel data set, with the first column being letters of the alphabet (a through dd, to make up the thirty rows I needed), and the second column all being the exact same number (I chose ten; it doesn’t matter, as long as every “amount” is equal).  Then I inserted a Pie Chart based on that data set.  Excel gave me a nice circle with thirty wedges of the exact same size.  


I took a screen capture of the chart, sized it to fit my Woodsie, and printed it out.  I used this little chart on top my Woodsie to mark where each pin needed to go. 

Drilling the holes and clipping and inserting the pins was a ridiculously fussy process, but I did end up with a much nicer perimeter of beads.  I wasn’t able to do that on my plastic ring washer, but I was less concerned about that set than the outside ring.  It’s a smaller ring with many fewer beads.  For all, I just used Ailene’s tacky glue, and it seemed to work fine, without the hazing.  I covered the top and the upper edge with some adhesive metal left over from making the tin ceilings in the Orient Express.   Here is try number three:

Not perfect, but much, much better.  And it lights!

Now I had lights for the dining room and kitchen (the standard half-scale globe ceiling light).  


I had intended to make a similar chandelier for over the piano, but 1) it was a lot of work and 2) most of it would be hidden anyway.  So I used a bead cage and a short piece of metal tubing to make a light similar to the light I had made for the Merrimack foyer.  I also had the floor lamp I had made, but I was concerned there would not be enough light in the living room, so I added a ceiling fixture I had originally purchased for the bedroom.  I figure I have enough time to get a replacement (which I’ve already ordered), given how slowly I’ve been working.  The ceiling fixture is by LightingBug.  Their lights are a little more expensive, but I love them.  They are not the same old fixtures you see in every half-scale build.   (They make 1:12, too.)  The little ceiling fixture I bought it so pretty and delicate-looking!  I think it just fits this house.

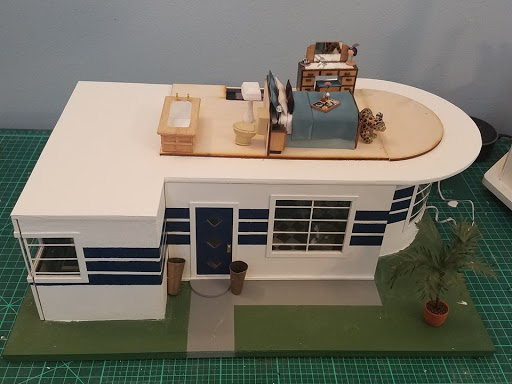
Here you can see where I mapped out the centers of each room, drilled the holes for the lights, and dug the channels for the wires.  I glued the roof/ceiling down, and the lights still worked!

Next, I glued down my mat board layer. (Yes, I decided to go with the mat board.  I liked its thickness the best.)

I then put some spackle around the edges, sanded and painted.


The second floor base is now glued down, and I am ready to start working on the floor.  And the lights still work.  Whew!

While working on the ceiling and electrical, I received a lovely gift from Sherrill.  I had commented on how pretty her pillows are and how interesting it was that she filled them with pellets.  She sent me four half-scale pillows, each stuffed with a different method—pellets, pellets and fiber, seed beads, and seed beads and fiber.  I learned two things.  The first is that I think I have been overstuffing my pillows.  I had stopped sewing my pillows because the stitching always really showed, but if you don’t overstuff your pillows, there is not as much strain on the seams, and the stitching doesn’t show as much.  The other thing is that seed beads and fiber make a really nice stuffing for half-scale pillows.  They were definitely the best of the four, although all were nice.  One set of pillows was done in a light-gray-and-white geometric pattern.  I think they are perfect in the living room of the Merrimack.  The gray in the pillows is a lighter version of the gray in the rug.  The other set of pillows, which are the same pattern in gold and white, are going in the art deco house.


Another wonderful addition was, oddly, the result of Covid-19.  This year’s Kensington Dollshouse Festival was canceled as a live show, but there was a kind of online show.  I would never be able to get across the pond to the show in person, but I could “attend” the online show.  I clicked on the various links for half scale and learned that one of my favorite Etsy artists has her own site now.  Life of Riley does some of the best half-scale food I’ve ever seen.   (She also does 1:12.)  I have purchased from her on Etsy, but she has a much larger selection in her own shop.  I ordered four items, which arrived quite quickly.  They are all absolutely wonderful, and I never would have known if not for Covid-19.


And there you have it.  I’m ready to start on the second floor.  I have already started cutting floor tile using my Silhouette Cameo.

Hope everyone has a wonderful, safe week!  Thanks for stopping by! 


Saturday, August 15, 2020

A Swap and a Garden Hat Pattern

You may remember, many months ago, I said I was working on a swap for an Instagram group.  Before I had a chance to send, shelter-in-place happened.  The swap for everyone was put on hold.  Now that things are loosening up a bit, some people are starting to send, so I sent my swap-ee’s gifts last Saturday.  They had to make it all the way to the Netherlands, and I figured the package would take weeks to reach her.  They made it in less than a week.  (Seriously.  I think it would have taken longer to get to New York.)  Now that she has received her items, I can reveal what I made. 

My swap recipient was Alexandra of Alexandra’s Bears.  I was so excited when I got her wish list.  She wanted something for her garden and/or bathroom in 1:24 scale!  She likes pale pink and white, roses, and romantic style. You may remember that a few years ago I made some garden accessories for a swap on the half-scale Yahoo group.  It is a fun set of items to make, and I knew I had to make some for Alexandra. 


Believe it or not, I keep a stash of unpainted watering cans, rose clippers and trowels on hand. I buy them in bulk from a place called Metal Miniatures in Wilmette, Illinois. The items always need a bit of filing before they can be painted, but they are decent quality cast-metal miniatures and are not expensive. The trowel and a set of rose clippers were given pink handles (of course) with Testor’s paint, but I decided to up my game a bit for the watering can. 

I have always just painted my watering cans, then painted the (slightly) raised flower detail that's included on either side.  That's fine, but a bit simplistic, and I'm not the best painter.  For this swap, I wanted to try a "shabby chic" look.  I used my mini files to clean up the can and file off the raised flower detail.  I then gave it three coats of Testor's flat white paint and let it cure for 48 hours.  I "shabbied" it up a bit with some Testor's rust and some Barnwood acrylic paint, thinned with matte extender.  Next, I found an image of painted roses, scaled it down and printed out two copies on white tissue paper.  (I tape the tissue to a regular sheet of paper before sending it through the printer.)  After giving them a coat of ModPodge for paper and letting them dry, I carefully cut them out as closely as possible to the design and decoupaged them onto the sides of the watering can. I was really happy with the way the edges of the tissue paper almost disappeared. 

The book is a half-scale version of Onward and Upward in the Garden, by Katharine S. White, wife of E. B. White.  The little gloves and seed packets are also made from paper.

Finally, I crocheted a little gardening hat for the set.  You can find my pattern at the end of this post.  (Please note that I use U.S. terminology in my pattern.  If you're used to British crochet terms, you can click here for a translation guide.)  The hat is trimmed with two pink flowers and a bit of 2mm green ribbon. 

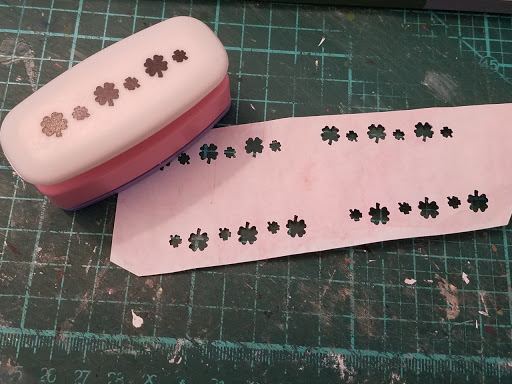
Then, because Alexandra likes roses (and I like making them), I decided to make her a climbing rose bush.  I had bought a half-scale planter box with trellis from Alpha Stamps a while ago because I liked it, but I really had no place for it, so it was sitting in my stash.  Aha!  The perfect use.  I knew I would need it one day.  😉  I put it together and painted it white, then made several pale pink roses.  This is my favorite rose tutorial:  http://blog.true2scale.com/2011/05/miniature-roses-tutorial.html  I used standard white printer paper, colored on both sides with watercolor pencils in pink, red, and a bit of yellow.  You use water to blend and soften the pencil, and this also gives the paper a bit of texture.  The instructions call for using quarter-inch hearts for 1:12 flowers; they would be 1/8 inch in half scale, but a tad smaller is even better.  I've been unable to find an affordable punch in stock that will cut hearts that small, but several years ago I picked up a shamrock punch at my local Daiso.  [Note:  I checked out my Daiso in early March, and they still had them in stock!  They are $1.50 apiece so definitely affordable.  I picked up a couple more.]  

I use the small shamrocks for geranium leaves.  The large shamrocks, cut into quarters, make hearts of just the right size for half-scale roses.  Cutting the shamrocks apart is a nice, Zen activity when binge-watching TV.  😊  It doesn't matter if the hearts you cut aren't perfectly identical. I think the variation makes a more realistic rose.

I used my Martha Stewart stars punch for the calyxes.  However, I only put them on the buds, not on fully-opened roses.  The leaves are dark green paper with a coat of satin varnish, punched with my PunchBunch mini tri-leaf punch (bottom two leaves only).  I made a few sets of five leaves attached to green thread that had been coated in hairspray and wrapped around a pencil to make a coil.  Snipping off 1/3" pieces of the coil gave me nice, curved "branches" for the leaves.

The planter box is deep, so I filled in the lower half with some scrap wood, then put in a layer of florist's clay.  It holds miniature flowers securely, but you can still change things out if you'd like to.  I finished that off with a bit of brown paint and a layer of dried coffee grounds for dirt.

I made an armature of floral wire threaded through the trellis, then added my roses and leaves.  I was going to fill in the rest of the planter box as well, but decided to leave that for Alexandra to make her own choices on what flowers she wanted, if any.

Finally, for the bathroom, I cross-stitched a little bathmat with rose detail, and added a small basket with towels, bath brush and some little pink bottles and jars.

Of course, the two bears I've bought from Alexandra wanted to get in on the fun and asked to pose with some of the items before I sent them off to her.  😉

I'll be doing another post on the art deco house soon.  I have all the ground floor lights working and am just finishing up the roof, so that I can start on the second floor.  Plus, I have some lovely pillows that were a gift from Sherrill that I want to show off.  😊

Hope you are all staying safe and healthy.  Here is my pattern for the half-scale garden hat.

Garden Hat Pattern

I use a .60 mm steel crochet hook and size 80 natural crochet thread.  Using a larger hook and thicker thread will, of course, make a larger hat.

Sc = single crochet

Sl st = slip stitch

Ch = chain

Dc = double crochet


Round 1: Make a magic ring, ch. 1, 5 sc into ring, sl st in beginning ch-1 to join: 6 sc.

Round 2:  Ch 1, sc into first st, 2 sc in remaining sc around, sl st in beginning ch-1 to join: 12 sc.

Round 3: Ch 1, sc into first st, sc in next sc, *2 sc in next sc, sc in next sc, repeat from * around, sl st in beginning ch-1 to join: 18 sc

Rounds 4-7: Ch 1, skip first sc, working only in back loops, sc in each sc around, sl st in beginning ch-1 to join: 18 sc.  Work fairly loosely on this part; if your stitches are too tight, you will have a very narrow crown.

Round 8: Ch 1, working only in front loops, sc in first sc, 2 sc in remaining sc around, sl st in beginning ch-1 to join: 36 sc.

Round 9: Ch 1, skip first sc, working only in back loops, sc in each sc around, sl st in beginning ch-1 to join: 36 sc.

Round 10: Ch 1, working only in back loops, sc into first st, sc in next sc, *2 sc in next sc, sc in next sc, repeat from * around, sl st in beginning ch-1 to join: 54 sc.

Round 12: Ch 1, skip first sc, working only in back loops, sc in each sc around, sl st in beginning ch-1 to join: 54 sc.  Fasten off and weave in ends.

Add hat band as desired.  I have used 2mm ribbon as well as perle cotton for hat bands.  Larger hats could take ¼" ribbon. 

Flowers (make 2):  Make a magic ring, *ch. 1, 1 dc, ch 1, sl st. into ring; repeat from * 4 more times.  Pull ring tight, tie off ends and weave into back of flower.  I glue the flowers onto the hat, then come up through their centers with yellow thread and make French knots to help secure them in place.  For my flowers, I use a .60 mm steel crochet hook and one strand of DMC embroidery floss.