
Happy New Year! Had a very busy Christmas week. We had our usual Christmas Eve buffet (Julbord),
then Mom flew in from Arizona on Christmas day.
It was a lovely visit; one of the highlights was afternoon tea at the
Claremont Hotel, which was fabulous. I
tried to stay away from too much online time, but, fortunately, Mom was happy
to read and relax while I puttered around with my miniature projects.

It
is meant to be painted with blue horizontal stripes on the ground floor and
chimney (which I didn't make in mock-up).
I applied some blue painter's tape to get a sense of how it would look,
even though I would use a darker blue paint.
At the very least, this showed me that I have to do a better job of
lining up my windows! I also think these
stripes are just a bit wide. The painter's
tape is .7 inches wide; I think I might like the stripes to be .5 inches
wide. The beauty of the mock-up is I can
test before I decide. I'll get some
half-inch painter's tape to try it out.
Here
is the house without the stripes.


The
floors and roofs are made from ¼" foam; the walls are made with 1/8"
foam. I intend to use wood of the same
thickness for the actual house. The
curved walls are currently poster board.
For the actual house, I'm thinking mat board, scored to allow it to curve,
and covered with a "skin" of card stock. The poster board tends to
lean a bit, and I'm hoping the mat board will be more stable. The bars on the windows are made with gray
quilling strips. The original design calls
for cardboard. I'll likely use card stock, of a similar or slightly smaller width.
The
posts around the second-floor edge (there will be more) will be connected by
jewelry wire to form a railing. The original
plans call for quarter-inch dowels with button-form caps.

I
used 3/16" inch dowel, as I didn't have any 1/8" dowel on hand. I actually like it and will probably use it
in the finished product. The caps are
made from some brads I got at Michael's.
They're a bit fussy—you need to pull out and clip off the "legs,"
as well as do a bit of filing, but I like the way they look. Maybe washers for the bases?

The
front and side walls are designed to be removable. Thin strips of wood make grooves for them to
slide into at the bottom. Not sure what
I will do in place of that catch, which I can't quite wrap my head around.

Here
is the house with the walls removed.
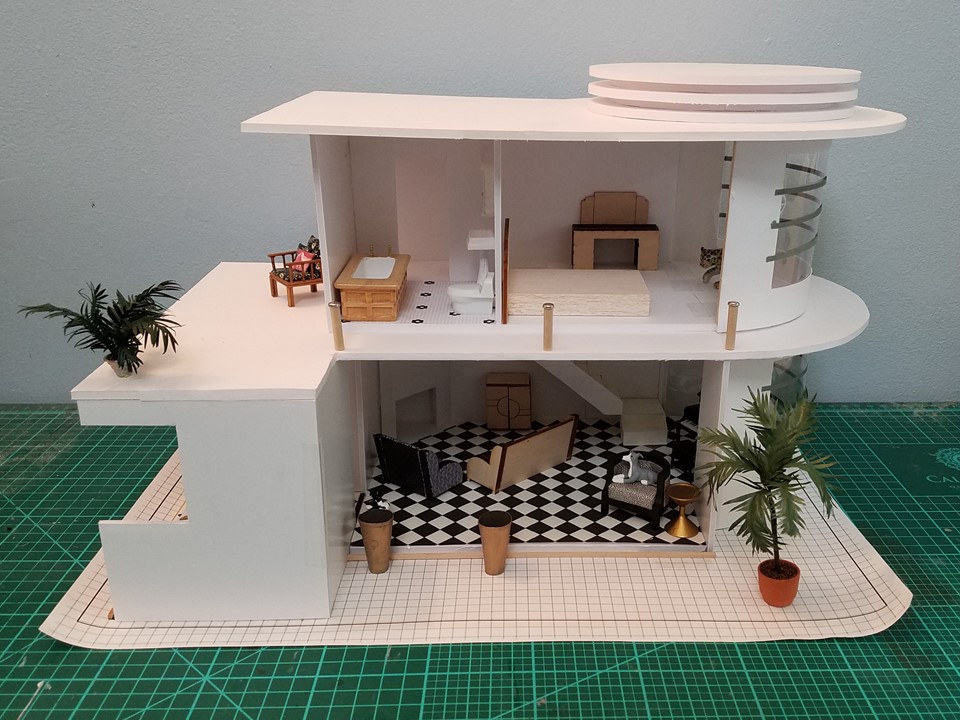

The
mock-up also gives me the opportunity to test out furniture and layouts, decide
what I need to add/replace/say goodbye to, etc.
Some of the furniture is just dry fit for now, so that I can at least
get a sense of it in the space. A couple
of pieces are borrowed from other houses.
I also had enormous fun hunting through my stash. The large copper vases outside the front door
are from a half-scale swap. The palm tree
is from a tropical diorama that I took apart to scavenge some of its elements. And I had forgotten I had that little statuette of Bast.
Here
is the living room.


This
room is not significantly different from the original plans, other than the
staircase. The plans called for a rise
and run of ¾" each.

That
would make for a 3/8" rise and run in half scale. That would fit the space and would make for a
pretty staircase, but it would also be quite steep with uncomfortably shallow
steps. A more realistic design is a 3/8"
rise with slightly less than a half inch run.
Unfortunately, this would slam the end of the staircase right up against
the wall to the piano area. I can't get
rid of the wall because it's load-bearing, so I decided to turn the staircase. I think that works. It allows for comfortable steps and doesn't
extend too far out into the room.
Another reason why mock-ups are good.
😊 I tried three designs before settling on this
one.

Now
that it's in the room, I like the purple chair more, so I may keep it and cover
the sofa with the same fabric. 😊 There will be a deco
face to the fireplace, and an oval coffee table (possibly this
one, or something similar). And, of
course, there will be a rug. Not sure if
I will keep the cabinet or go with this one,
which I love. The piano is a Bespaq
piece I got on sale at a miniature show.
I do like it, despite the truly annoying keyboard. (Do miniature designers not have eyes? The 1:12 piano I had in my childhood
dollhouse had only sets of 3 black
keys. Sheesh!) You can see the leopard-print chair and Jazz,
situated to be visible even when the house is closed up.
The
kitchen/dining area changed more. For
one thing, they are both a bit bigger.
The original plans had the kitchen being 6" x 6" (3" x
3" in half scale). That is a very
tiny kitchen! Mine is 4" x 4 1/4"; not a huge increase, but enough to make the kitchen more workable. The kitchen and dining room also have full-height
ceilings; in the original plans, their ceilings were lower than the living room's. The two-level roof line was pretty, but I
decided I needed the space more.


The
stove and refrigerator are both works in progress; the work table was borrowed
from the Fairfield for size and placement, not so much for looks.
That blue square represents the sink.
The
original sink I bought at a mini sale is really nice but, I think, may be too big for
the space. I could make it fit, but then
there would be no room for a work space.
If I move it all the way to the right, I could possible squish in a small table, but I'm not sure I like
that.


The
dining room is also larger than the original. The plans call for it to be 6" x 8" (3" x 4"); mine is 4" x 4 3/4".


The
table is just a mock-up made from mat board and toothpicks for size, and the chairs
were borrowed from the bungalow. These
are the actual table
and chairs
I will have. The drinks cart is from a kit by Jane Harrop. I love how well Jane's kits are cut, but the
wood is not the best. It always has little
fissures in it. I filled in the wood on
the circles as best I could with stainable wood putty, sanded well, and gave it
two coats of cherry stain. I then
replaced the shelves with very thin birch wood to which I added a cherry veneer,
and the railings with cherry strip wood from Northwestern lumber. My replacements were also given a cherry
stain, and the whole thing was finished with shellac for a well-polished sheen.


The
liquor bottles are a combination of the standard
half-scale liquor bottle set (with new labels), and some 3-D
printed bottles from Shapeways, given some Gallery Glass coatings. (Yep.
That's a bottle of absinthe there on the right.) And remember those annoyingly small wine
bottles? One of them had its neck snipped
and was turned into a bottle of Angostura Bitters. 😉 I have a
left-over reject from the champagne glasses in the Orient Express on the second
shelf. I'll be adding more (and better)
glassware to the cart.
Upstairs,
I extended the second story back to the edge of the kitchen/dining room so that
I could make space for a bathroom, which was entirely left out of the original
plans.


I
think I need to move the second story about a quarter inch to the right (the
window is not quite lined up with the window on the ground floor), which will
give me another quarter inch in the bathroom.
If I adjust the door position a bit, I can create a surround for the tub
(check out this
gallery for some examples, although mine won't be quite as fancy) and pretend
that the bump-in is a closet opening into the hallway.

Not
sure these will be the sink and toilet I use; the toilet will almost certainly
be replaced. They were what I had on
hand. The sink appears to be meant to be
a wall sink, but for now I made a quicky pedestal for it out of a golf tee.

In
the bedroom, I had originally envisioned a sitting area in the window space,
but now I'm kind of leaning toward a writing desk. Maybe something like this
or this?
I have to create at least a couple of my
own minis for this house. 😊
There will be a deck on the ground floor roof. Right now, I've borrowed a chair from the Merrimack. I have a chair and coffee table kit from Twin Palms to make up, and I really think I need a deck chair. 😁
And
there you have it. It will be a while
before I can start construction, as I have to work on my items for the annual
half-scale swap, but I will likely continue to work on some pieces for the
house in and around my assembly-line work.
😊 Stay tuned.
As always, thank you so much for stopping by and for your encouraging and astute comments. Hope you all have a wonderful new year, filled with joy and minis!
As always, thank you so much for stopping by and for your encouraging and astute comments. Hope you all have a wonderful new year, filled with joy and minis!
You have made great progress! I’m so impressed with your amazing ability to recreate it in half scale. The proportions and the furnishings are looking perfect.
ReplyDeleteTea at the Claremont? Don’t you just love those historic hotels? We get to the Bay Area from time-to-time as my hubby’s son lives in San Francisco. Enjoy your new project and have a Happy New Year.
Thank you so much! Yes, isn't the Claremont wonderful? Mom had never been there before. It's such a beautiful hotel.
DeleteWow! This will be wonderful. I've seen the plans for this before and would never have thought of doing it in foam core! Brilliant.
ReplyDeleteThank you! Of course, this is just the model, and I'll be doing it in wood. But it's a whole lot easier to change things when they're just foam core taped together! 😊
DeleteWowza! You have been a busy little bee. I love this build. I envision a Hollywood mogul of starlet resides in this glamorous home.
ReplyDeleteThanks! Me, too. 😉
DeleteGreat Progress and a Good Vibe!!!
ReplyDeleteand I LOVE the curved windows on your Deco House, Deborah, although I wouldn't want a panther or cheetah roaming free inside, no matter how "chichi"a pet they may be! ;D
elizabeth
LOL! Thank you. Not sure I'll keep the cheetah, but I do see so many art deco pictures with them in. It could just be a statue. 😉
DeleteWow Deb it is so impressive that you were able to create this amazing practice model out of foam core and posterboard! And what a brilliant way to actually visualize the spaces and layout that you'll have to work with! Now you can see that increasing the kitchen and dining room space was essential, and that adding in the master bath was also a Must Do!
ReplyDeleteI'm super excited about the materials you are going to try out for the curved walls and railings! I like the 3/16" dowels, too, and think they'll not only look great but will be easier to work with and be more stable in the end. For the wall catch, Sheila and Brae probably have some great advice about using magnets.
I LOVE the baby grand in the round window! It was made for that space!
The turned staircase is a really great solution and will make a great place to stand and see the piano player at crowded parties! I bet you could use the Cameo to recreate an embossed key piece.
Yeah for keeping the purple chair! With a matching sofa it's going to look so chic! And Shannon's art deco table and chairs are going to look so cool!
I am so excited for the bathroom and all of the tile work! This is going to be such a fun project to follow and I can't wait for you to teach us what you learn!
Thank you, Jodi, for all your comments and suggestions. I really appreciate them. I did a foam core mock-up on the Roosevelt library, too, and was really glad I did. It's so much easier to make adjustments that way. I was thinking of magnets for the walls, if I can find any small enough. And when I bought the baby grand, I had exactly this location in mind. 😊 I do expect to learn a lot, again. I have been saving ideas, such as how Emily did the half-scale tile in her kitchen and how Brae did the tile mural in her bathroom. I have a mural in mind for mine, too. This whole project should keep me busy for at least another year.
DeleteThis comment has been removed by the author.
ReplyDeletewow your mock up is brilliant. The real thing is going to be amazing. I love the drinks cart.
ReplyDeleteThank you!
DeleteHi Deborah. Happy 2020. The house looks great. I do like it with the stripes. Makes it very nautical and authentic and I think without them, it looks a little plain. You are right though that they look a little wide. I am sure you will work out the perfect width and spacing though! Lots of great ideas flowing. Definitely needed to make the kitchen and dining room larger, and adding a little bathroom makes it complete. Hope to see more progress soon! Xx
ReplyDeleteThanks, Shannon! I have tried 1/2 inch stripes, and I think they look much better. Can't wait for your kits to come! They will make the house look even better!
DeleteI love both the hexagonal bathroom floor and the black and white checkerboard. It's going really well - I am looking forward to see your journey of creation for the new house. Just to make you giggle, I gasped when I saw the price of the desk - I thought it was a miniature one that you were buying for a second there. Well, that's what happens when you are worn out from work!
ReplyDeleteHa, ha! Yes, I have very expensive taste. The beauty of miniatures is I can make things myself and "own" them for a tiny fraction of the cost. 😉
Delete