Tuesday, October 23, 2018

The Windsor Chair


Apologies for not having posted for a while.  I flew to Arizona to visit my mother for a week and came down with a cold. 🤧 Although it was a mild cold, I still had it the weekend of the Good Sam Show, which I really felt that I shouldn't attend under the circumstances.  😢  I spent most of the weekend just resting.  Last week, I was in training all week, learning Java coding for one of the applications I support.  Between recovering from my cold and straining my brain on all that coding, I was pretty exhausted every night, which meant that I really had no energy to work on the library.  This past weekend, though, I finally got to make something.  Yay!

The library has a Windsor chair.


I had originally intended to purchase one here:  https://www.mastersminiatures.com/54-windsor-armchair-121-p.asp, but I feel like I've kind of been on a roll making my own pieces and thought I'd at least like to try to make one myself.


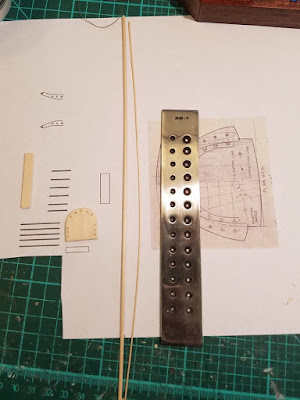
My biggest concern was how to get dowels small enough.  The smallest I could find online were 1/16" in diameter, and those were just way too thick for half scale.  I thought I would have to buy a lathe, and was blanching at the price, but, on a model ship building Web site, I found out that the best way to make super-skinny dowels was with a jeweler's draw plate, which I promptly ordered.  Basically, what you do is take your 1/16" dowel and keep pulling it through successfully smaller holes on the draw plate.  As you do that, the dowel gets shaved down more and more until it's the size you need.  I found that I had to pull the dowel through each hole several times, and it helped to pull from end for a while, then switch to pulling from the other end.  Here you can see how I was able to really shave down my dowel!  The one on the left is what I started with; the one on the right is what I ended up with. The process is actually kind of fun and Zen, but you do get little wood shavings everywhere.  😊


I cut the arms, back and seat from bass wood, and used my little pin vise to drill the holes I needed.  I had to go fairly thick on the chair back, as I needed to be able to drill holes in the edge of the wood.  The dowels did not take stain well, so I ended up using my India ink pens to try to color them to look like my mahogany stain.


On my first try, the dowels looked too skinny to me (although looking at the original chair, they were probably fine).


So I tried again, going a little thicker with my dowels.  I also made even thicker dowels for the legs and did a little carving on the ends, using the same techniques I used on the barley-stick table legs.  It was fiddly as all heck trying to get all the dowels inserted into their correct holes and relatively straight.  That was definitely the hardest part of making it and accounted for the most use of "magic" words.  The outer back dowels must go all the way through the arm rests, and, as you can see on try one, I had difficulty getting the arm rests even.


Here is the little chair I ended up with, next to a match box. I am actually pretty happy with it, although I know it's not an exact match for the one Theodore Roosevelt had.  Below is a picture of it in the room.


Thursday, October 4, 2018

The Second Side Table


Next up was the side table that goes next to the flowered chair.  I call it the badger side table, because there is a stuffed badger right next to it.  The badger commemorates Josiah, a pet badger owned by the Roosevelts until he had to be given away due to a bad habit of biting people (!).  Yes, I do have a plan for making him, but it’s going to require learning a new skill, so we’ll see.  😊


Not much exciting in the making of the table itself.  As usual, I sized it to fit existing strip wood, although the top has some of the nice maple veneer I got from Carrie.  This table has a drawer and a shelf, so I got to use the “Chippendale” drawer pull I made in my demo. 


What was a much more interesting exercise (and took a lot longer) was what goes on the table.  


For one thing, there is a lovely blue glass pitcher.   While I can find blue glass pitchers in 1:12 scale, I’ve had no luck in 1:24.    I did find a clear glass pitcher that was a good shape and thought of using Gallery Glass to color it.  However, I think it would be difficult to cover a convex shape like that evenly.  (I actually tried Gallery Glass on the green lamp shade, and it was definitely not a success.)  I’d hate to waste the money and have it not work out.   I decided to make my own “ceramic” pitcher from quilled paper.   The process for quilled paper pottery is explained in detail here.  Although the whole process can take several days, it is one of my favorite things to do.


Here is my pitcher before the final sanding.  Its “belly” is made from two quilled paper bowls, one inverted on top of the other, while its neck and lip are simply card stock.  Its handle is made from floral wire.  I drilled a hole in the bottom of the upper bowl before inverting it, to ensure I would be able to insert flowers.


What I love about quilled paper pottery is that, as you fill in with gesso and sand down, you retain very slight ridges that make it look as though it was turned on a pottery wheel.  I then gave it multiple coats of cerulean blue, mixed with a dab of turquoise and some paint extender.  The extender makes the paint go on very thinly without brush marks, but it does take several coats to cover, with quite a bit of drying time in between.  It is finished with some gloss varnish and is filled with paper flowers, made with the tiny flowers from my edge punches.


The little book shelf is made from a strip of ¼’ wide wood.  The ends were cut from some wood paper with the help of my Silhouette cutting machine.  Each end is actually two pieces, stuck together back to back.  I couldn’t get the tiny holes cut out, so I simply colored on some dark blue with an India ink pen.  The metal embellishments come from a cut up bead cap.  I added a few small blue books and was happy with the result.


The table topper was definitely the hardest part.  It looks as though it has some green in it, but I had a cream fabric with a small tone-on-tone print, so I initially used that.  I cut a strip of ¼” wide fabric, its edges sealed with Fray Check.  Then I used an overcast stitch along one edge to gather it.  I cut a square of paper just slightly larger than my table top, covered it in the fabric, and then tried to glue my fabric along the underside.  While this sort of worked, I clearly did not cut my square large enough. By the time I’d glued on my ruffle, it would no longer fit over the top of my table.


 For my second try, I glued the ruffle to the outside edge of a square of cardstock cut to fit the table top.  I then glued a square of paper, covered in fabric, to the top.  I had to round the corners because they otherwise extended too far out over the ruffle.  This one fits, but I’m not happy with how it looks.


I finally decided that the fabric I was using was just too thick and stiff to work properly.  I checked my tie collection for some fabric that might work—nothing.  I also checked my two favorite miniature fabric vendors—Miniature Luxuries and Dragonfly International.  Again, nothing.  So, I selected a green damask image that I liked, tiled it, sized it, and printed it on some silk from Dragonfly.  I tried method one again, cutting the original square just a bit larger.  I also used my Pretty Pleater to pre-ruffle the fabric, so that it would hang more realistically (sort of).  I’m not super happy with the results, but I can live with it for now.


There is a lamp that goes on the table as well.  I have a lamp that I was going to use, but now, of course, I’m thinking of making my own to replace it.  My light bulbs finally shipped, so I’m hoping they arrive soon, and I can start playing with them.