Thursday, July 26, 2018

A Little Time Out: Books and a Rug


Took a few days this past week/weekend to go stay with my mom, who recently had knee replacement surgery.  She is awesome and doing very, very well.  (I know she reads this blog sometimes, so shout out to Mom!  Hope you feel better and better every day!)  While that meant I couldn’t work on big (relatively speaking) items, I took along two projects that travel well:  miniature books and a rug.
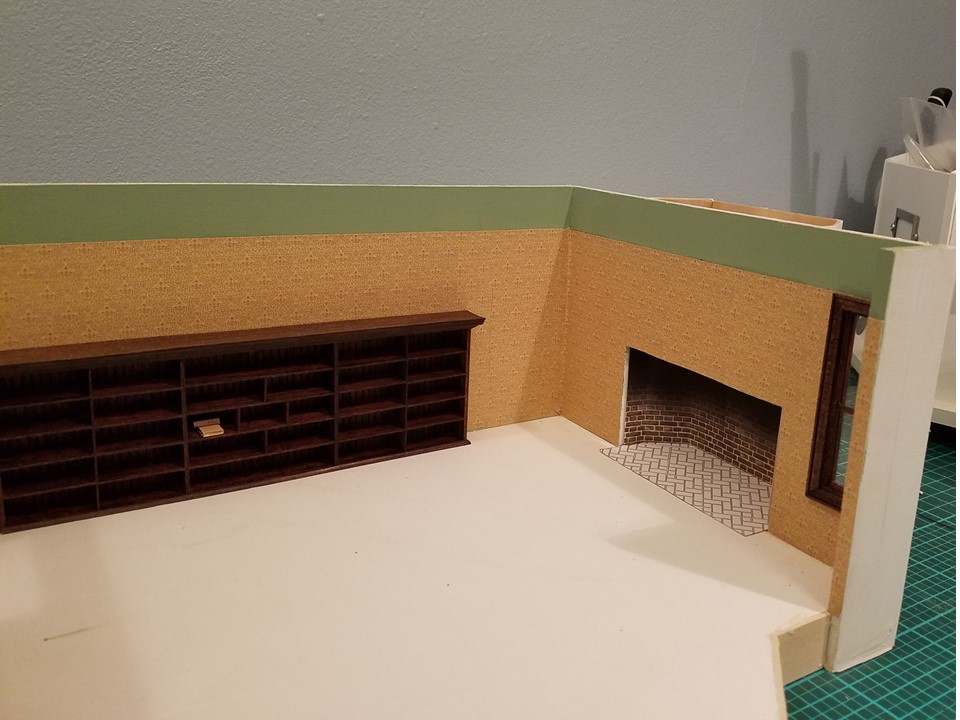
That bookcase is going to be a challenge to fill, and there will be another, smaller bookcase along the left-hand wall.  Because I’m really trying to be a stickler for authenticity, I’ve been looking at close-up photos of the bookshelves and trying to figure out some of the book titles.  As much as possible, I am including those titles on my shelves.  These include:  Camps in the Rockies, History of the United States, Life and Letters of Charles Darwin, Complete Works of Abraham Lincoln, Piers Plowman, Zadoc Pine, The Great Lone Land, California and Oregon Trail, the Campaign of Waterloo, Albert Nyanza – Great Basin of the Nile, From the Congo to the Niger and the Nile, Works of Alexander Hamilton, and the Writings of John Burroughs.  I also have a few books I think ought to be there (and maybe are):  Some Heroes of Travel, The Roughriders, The Dark Continent, and, of course, African Game Trails by Theodore Roosevelt. 


And then there are the generic, printable, vintage book covers that I’ll be using to fill the remaining shelves.  Update:  Oh, joy!  I just found this:  http://www.theodorerooseveltcenter.org/media/Files/Articles/ReadingWriting/2008-inventory.pdf.  This will really help me find volumes to fill the shelves. 

Making the books is a tedious process, because I make the covers as though I am making real miniature books, which means I print the covers on paper and wrap them around card stock coverboards, roughly following the process here:  https://www.deviantart.com/maylar/art/Micro-Book-Tutorial-135409683.  I am not, for these, including actual pages from the books, or I’d finish sometime around 2025.  For the book interiors, I am simply using some mat board and some balsa wood, depending on the desired thickness of the books.  I do find this process makes the books look more realistic.  Compare the books I made to printies of a shelf of books wrapped around a block of bass wood (upper left shelf, bottom shelf); the blocks will not be used in the final room box.  You can definitely see which of my books have the generic printie covers as well, so I may end up replacing those, although they don’t look as bad from a distance.


Anyway, after a couple of afternoons of work, I had made 25 books, which filled up . . . 2½ shelves, and smaller shelves at that.  There is a lot left to fill.  *sigh*  But making books is a good project to work on when I am taking a break or working out how to build my next piece of furniture.


I also got more work done on a rug.  It is being cross-stitched on 36-count Evenweave.  Rugs generally take around four months to make, and I am slowly getting there on this one.


This is the Kurdish Kilim rug from Susan McBaine’s Miniature Needlepoint Rugs for Dollhouses, published by Dover.  It has a lot of nice charts, and is available through Amazon or as an e-download directly from Dover Publications.  I had originally bought it because it has a zebra skin rug chart!  This rug will go in front of the fireplace.  Not an exact match, but I think close enough to work.


Wednesday, July 18, 2018

The Floor

If you look at pictures of the real-life library, the floorboards are quite narrow—I’m guessing 2-3” wide.  I therefore chose 1/8” x 1/32” cherry wood strips from Northeast Lumber for my floor.  According to the restoration documentation, the library floor was finished with orange shellac.  I don’t have any of that, but I mixed golden oak and red mahogany Minwax stains, which I thought gave the wood a nice, warm color.  As always, it is critical to stain before gluing.  Once glue gets on wood, the stain just won’t take.

The strips are 24” long, so I cut them into 4” (8’) lengths.  I based the length on the floorboards in our 1925 home with similar flooring.  Midway through the process, my little chop saw stopped working.  I have no idea why.  I can’t imagine the wood was too much for it.  The only thing I can think of is that it wasn’t getting much rest between cuts, so it overheated?  In any event, nothing I tried would bring it back to life, so I finished cutting my strips with my old-fashioned miter-box and razor saw.  Hey, it worked.

I first made a template of the floor from card stock.  I prefer to glue the wood to a template, and then glue the template to the floor.  That way, there is no problem reaching difficult spots, seeing what I’m doing, or sanding the finished floor.  Also, if I’m not happy with a board, it’s much, much easier to pull it off the paper than the wood base of the room box (and, yes, I did have to do that a couple of times).  I did put the template in place while doing the front edge of the perimeter rows, so that I could make sure they were nice and flush with the foundation.  Then it was a tedious process of making my way around five times for the “frame,” and then filling in with strips. You can see that the wood doesn’t come quite to the walls on two sides.  I have left channels for the wires of the lamps.  They’ll be covered with baseboard and/or bookcases, so you won’t see them when I’m done.  Neither the fireplace nor the bookcase are glued in in this picture.  They are just there for checking dimensions.


I finished the wood with three coats of clear shellac, using 0000 steel wool in between and after my final coat had dried.  I filled in a little egg carton “tile” in front of the fireplace and, finally, added my sandpaper brick hearth, before gluing the entire thing down with Yes paste.


I am very pleased with the way the floor turned out.  You can see I also decided to stain and varnish the “foundation.”  I decided I liked the look with the wood floor. 


Note:  As you may have noticed in my previous post as well, the interior of the fireplace changed.  The spouse took one look at the fireplace (pre-gluing, fortunately), and said, “You can’t have a floor and fireplace that look this nice and that two-dimensional interior.”  So the printed back was replaced with more sandpaper brick.

Wednesday, July 11, 2018

The Fireplace


While waiting for the wood for my floor to come, I started work on the fireplace.  For the pillars, I cut various bits of strip wood and shaped them using a file, my mini files, and sandpaper.  The curved supports took the longest, as I started with ¼” x ¼” strip wood and had to carve out a large portion.  I’m pleased with how they turned out shape-wise. 


I wanted to carve a little wheat pattern into the supports, but my Dremel attachment was way too large.  I tried making my design by hand with some carving tools on a piece of scrap wood, but, when I was done, it looked as though the cat had been chewing on it.  Not the look I was going for.  So I took wood veneer designed for the Cameo and punched out little petal shapes with a daisy punch, then arranged them to look like a head of wheat.  They don’t show up quite as well as I’d like them to, but the carving on the real fireplace is pretty subtle, so I guess that’s OK.


The fireplace surround was made from egg carton stone.  I also wanted to incorporate the sunflower tiles from the original.  According to what I have read about the historic preservation of Sagamore Hill, the sunflower motif was used throughout the house and appears in numerous tiles and decorations on both the interior and the exterior.  I knew I’d never be able to exactly recreate those tiles, but I wanted to at least try.  On a recent visit to a new bead store that just opened in our neighborhood, I found two small sunflower charms.  I clipped off their rings, filed them down, then rolled out some polymer clay.  I placed two strips of 1/32” thick wood on either side of the clay on my rolling surface, then rolled until the clay was flat and so thin that the rolling pin was rolling along the strips on both sides.  Then I cut two half-inch squares, pressed the sunflowers in, straightened out the sides (which bulged when the charms were pressed in) and baked. Not identical to his, but they should work. 


As you can see, I laid out my grid using Word and printed it on card stock.  I did something similar when I was laying the stacked stone for the fireplace in the Merrimack.  I find it much easier to lay things out properly, and then I know exactly where to glue my “bricks.”  I painted my egg carton a greenish gray, then drew out the lines for my bricks using strip wood of the correct width (and my little triangle to keep things running straight and at right angles).  I cut the bricks with my utility knife.


Here you can see the bricks in place, after being coated with “matte” varnish.  I seriously don’t understand how they can call it matte.  I’m not worried on this piece, since grouting and touch-up paint will take care of the shine, but this varnish has always looked glossy to me!


You can also see that I’ve painted the sunflower tiles, and added a ring around the centers, using a gold enamel paint pen.

Once I’d finished grouting and painting, I put my inset into my mantel, holding it in place with strips of tissue paper glued to the back.  I didn’t want to use anything thick; I wanted to make sure my mantel would still fit tightly against the wall.  I finished the front with strips of .0208 x .0208 railroad lumber.


The vases are painted charms, and I made the little clock.  It has real tiny watch hands on it, so I can change the time.  I had no idea what his two portraits were, so I got the cleanest screen captures I could from pictures of the library, fed them into Google images, and immediately came up with Maurits, Prince of Orange by Pieter Tanjé and William I of Orange, also by Tanjé.  Now that’s something I couldn’t have done 40 years ago!  I then got clean copies of the prints off the Internet and framed them with railroad lumber.  I am not sure yet how I will replicate the birds’ nest candelabrum, but would love to figure out a way.

Wednesday, July 4, 2018

Building the Box


Two blog posts this time, as the one on the windows was a little short.

I cut the walls from quarter inch thick craft plywood I had picked up at Joann.  All I can say is “Ugh!”  I knew I wouldn’t enjoy this part, but I thought it would go a little more smoothly than it did.  The straight cuts went OK.  I used my mini table saw from MicroMark (and a jeweler’s saw to get the diagonal cuts on the floor), and that part went well.  Here you can see me dry fitting as I cut.


However, for the internal cuts, I had a terrible time.  I had heard that using a jigsaw is as easy as using a sewing machine.  It’s not.  I can sew just fine, but I could not get that jigsaw to go where I wanted it to go.  Finally, the spousal unit stepped in and saved the day.  The cuts weren’t perfect, but they were better than mine.  I then used a Dremel, a file, my mini files and some sandpaper to enlarge the holes and even them out as best I could.  As you can see, they got a little wavy, due to the Dremel.  However, once they’re trimmed out, that shouldn’t be noticeable.  You can see them below with the windows temporarily in place.


Since the boards are 6 inches in width, I didn’t trim them down, but am using approximately one inch at the bottom for the foundation.

I primed and sanded all my pieces and cut foundation supports for the floor.  To get the height I wanted, I sandwiched together three lengths of half-inch wide strip wood. I also had to separately cut the fireplace extension, since the 12” x 12” piece of plywood I bought from Joann was not long enough.


I painted the walls the dark green (it’s washed out in the photo below) and then applied my wallpaper.  You can see I have left a little loose on the edges to cover the seams once the walls are glued in place.


I could find no miniature wallpaper that was even close to the wallpaper in the library, so I took a screen shot of the paper from a picture online and tiled it to make my own.  Even though I had a nice, clear screen shot from a close-up picture of the wall, once I had shrunk it down to 1:24 size, it was way too dark and the pattern was lost.  I fiddled around with filters (brightness, contrast, warmth, saturation), until I got something I felt I could live with.  It’s a little too gold, but brown just made the pattern fade out.  I then printed it out on HP Bright White paper (which is a little heavier than standard printer paper) on my printer’s “Best” setting.  Finally, I sprayed it with matte sealer to protect it.  I know people have had problems with home-printed wallpaper.  I’ve been printing my own for several years now and <knock wood> have had no problems so far.

Then it was gluing time.  I love my right-angle clamps for a job like this.  You can see some sandwiched strips of wood sticking out on the left-hand side.  This is actually the piece I eventually glued under the fireplace extension.  I was using it temporarily when gluing the floor because the left-hand side kept wanting to dip down.


I glued in the extension for the fireplace, then encased it with stripwood.


And here it is.  I trimmed out the front foundation with more strip wood.  Not sure how I will finish it (stain? paint? cover?) so for now it’s unpainted.  I will wait until the fireplace and wainscoting are in before I put the valance on the fireplace wall.  You can see I went with the half wall on the right-hand side.  I felt it opened the room up more.  The box will also eventually get a ceiling, but for now I’m leaving it off, as that makes it easier for me to get my hands in to decorate.

You can also see the herringbone grid I have printed out for laying the floor of the fireplace.  I intend to use sandpaper bricks for that. 


The Windows


Before I cut my wood, I had to make the windows.  It’s critical that the holes be cut big enough to accommodate the finished windows.  As I’ve learned from previous builds, trying to fit them after the room is assembled would be too difficult.  I used 1/4” x 1/16” basswood strips and .0416 x .0833 model railroad lumber from Midwest Products for the windows themselves. I used the basswood for the bottom and sides, but because I had to keep the top open for inserting the “glass,” I used just a strip of the railroad lumber laid flat, rather than on edge, for the top.  Here you can see me gluing it in my little gluing jig.


then glued the railroad lumber inside both sides and the bottom—one strip flush with the back, one strip offset just slightly (probably 1/32”) from the front.  This left a gap in the middle to form the channel for the “glass.”


At the top, I put a second strip of HO lumber behind the first strip, for further stability, then added a strip to the back.


Here you can see the “glass” (2 mm thick clear styrene left over from another project) in place.


The molding I was originally going to use was 1/4” wide.  It seemed a little large for such narrow windows, which are less than 1 inch wide themselves.  I had ordered some molding from Earth and Tree that was 7/16” wide.  It’s a little hard to tell from the drawing, but the molding is symmetrical.  I was able to split it down the middle to get two strips of molding that were less than 1/4” wide.  I thought this worked better with the size of my windows.  I used one more strip of HO lumber across the middle, to make it look like a double-hung window.  Et voila!  Windows done.