
Two
blog posts this time, as the one on the windows was a little short.
I
cut the walls from quarter inch thick craft plywood I had picked up at Joann. All I can say is “Ugh!” I knew I wouldn’t enjoy this part, but I
thought it would go a little more smoothly than it did. The straight cuts went OK. I used my mini table saw from MicroMark (and
a jeweler’s saw to get the diagonal cuts on the floor), and that part went
well. Here you can see me dry fitting as
I cut.

However,
for the internal cuts, I had a terrible time.
I had heard that using a jigsaw is as easy as using a sewing
machine. It’s not. I can sew just fine, but I could not get that jigsaw to go where I
wanted it to go. Finally, the spousal
unit stepped in and saved the day. The
cuts weren’t perfect, but they were better than mine. I then used a Dremel, a file, my mini files
and some sandpaper to enlarge the holes and even them out as best I could. As you can see, they got a little wavy, due
to the Dremel. However, once they’re
trimmed out, that shouldn’t be noticeable.
You can see them below with the windows temporarily in place.

Since the boards are 6 inches in width, I didn’t trim them down, but am using approximately one inch at the bottom for the foundation.
I
primed and sanded all my pieces and cut foundation supports for the floor. To get the height I wanted, I sandwiched together
three lengths of half-inch wide strip wood. I also had to separately cut the
fireplace extension, since the 12” x 12” piece of plywood I bought from Joann
was not long enough.
I
painted the walls the dark green (it’s washed out in the photo below) and then
applied my wallpaper. You can see I have
left a little loose on the edges to cover the seams once the walls are glued in
place.

I
could find no miniature wallpaper that was even close to the wallpaper in the
library, so I took a screen shot of the paper from a picture online and tiled
it to make my own. Even though I had a
nice, clear screen shot from a close-up picture of the wall, once I had shrunk
it down to 1:24 size, it was way too dark and the pattern was lost. I fiddled around with filters (brightness,
contrast, warmth, saturation), until I got something I felt I could live with. It’s a little too gold, but brown just made
the pattern fade out. I then printed it
out on HP Bright White paper (which is a little heavier than standard printer
paper) on my printer’s “Best” setting.
Finally, I sprayed it with matte sealer to protect it. I know people have had problems with home-printed
wallpaper. I’ve been printing my own for
several years now and <knock wood> have had no problems so far.
Then
it was gluing time. I love my right-angle
clamps for a job like this. You can see
some sandwiched strips of wood sticking out on the left-hand side. This is actually the piece I eventually glued
under the fireplace extension. I was
using it temporarily when gluing the floor because the left-hand side kept
wanting to dip down.

I
glued in the extension for the fireplace, then encased it with stripwood.

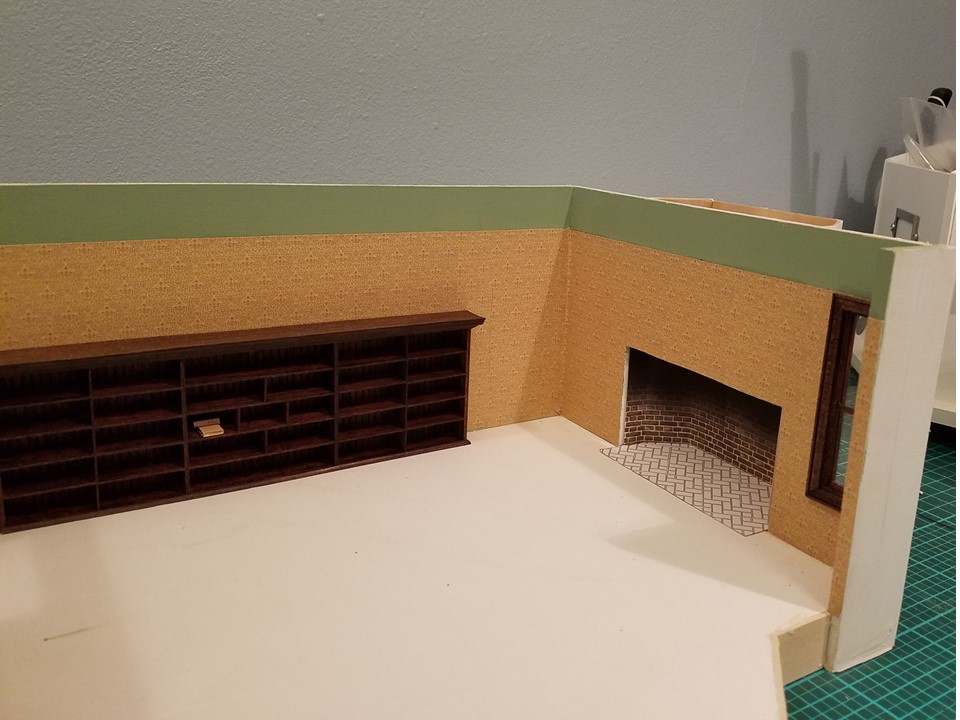
And
here it is. I trimmed out the front
foundation with more strip wood. Not
sure how I will finish it (stain? paint? cover?) so for now it’s unpainted. I will wait until the fireplace and
wainscoting are in before I put the valance on the fireplace wall. You can see I went with the half wall on the
right-hand side. I felt it opened the
room up more. The box will also
eventually get a ceiling, but for now I’m leaving it off, as that makes it
easier for me to get my hands in to decorate.
You
can also see the herringbone grid I have printed out for laying the floor of
the fireplace. I intend to use sandpaper
bricks for that.

Beautiful Work!
ReplyDeleteI've never heard of right angle clamps before so this was something new for me to learn.
Thank you! I got them from MicroMark, when I was working on the Fairfield. They are magnetized, with an inner piece and an outer piece. They don't work well on thick wood (I was never able to use them on the Merrimack), but they've come in extremely handy on smaller jobs.
DeleteIn spite of the tool challenges, you got the job done! The structure looks great, and as you said, trim hides a lot of the imperfections.
ReplyDeleteScroll saws do have a learning curve, but with a little practice adjusting the mark to follow, the saw speed and the push rate, it gets better. I tend to go faster when I get nervous, so I have to tell myself it's okay to stop the cut and slow down if I need to. I also found making up a fence for straight cuts using scrap wood and clamps helps. Access cuts for windows are a bit trickier. I found that it takes strategic planning and patience, too. Cutting out the center, then making a series of cuts to the line, then slowly chipping them away. You still have to fill in the access cut you made to get to the window, but that is no big deal with glue and then spackle. Practice and YouTube videos have taken a bit of the nervousness out for me.
Great work, Deb! Looking forward to the next post!
Oh, I definitely have a lot of learning to do! :-) I stupidly drilled a hole in the center of the window/door openings, thinking I could then just saw my way around the opening, kind of like I'd do if I were cutting them out with scissors. Even using the thinnest blade possible, I was never able to turn the corner properly. I drove right off the road, so to speak! What my spouse did was drill holes near the corners, and make four straight cuts. Much smarter! Live and learn.
DeleteI feel your pain! My holes are never straight, I'm pretty sure that is why we have trim. :) Everything looks terrific.
ReplyDeleteThank you! Trim is my best friend these days. :-)
DeleteI am glad the spouse helped. My daughter usually takes over when I get frustrated. She says I have no fine motor skills!! It's looking great. I can't believe the walls are up so quickly.
ReplyDeleteThanks! Sometimes a new perspective, particularly when I am starting to get really frustrated (and have just ruined three boards), really helps! (And I've seen your quilling. You do have fine motor skills!)
ReplyDelete