Wednesday, August 29, 2018

The Side Bookcase


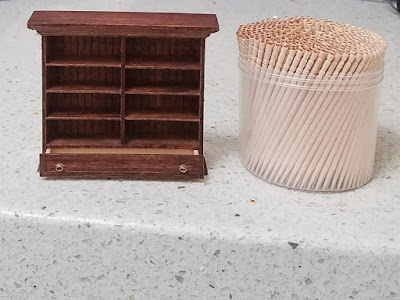
Back to furniture making!  I decided to start with something simple and selected the smaller bookcase that goes along the left-hand wall.  When enlarging and lightening one of the pictures of the bookcase, I realized that it has a drawer along the bottom.  (Maybe two; it’s hard to tell because the chair is in the way.  Because our home has a lovely built-in with a long drawer along the bottom, I decided to make one long drawer on the bookcase.)


I started with my drawing in Word.  Planning in this way really helps me play with proportions and gives me something to cut out and place in the space, so that I can see how it’s going to work.  I also adjust my plans to fit standard strip wood dimensions.  There’s only so much wood cutting I can do. 😊  For this bookshelf, I used mostly 1/16” thick bass strip wood, with the exception of the shelves and the drawer front; they are all 1/32” thick.  The shelves are 1/2” deep.  The drawer front is cut from 3/8” wide strip wood.


Once my pieces were cut and stained, I put together the inside of the drawer first.  I like to use a face plate on my drawers, as I think it gives them a cleaner look, but I needed the inside put together to make sure I accommodated it when gluing together the bookcase.  I don’t bother staining the wood on the inside of the drawer; I just glue it together in my little gluing jig.  Here are some pictures of the finished drawer, so that you can see what I’m talking about.


Once I had the inside of the drawer glued together, I could start gluing my main shelves and shelf-divider.  Because I had that drawer at the bottom, I couldn’t use my trick of extending the vertical line on my pattern and laying the back of the bookcase on top, to ensure proper placement of the divider.  Fortunately, the bookcase takes beadboard at the back, so I could just line my divider up along one of the “boards.”  You can see I used my Lego blocks to make sure that the pieces were glued in at right angles.


Once the sides were glued on, I glued the face plate onto my drawer, and trimmed it out with HO scale lumber.  I trimmed the bottom of the bookcase with quarter round.  Then I used the spacers from the first bookcase I built to glue in my shelves.


If any of you have followed the thread on Greenleaf forums about half-scale hardware, you’ll know that it’s extremely difficult to find.  I make my own “Chippendale” drawer pulls.  I start with a piece of cardboard and lay out repositionable (not permanent!) double-stick tape.  I cut small diamonds from heavy card stock.  The color doesn’t matter, since I paint them.  It just happens that the heaviest card stock I have is colored gold.  I tried to find a nice shape I could make with a punch, but nothing quite worked for me.  If you have a punch that you like, you could use that, too.  You could also cut ovals, or, if you are going for more of a craftsman look, rectangles.  I place my diamonds on the tape, and lay another strip of cardstock just below them, to give the bottom of the pulls something to rest on while I’m gluing, so that they’ll hang straight.


Then I remove links from a fine chain and use super glue to glue them to my cardstock diamonds.


Once the glue is dry, I remove the extra strip of cardstock.  Finally, I paint the whole thing (chain link and diamond) with Testor’s enamel paint.  Sometimes I use gold.  This time, I mixed a little flat black in with the gold to give it a more antique look.  When the paint is dry and I’ve finished varnishing my drawer, I can simply lift the drawer pull assembly off the removable tape and glue it to my drawer front with a little tacky glue.


While waiting for my paint to dry, I added the cornice and a final piece of strip wood to the top of my bookcase.  I gave the whole thing three coats of satin varnish, using 0000 steel wool to smooth it in between coats and after the final coat.


And here it is in place.  I may reframe that painting.  The frame I made isn’t really heavy enough.

The figurine (which in the original is the Japanese god of benevolence and hunting) is one of a group of tiny bonsai mudmen I scored off eBay a while ago.  The buffalo is a little large, but that’s all I’ve been able to find so far, and the small Asian blue-and-white vase, is, of course, a bead from Michael’s.


Tuesday, August 21, 2018

Artwork and Accessories


My picture rail didn’t come in until this past Friday.  While waiting, I finished my rug and worked on accessories and art work.

The completed rug:


It has more white than the original, but I’m OK with that.  Nothing in this build is a perfect match.  Only four more rugs to go!

You also may remember that I was trying to find a substitute for the Frederic Remington Paleolithic Man bronze.  He looked a little like a gargoyle to me, so I found a small gargoyle charm, removed the loop, added a “rock” made of Sculpey, and painted the whole thing bronze.  I’ve lightened the final picture a bit so he doesn’t look like a blob; he’s actually a darker bronze than that.  The original Remington is also darker, but, again, that made it hard to see.

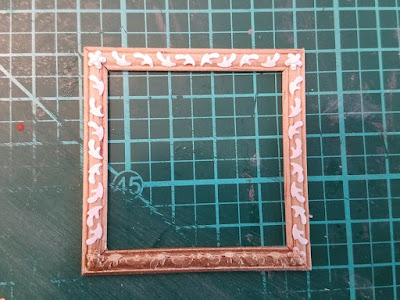
I spent a lot of time finding matches for the pictures on the walls.  I was never able to find the exact portrait of Washington he has, so I found the closest I could.  [I have no idea what is hanging below Washington, as the stupid lamp blocks it in every picture I’ve seen.]  I also made most of the frames.  I had a metal frame that was a fairly close match to the ornate frame around the moose painting, but was unable to find anything in half scale that was even remotely like the frame on the portrait of Theodore Roosevelt, Sr.  I ended up making my own from the window frame material that I never used, plus some curlicues made with a small craft punch, all finished with some gold paint.


Most of the art work was printed on HP Bright White paper.  The “paintings” have been printed on fabric and covered with three coats of mat gel medium.  This protects the ink, as well as enhancing the color and giving the surface a bit more depth.

With the picture rail stained and in place and the border added, I’ve put up my pictures with some Quake Hold.  They are only temporarily in place for now, as I may need to take them down for a bit when I add the ceiling.


On the fireplace mantel, I made a more ornate version of the hunter’s flask and added a couple more items, including my favorite—an HO-scale pewter coal hod with an added wire handle, painted copper (far left).  The tiny coal hod in the real Sagamore Hill was apparently given to Theodore Roosevelt for his work in settling the coal miners’ strike of 1902 and ensuring that the workers were treated fairly by the owners.  To see close ups of some of the real-life versions of these pieces and learn their stories, check out https://artsandculture.google.com/exhibit/RQLiiFwUSgNqLw.  I’m still trying to find a way to make the bird’s nest candlesticks.  My first try was unsuccessful, but I am not giving up!


Even though the room still needs a ceiling, baseboards and door trim, I am going to take a break from room construction for a while and go back to furniture making, which I prefer. 😊 As you can see, I have many tables and chairs to go, plus the smaller bookcase on the library’s left wall.

Friday, August 10, 2018

The Valance Wall


Before adding the valance wall, I hung the mosaic of Pope Leo XIII in the papal gardens (far left).  According to the Google Arts Web site, the mosaic was a gift to Theodore Roosevelt from the Pope when William Taft (then governor of the Philippines) was in Rome to negotiate the purchase of church lands in the Philippines by the United States.  Obviously, I don’t have a real mosaic—just a print-out of the mosaic, coated with a little clear nail polish and framed. I also added a lightweight white cotton lawn curtain to the window, using a Pretty Pleater to give it nice folds.  I know these are a bit pricey, but I have never been able to get good curtain folds with the skewer and pin method.  I ended up with a lot of obvious pin holes, as well as uneven, messy folds.  The Pretty Pleaters are easy to use, and I have been very happy with the results.


I then prepped the valance wall with paint and paper, added some framing material painted gold along the bottom, and tested it in the space.


The border will go all the way around the room.  The odd gap between the paper and the border will be filled on the other two walls with picture rail, which is on its way from Manchester Woodworks. The Georgian gold brackets (there are two) came from Sue Cook in the U.K.  She does exquisite plaster work in both 1:12 and 1:24 scale.  The brackets arrived very quickly and were beautifully packaged, so they weren’t damaged in any way.  The brackets were not glued on until the wall was glued in place.

Finally, it was time to glue in the valance wall.  I admit, I was a little reluctant to add this piece, as I was so happy with the way the wall looked without it.  However, for accuracy, it needed to go in, and, as it turns out, I’m happy with it in, too.


In other news, it turns out that the bronze statue that I thought was some kind of raven or bird of prey is not.  I learned from a tweet on Sagamore Hill’s Twitter account (yes, apparently they have one) that it’s actually Frederic Remington’s Paleolithic Man.  Yeah.  Not going to be able to reproduce that in miniature, but I have an idea.  More to come.

I also did my first lighting test.  The wires will mostly be hidden behind/beneath baseboards, bookcases, and rugs.  I have one more lamp, but during testing, its fragile little shade broke.  Aaarggghhh!!!  Fortunately, the rest of the lamp seems to be OK, so I will likely keep it and add my own shade. 


Thursday, August 2, 2018

The Inglenook


The next project I worked on was the inglenook.  I actually started this before my trip to Mom’s and finished this past weekend.

As always with anything I work on, I started planning in Word.  I knew I would be working with standard sizes of strip wood, so I played around with possible configurations:


The first design used 3/8” strip wood.  It just didn’t look right, and I couldn’t quite get everything to fit properly.  The second design used 1/4” strip wood; I got the right number of squares in, and it fit around the bench better.  There were some further slight modifications after cutting out and testing against the fireplace, and below you can see my final patterns ready to go.  You can also see the cut to accommodate the molding on the fireplace mantel.  Once again, I glued my wood to the paper backing (except for the bench end), as it made things so much easier.


I used miniature baseboard and crown molding, as well as standard bass strip wood and 1/8” wide railroad lumber. I cut each of the little squares from my strip wood, then sanded all the edges at an angle, using my sanding twigs.  I had also tried my mini files and regular sandpaper, but the sanding twigs were by far the easiest to use for this task.  The hardest part was holding those little squares down while I sanded.  By the end of the process, all the finger tips on my left hand were sore from pressing down during sanding.  As I finished, I stored them all in a spray bottle cap.  The floor of my workroom is notorious for eating things unlucky enough to fall onto it, and I didn’t want to have to make any extras! 


Then all the wood was stained, and I glued it down, before finishing everything with two coats of satin varnish.

After I got everything glued in (of course), I decided I wasn’t happy with the bench. 


There was too much grain in the wood, and either that or the floor pattern made it look like it is wider at the right end than the left.  (It isn’t; it’s strip wood—all one width, all the way across.  I even measured to make sure.)  It was now glued in and wasn’t coming out without doing damage.  So, I used some of my real wood mahogany scrapbook paper to create a veneer for it.  Better, I think.  The right side still looks odd, but I really think it’s an optical illusion from the floor pattern. (Sorry for all the dusty bits.  I had been testing my valance wall, which required some sanding, and it was apparently shedding sawdust.  Where is the maid when I need her?) 


 The bench backs and the right-hand side of the inglenook also make use of the mahogany scrapbook paper.  While the bench on the right-hand side has much less grain than the original left-hand bench, I may still veneer it, so it matches the left bench better.  I will not be finishing the end or adding an armrest, because, technically, this is just a cross-section of the bench.


And there we have it.  The final thing I will have to do before adding the valance wall is put a curtain on the window, as I know I will never be able to get that hung once the valance wall goes on.

Oh, and I made 21 more books, for a running total of 48 so far.  I originally estimated 100 books for the bookcase.  I was very, very wrong.