Friday, January 18, 2019

Josiah (by SuAmi)


I'm still working on the orange chair, although I have had to take a break to work on my items for the annual swap for the HalfScaleMinis group.  Unfortunately, I can't write about my items until after the swap has occurred, on pain of being banned from the swap in future years.  I can say that my original idea did not work, which necessitated a return to the drawing board, but I finally came up with an alternative plan, and production is going full speed ahead.


In the interim, I do have a little something to post about, a very little something—Josiah!  In 1903, Theodore Roosevelt was given a badger by a young girl in Kansas.  The Roosevelts named him Josiah and kept him as a family pet for a while, until they had to give him up due to his habit of biting people.  In return, they got a stuffed badger for the library.  He looks kind of ferocious.


My original hope was to crochet an amigarumi version.  I got a pattern for a stuffed toy badger and thought I would be able to make one the right size by using a single strand of embroidery floss and a size 14 hook, as well as simplifying the pattern a bit.  I actually have done miniature crochet like that, with decent results.


This time, however, despite several attempts to modify and simplify the pattern, I finally had to admit defeat.  I have no idea how they crochet in the round for those teeny little legs without losing track of their rows and wanting to tear their hair out.  It was time for my back-up plan.

SuAmi on Etsy does some of the sweetest, tiniest amigarumi animals I have ever seen, and I have always wanted something by her.  So, as a Christmas gift, my mother bought me one of her badgers.  (Admittedly, at the time we ordered it, I hadn't made my goats and sheep, so I hadn't considered the possibility that I might be able to make a polymer clay version work.)  Anyway, he arrived this week, and he's cute as can be.


Here he is in the room.  I think he fits in there very well.


I am telling people that he is the real Josiah, not the stuffed version.  He just happened to wander into the room and stand at that exact location. 😉 It's clear he's not nearly as fierce as his taxidermy counterpart. 


The books are also coming along, slowly.  At last count, I had made 269 books (including the books on the desk and side tables), but I still have 17½ shelves left to fill.  Fortunately, I can make the books while sitting and watching TV.  Suggestions of good shows to binge watch while making swaps and books are welcomed.  😊  We subscribe to Netflix, BritBox and Acorn.  Last year, I watched all three seasons of Broadchurch while making my swaps.  I've already consumed all of A Place to Call Home, 800 Words, The Great British Baking Show, and most seasons of QI.


Wednesday, January 9, 2019

Two More Animals


In my continuing effort to make the animals for the library, I made a second goat about the size of my first completed goat.  (The very first one I made is on the left, below; the new one I made is in the middle.)  Unfortunately, it goes over the door, and I forgot that I have less space there.  The middle goat head was too big by about 1/8 of an inch. *sigh*  So I made yet another one (the one on the right).   It is only about the size of a dime, and I shaped its base around a piece of the picture rail that runs around the room, so that it can fit over the rail when hung.


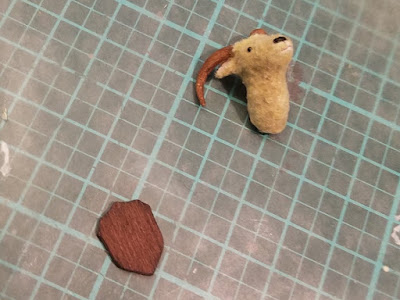
Next I moved on to what I initially thought was some species of antelope.  Based on its coloring and lack of markings, however, I've decided it's actually some kind of sheep.  In any event, I only had a picture to work from this time, but I am very pleased with how he turned out.  (OK.  I had one first try that never made it to the baking stage, because I fiddled around with his head for so long that the clay got a little too warm, and his neck basically turned into a ribbon.)  But this guy I like.  😊  I initially had his eyes in the wrong place (more on the top of his head), so I filled them in and did a second short bake, then I used my pin vise to drill holes in the correct place (on the sides of his head).  I actually like the way the drilled holes worked for housing the microbeads.  Here he is painted and ready for flocking.


He was much quicker to flock, because I only needed the powder flock.  There were no "long" fur pieces that I needed to attach.  However, I couldn't find a color of floss I liked, so I used two colors—one a bit darker and one a bit lighter than I wanted.  I pulled each color's six strands of DMC floss apart, then alternated the two colors in the bunch of strands I used for snipping my flock (see steps 12 and 13 in this link).  Together, they made the color I wanted.  I used my Silhouette Cameo to cut the mounting plaque—it's three layers of thin chipboard and one of mahogany scrapbooking paper.  


After I glued him to the plaque with JB Weld, I filled in around the edges with more flock.


My second goat is on the right, above.  He looks a bit fluffier than the first one.  With him, I put a layer of the powder flock all over him before laying down the longer pieces of "fur."  Mountain goats have quite heavy coats, for obvious reasons.  I think I'm going to add a little more powder flock to the face of my first goat.  My brother thinks my goats look a lot like dogs (except for the heavy brows), and there is definitely more of a "cute" factor to all my animals than their real-life counterparts.


From this angle, my sheep/ram looks kind of like a teddy bear.  I guess that's fitting.


I am going to take a break before making the boar's head, for which I want to try the air-dry clay that Brae recommended.  There is at least one more chair to make, probably two.  I received an engraving tool from my mother for Christmas, and there is a carved chair in the library that is calling my name. . . .  😊