Saturday, August 15, 2020

A Swap and a Garden Hat Pattern

You may remember, many months ago, I said I was working on a swap for an Instagram group.  Before I had a chance to send, shelter-in-place happened.  The swap for everyone was put on hold.  Now that things are loosening up a bit, some people are starting to send, so I sent my swap-ee’s gifts last Saturday.  They had to make it all the way to the Netherlands, and I figured the package would take weeks to reach her.  They made it in less than a week.  (Seriously.  I think it would have taken longer to get to New York.)  Now that she has received her items, I can reveal what I made. 

My swap recipient was Alexandra of Alexandra’s Bears.  I was so excited when I got her wish list.  She wanted something for her garden and/or bathroom in 1:24 scale!  She likes pale pink and white, roses, and romantic style. You may remember that a few years ago I made some garden accessories for a swap on the half-scale Yahoo group.  It is a fun set of items to make, and I knew I had to make some for Alexandra. 


Believe it or not, I keep a stash of unpainted watering cans, rose clippers and trowels on hand. I buy them in bulk from a place called Metal Miniatures in Wilmette, Illinois. The items always need a bit of filing before they can be painted, but they are decent quality cast-metal miniatures and are not expensive. The trowel and a set of rose clippers were given pink handles (of course) with Testor’s paint, but I decided to up my game a bit for the watering can. 

I have always just painted my watering cans, then painted the (slightly) raised flower detail that's included on either side.  That's fine, but a bit simplistic, and I'm not the best painter.  For this swap, I wanted to try a "shabby chic" look.  I used my mini files to clean up the can and file off the raised flower detail.  I then gave it three coats of Testor's flat white paint and let it cure for 48 hours.  I "shabbied" it up a bit with some Testor's rust and some Barnwood acrylic paint, thinned with matte extender.  Next, I found an image of painted roses, scaled it down and printed out two copies on white tissue paper.  (I tape the tissue to a regular sheet of paper before sending it through the printer.)  After giving them a coat of ModPodge for paper and letting them dry, I carefully cut them out as closely as possible to the design and decoupaged them onto the sides of the watering can. I was really happy with the way the edges of the tissue paper almost disappeared. 

The book is a half-scale version of Onward and Upward in the Garden, by Katharine S. White, wife of E. B. White.  The little gloves and seed packets are also made from paper.

Finally, I crocheted a little gardening hat for the set.  You can find my pattern at the end of this post.  (Please note that I use U.S. terminology in my pattern.  If you're used to British crochet terms, you can click here for a translation guide.)  The hat is trimmed with two pink flowers and a bit of 2mm green ribbon. 

Then, because Alexandra likes roses (and I like making them), I decided to make her a climbing rose bush.  I had bought a half-scale planter box with trellis from Alpha Stamps a while ago because I liked it, but I really had no place for it, so it was sitting in my stash.  Aha!  The perfect use.  I knew I would need it one day.  😉  I put it together and painted it white, then made several pale pink roses.  This is my favorite rose tutorial:  http://blog.true2scale.com/2011/05/miniature-roses-tutorial.html  I used standard white printer paper, colored on both sides with watercolor pencils in pink, red, and a bit of yellow.  You use water to blend and soften the pencil, and this also gives the paper a bit of texture.  The instructions call for using quarter-inch hearts for 1:12 flowers; they would be 1/8 inch in half scale, but a tad smaller is even better.  I've been unable to find an affordable punch in stock that will cut hearts that small, but several years ago I picked up a shamrock punch at my local Daiso.  [Note:  I checked out my Daiso in early March, and they still had them in stock!  They are $1.50 apiece so definitely affordable.  I picked up a couple more.]  

I use the small shamrocks for geranium leaves.  The large shamrocks, cut into quarters, make hearts of just the right size for half-scale roses.  Cutting the shamrocks apart is a nice, Zen activity when binge-watching TV.  😊  It doesn't matter if the hearts you cut aren't perfectly identical. I think the variation makes a more realistic rose.

I used my Martha Stewart stars punch for the calyxes.  However, I only put them on the buds, not on fully-opened roses.  The leaves are dark green paper with a coat of satin varnish, punched with my PunchBunch mini tri-leaf punch (bottom two leaves only).  I made a few sets of five leaves attached to green thread that had been coated in hairspray and wrapped around a pencil to make a coil.  Snipping off 1/3" pieces of the coil gave me nice, curved "branches" for the leaves.

The planter box is deep, so I filled in the lower half with some scrap wood, then put in a layer of florist's clay.  It holds miniature flowers securely, but you can still change things out if you'd like to.  I finished that off with a bit of brown paint and a layer of dried coffee grounds for dirt.

I made an armature of floral wire threaded through the trellis, then added my roses and leaves.  I was going to fill in the rest of the planter box as well, but decided to leave that for Alexandra to make her own choices on what flowers she wanted, if any.

Finally, for the bathroom, I cross-stitched a little bathmat with rose detail, and added a small basket with towels, bath brush and some little pink bottles and jars.

Of course, the two bears I've bought from Alexandra wanted to get in on the fun and asked to pose with some of the items before I sent them off to her.  😉

I'll be doing another post on the art deco house soon.  I have all the ground floor lights working and am just finishing up the roof, so that I can start on the second floor.  Plus, I have some lovely pillows that were a gift from Sherrill that I want to show off.  😊

Hope you are all staying safe and healthy.  Here is my pattern for the half-scale garden hat.

Garden Hat Pattern

I use a .60 mm steel crochet hook and size 80 natural crochet thread.  Using a larger hook and thicker thread will, of course, make a larger hat.

Sc = single crochet

Sl st = slip stitch

Ch = chain

Dc = double crochet


Round 1: Make a magic ring, ch. 1, 5 sc into ring, sl st in beginning ch-1 to join: 6 sc.

Round 2:  Ch 1, sc into first st, 2 sc in remaining sc around, sl st in beginning ch-1 to join: 12 sc.

Round 3: Ch 1, sc into first st, sc in next sc, *2 sc in next sc, sc in next sc, repeat from * around, sl st in beginning ch-1 to join: 18 sc

Rounds 4-7: Ch 1, skip first sc, working only in back loops, sc in each sc around, sl st in beginning ch-1 to join: 18 sc.  Work fairly loosely on this part; if your stitches are too tight, you will have a very narrow crown.

Round 8: Ch 1, working only in front loops, sc in first sc, 2 sc in remaining sc around, sl st in beginning ch-1 to join: 36 sc.

Round 9: Ch 1, skip first sc, working only in back loops, sc in each sc around, sl st in beginning ch-1 to join: 36 sc.

Round 10: Ch 1, working only in back loops, sc into first st, sc in next sc, *2 sc in next sc, sc in next sc, repeat from * around, sl st in beginning ch-1 to join: 54 sc.

Round 12: Ch 1, skip first sc, working only in back loops, sc in each sc around, sl st in beginning ch-1 to join: 54 sc.  Fasten off and weave in ends.

Add hat band as desired.  I have used 2mm ribbon as well as perle cotton for hat bands.  Larger hats could take ¼" ribbon. 

Flowers (make 2):  Make a magic ring, *ch. 1, 1 dc, ch 1, sl st. into ring; repeat from * 4 more times.  Pull ring tight, tie off ends and weave into back of flower.  I glue the flowers onto the hat, then come up through their centers with yellow thread and make French knots to help secure them in place.  For my flowers, I use a .60 mm steel crochet hook and one strand of DMC embroidery floss.


Sunday, July 19, 2020

Curved Windows and Ceiling

Hope you’ve all been doing well.  I had a week of vacation the week before last.  You might not think that would be all that much fun, given that we couldn’t really go anywhere.  However, it was lovely not having to work.  I was able to spend time on my art deco house, sew two shirts, and plan the 65th birthday party for my better half.  For over 25 years, we have celebrated with a themed barbecue, which obviously wasn’t possible this year.  However, I was able to put together a treasure hunt that involved calling/texting/e-mailing our friends to get clues, a video retrospective of past barbecues that I showed during our Zoom party, and the return of Traffic Symbol Bingo from birthday 55.  All of this, including getting cake, candles, party hats and noisemakers to all our friends, was a complete surprise, which I think was fairly amazing given the fact that we are living on top of each other pretty much 24/7.  It definitely required some creative excuses for why the door to my craft room/office had to be closed for extended periods of time.  😁


Back to miniatures.  As you can see, the curved window is done, and it turned out to be much easier than I thought it would be.  Both the styrene and the wood strips I was already using for the other windows were so thin and flexible, I was able to use them for the curved window as well!  What was a little more difficult for the curved window was the frame.   For the sides of the frame, I used the same strip wood and railroad lumber I had used for the other windows.  However, they were definitely not flexible enough for the top and bottom.  For those, I used one of the disks I had purchased to make the floors.  I traced around it for the interior curve, and then drew a second curved line ~3/32” outside that.  Since I forgot to take pictures, I made a representational drawing.


I cut two of these very slender arcs from poster board.  I then cut narrow strips of poster board (again, about 3/32 of an inch wide), curled them by sliding them between my finger and the handle of a paintbrush (almost the way you would curl ribbon for a package), and glued them carefully along the inside and outside edges of both arcs.  I glued the frame’s side pieces to the bottom arc.  I placed the  window frame within the window opening and secured it with painter’s tape while it was drying to be sure I got the right shape.  When making the grids and gluing them to the window, I didn’t leave my template flat; I taped it around the curved section of the second floor.  That way, the grids and window were already being trained to curve, and the grids wouldn’t just pop off the instant I started bending the styrene.  When the glue was dry, I carefully fitted the window into the frame I had made.  Instead of leaving the top open, as I had with the other windows, I glued the second arced piece I had made over the top edge of the window.  Finally, I glued the whole assembly into the window slot and trimmed it, both inside and out, with casings made from painted poster board.  To my astonishment, it worked!  Unfortunately, I was so focused on whether it would turn out as planned that I neglected to take pictures.  I will try to do a better job of documenting the process when I do the curved window on the upper floor.


To finish things off, I curved a length of 18 gauge wire and glued the ends into some pre-drilled bits of wood using JB KwikWeld.  I painted my wood bits silver, then glued them to the outside of my interior window casings.  To this “curtain rod” I glued some white shantung silk that I had pleated using my Pretty Pleater.  (The top and bottom hems were finished using Stitch Witchery.)  You won’t see much of the drapes once the roof is on, but I think they add just a bit of elegance to that section of the room.


I still needed something for over the fireplace.  I had bought a lovely, beveled-edge, octagonal mirror, but it was so thick it looked totally out of scale.  *sigh*  I tested out other art work for the space and ultimately kind of fell in love with a painting by Sally Rockefeller.  She is a contemporary artist, so technically this painting wouldn’t have existed at the time of this house, but I loved the flapper woman and the palm trees.  The painting has a bit of the purple that is on the walls, but, more importantly, it has other colors that give the room some much-needed warmth.  It’s only on temporarily, in case I change my mind, but I’m really liking it so far.


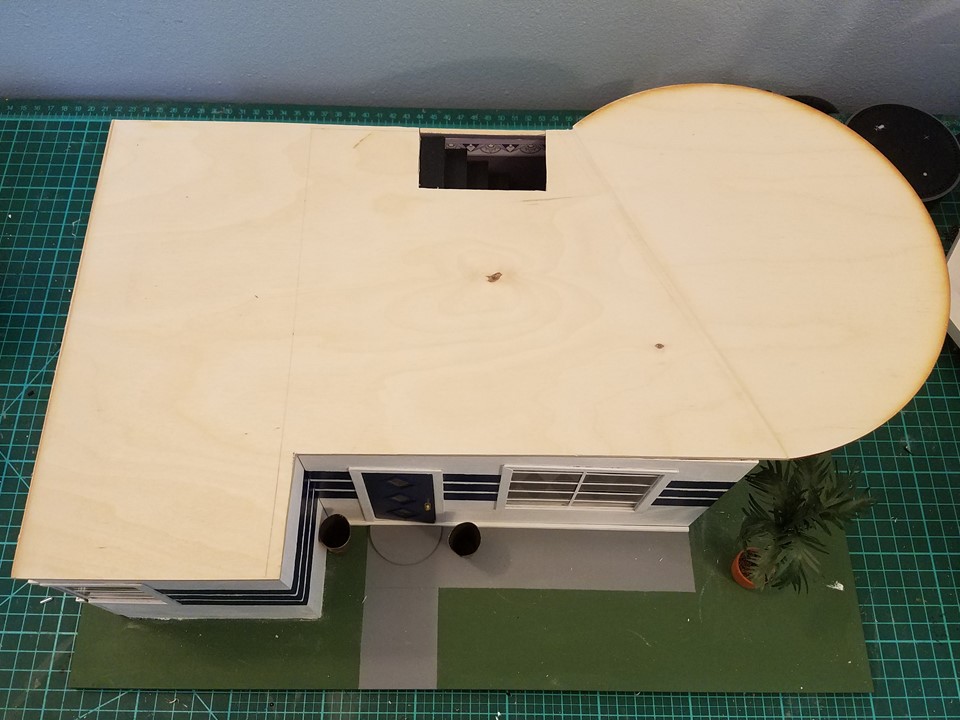
During my week off, I got brave and cut the roof/ceiling for the first floor.  I had originally planned for it to be ¼” thick, which is why I didn’t have it laser cut along with the rest of my pieces.  He has a limit for cutting thickness of 1/8 inch.  The biggest issue, though, was the lighting.  How was I going to cut channels for the wires when both the top and bottom of the kitchen/dining area were going to be open?  I pondered this a lot, and finally decided to cut my roof/ceiling from 1/8” plywood. I’ll cut my channels on the top, and then add another layer over it.  I was thinking mat board, because that would make the floor the exact thickness I would like, but I’m not sure how well it would hold up.  I may use wood veneer—not quite as thick as I would like, but would be essentially like wallpapering over a channel cut in a wall, and has the advantage of being actual wood.  

Anyway, I used my table saw to cut the plywood.  I had some 1/8” thick circles of the exact side I needed, but I needed to be able to attach them to the main part of the roof.  To simplify this process, I cut the joining edges of both on the same diagonal, then glued them together, puttied and sanded.  You can see the line in the photo, but it will be covered by the veneer, and I don’t think would have shown once painted anyway.  It works pretty well, I think. 


With the roof made (although not yet glued on), I could play around with dry-fitting my upper-story pieces.  That was a lot of fun.  😊  What do you think of think of the wallpaper for the bedroom?  I am thinking the bedroom floor will be a diamond pattern, similar to the first floor, but made of two tones of wood.  I’m hoping I’ll be able to get my Silhouette Cameo to cut the squares of veneer.  I’d go with a deep plum for the rug, to match the throw pillows on the bed.  The drapes would be the same very pale pink shantung silk used in the second set of pillows. 


And, yes, Jodi, just for you the little mock-up of where my railing pieces will go.  😉  I need to get a few more of those metal washers, as they are just the right size to hold the dowels.  If you’re wondering what that paper cut-out in the curved part of the bedroom is, it’s the footprint of the art deco desk I hope to make. 


I spent this weekend working on a chandelier for the dining room, but haven’t had much success.  Plus, there is something funky going on with the electrical strip, so I have to diagnose that and figure out how to fix it.  *sigh*  This is why I hate electrical so much.  😣

Hope you all have a wonderful week.  Thanks for stopping by!

Thursday, July 2, 2020

A Door, Some Windows and More


Happy July, everyone!  We continue to shelter in place, enjoying our back deck, Zooming with our friends, wearing masks and practicing safe social distancing.  I am grateful that I can work from home and that I’ve figured out how to balance work and my mini time, but I will be very glad when this is all over.

This update doesn’t have as much eye candy, because I am doing basic components—windows and doors.

To start with, I made the door.  I wanted to do a three-diamond door for some visual interest. (Inspiration here.) There are, of course, no doors like that for sale in half-scale, and I wanted windows, so I used my tried-and-true method of cutting multiple layers with my Silhouette Cameo II.  It can’t cut wood, but it can cut wood veneer.  So I used wood veneer (thanks, Carrie!) for the outer layers, and three layers of the chipboard the Cameo can cut for the core. 


The three layers of chipboard turned out to be the exact thickness of the clear styrene I wanted to use for the panes, so that worked out well.  You can see that the diamonds for the core are a bit bigger than the diamonds for the exterior layers, so that the exterior layers will hold the styrene in place.  I don’t have sophisticated software for designing, so I generally create my designs in PowerPoint, save the slide as a JPEG file, import it into my Silhouette software, and trace the image.  Works like a charm.  After painting, staining, and varnishing (as appropriate), I glued everything together.  The diamonds looked a bit unfinished, so I framed them out with some HO 1x4 lumber.  I built the doorframe from 1/8” x 1/32” strip wood and used this tutorial to make the hinges.  In retrospect, I could have gone with a bit thicker wire for the hinges, but they work OK.  Added some door hardware and framed it with 3/16” x 1/32” strip wood, and I had a door!  I’m really pleased with the way it turned out.


I used more 1/8” x 1/32” strip wood and more railroad lumber to create my windows, then framed them with 3/16” x 1/32” strip wood.  One edge was always left open to insert the styrene.  I used a thinner styrene for the windows than I had for the door because the windows’ slots were necessarily narrower, and I needed to accommodate the mullions.


I used the HO 1x4 lumber for my mullions and pre-painted them white.  Then I used the incredibly high-tech method of printing out templates for my windows, taping the styrene over the templates, and gluing the mullions on with tiny dots of glue along the edges.  It took a bit of trying to get the templates for the mullions to line up with the stripes I had painted.  (You can see where I had cut out one of the templates to test.) 


On my first attempt, I added two vertical mullions to the front windows.  After looking at it in place, I decided it made each of the individual panes too small and made the window look too conventional.  Unfortunately, I didn’t take a picture.  I just pulled it out, pulled off the mullions, and tried again.  I like the single centered mullion much better. 


I edged the side windows with additional strips of the HO lumber—one going right along the edge, and one going at a right angle to the styrene to cover the open side.  There is a slight gap where the two side windows meet.  I was going to use a thicker strip of wood along the left-hand window to cover that up, but it ended up looking too bulky.  I lost the “lightness” of the wrap-around window.  I guess I’ll live with the little gap.  😊


With the windows glued in place, the first floor is really starting to look finished. (Keep in mind that the "roof" and second floor are still the original foam core and not glued in place.)  Now, of course, I still have to do that curved window. I have an idea; we’ll see next time if it worked.  


Because I find making components a bit of a slog, I’ve also been working on more mini books.  I realized when I was looking at books for my art deco cabinet that some of Agatha Christie’s and Dorothy L. Sayers’ books are in the public domain now.  [An aside:  First of all, I am shocked that none of those books made the best-seller lists or “most significant” books list provided by UC Berkeley.  Seriously??  Our introduction to Lord Peter?  The debut of Hercule Poirot? Sacrilege, I tell you!  😉 Second, did you know that many more books, films and musical compositions are entering the public domain in the U.S. each year, now that the copyright extensions are finally expiring?  I always thought of the copyright extensions as “Mickey Mouse laws,” because I know Disney really wanted to extend its protection of Mickey; I had no idea the Gershwin Family Trust was also instrumental (forgive the pun) in getting these extensions passed.]  Anyway, I was able to get the .mobi files from Project Gutenberg and put them on my Kindle.  So now I have free books to read, and I have started writing summaries to use in my mini books.  The first book I did was Whose Body?, by Dorothy L. Sayers.  I like to set them up in both 1:24 and 1:12 scale while I’m at it.  Here you can see the comparison in size. 


The 1:12 book has a separate dust jacket; the 1:24 version does not, but I tried to simulate the look.  And, of course, my little homeowner now has the 1:24 scale version on her bedside table, ready for a little bedtime reading.


That’s all for now.  Hope every stays safe and healthy!  Thanks for stopping by!

Monday, June 15, 2020

A Teeny, Tiny Dining Room and More


Hello!  Hope you have all been doing well and staying healthy. I’ve been thoroughly enjoying the projects that many of you have been working on.  I am not quite as productive, but the art deco house is moving along steadily, if slowly.

My first little project was filling the refrigerator/icebox in the kitchen.  I couldn’t have a refrigerator that opened and not put something inside.  😊  So now it holds milk, butter, something wrapped in brown paper from the butcher, and some eggs and carrots that Effie brought from the Fairfield’s kitchen garden and hen house.  I couldn’t find milk bottles in half scale, so this is one of my 3-D printed wine bottles, with the neck mostly cut off and a bead glued on top.  Painted, it doesn’t look too bad.  Now my little resident will have fresh food on hand.
Next, I started work on the dining room.  This is another small room, but it holds what I need, even if it is a smidge crowded.  

The drinks cart has been updated with lots of lovely new glassware.  

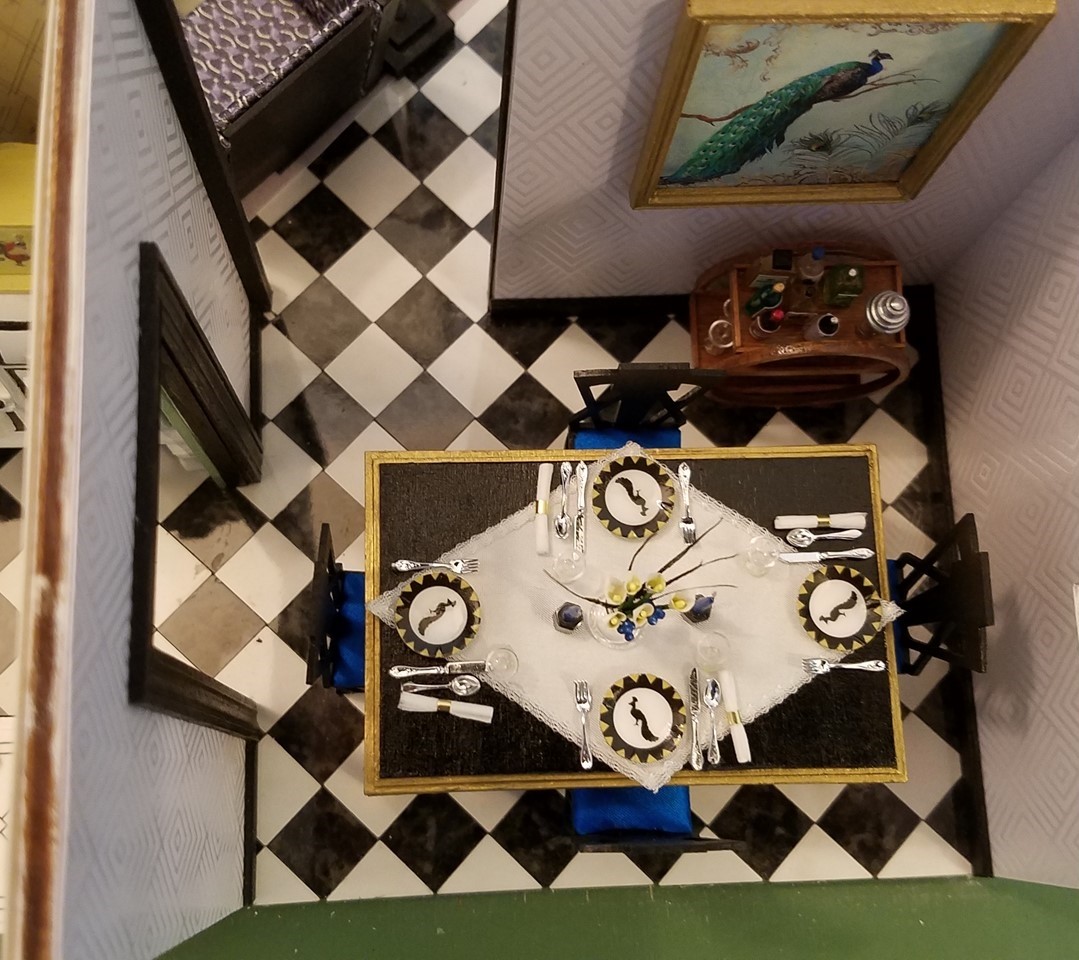
I still need an ice bucket for the bottom shelf, but haven’t found one yet (or rather, I haven’t found the perfect little bottle cap to repurpose as an ice bucket).  My original plan was to make the room black, white and gold, with light gray silk on the chair cushions, but the thought of another gray and black room was a little depressing.  I looked through my stash and found a swatch of some gorgeous blue silk charmeuse from Mood.  Then, looking on the Internet for some wall ideas, I saw peacocks.  The idea for a peacock-inspired dining room was born.  I know that peacocks are more art nouveau than art deco, but my little home-owner is fine with mixing styles. 
I started with the walls.  After spending way too much time trying different wallpaper designs, I ended up using the same white scrapbook paper I used on some of the walls in the living room.  It’s such a tiny room that anything too colorful or busy would just be a distraction. Plus, I plan on making a rug with a peacock feather design and a base color that matches the chair cushions.  That will be colorful enough.  The scrapbook paper does have a nice art deco design embossed in it, but it is subtle.  There is no room for a hinged door between the kitchen and dining room, and I am not as talented as Brae at making pocket doors.  I may hang a curtain of beads in the doorway, or I may add a little hardware to make it look like there’s a pocket door there.  It’s all smoke and mirrors anyway.  😉


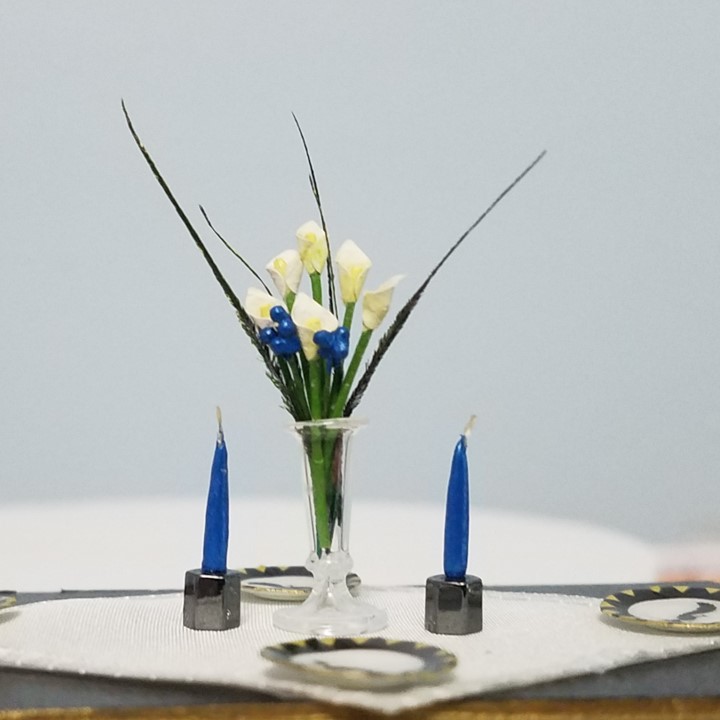
The table and chairs are from Red Cottage Miniatures, and, as usual, went together with ease.  The chairs are black with that lovely blue satin used for the cushions.  I couldn’t stand the thought of covering up that beautiful table with a table cloth, so I came up with the idea of a diamond-shaped runner.  It is made from some bits of left-over white silk (two layers, because it is thin), and some fairy lace.  I plan on having short-stands of “crystals” hanging from each point, but the beads I have ordered have not yet arrived.  I designed the plates to look as though they are part of the same set used on the breakfast tray in the bedroom, but have added a peacock silhouette to the center of each plate.  The napkin rings are crimp beads.  The candles are made from thread and polymer clay, painted with some blue metallic paint I had; their holders are just beads.  All glassware by Linden Swiss from the Virtual Dollhouse; the lovely flatware is from My Favorite Dollhouse.

The centerpiece is calla lilies and spikes of real peacock feathers (inspiration photo).  

The calla lilies were super easy to make—just dip the tip of some green floral wire in yellow paint, let dry, and wrap an upside-down heart around it.  I used tissue paper painted warm white on both sides and a punch that I had picked up from Daiso to make the hearts. 

I did use a tiny bit of yellow and green pastels around the base of each flower, and shaped them a little on my craft foam with my ball tools.  I would dearly love to have used actual tiny peacock feathers in the centerpiece, but I was unable to find any in half-scale, and didn’t want to try making my own; the peacock spikes will have to do, and I do like the way they look.  I added a peacock painting to the wall, and the room is essentially done.  


As I was working on the dining room, I thought of how beautifully the Fiesta Ware had popped in my glass-fronted cabinet in the kitchen.  Then I realized (duh) that it was up against a creamy white background.  I took my lovely art deco cabinet from the living room, gently and carefully pried off the front piece (whew! no damage at all!), and painted the inside back the same white I had used on the kitchen cabinets.  While the front was off, I took the time to fill it.  I already had my black “ceramic” panther, but I really wanted to make some books for it.  No dollhouse is complete without a few books for the occupant to enjoy!  With the help of UC Berkeley’s “Books of the Century” to pick some period-appropriate reading material and Facsimile Dust Jackets, which provides dust jacket art by both title and year, I was able to make up a nice selection of 1920’s books.  


The only things I changed were the spines, to ensure that the titles would be readable, even when the books were on the shelves.  Then I use two N-scale swimming figures, some matboard, cardstock, and bronze paint to make my little art deco bookends.  

I am extremely happy with how they turned out.  I have included an original swimmer in my picture.  (I have no idea what he is supposed to be doing.  Maybe lolling in an inner tube?)  From cheap plastic to upscale bookends, with just a bit of paint.  😊  They make up a nice row on the center shelf of the cabinet.  I added a couple of bead “vases” and a bronze and gold elephant (a Peruvian ceramic bead I painted), and glued the cabinet front back on.  This time I put the door pulls at the top, where they belong—another benefit of having redone the cabinet.  🙄  See how much easier it is to see inside now?

Here is a top-down shot of the first floor.  

I’m still pondering the living room rug; one reader suggested including a bronzy green.  I love that idea, but don’t have anything like it in my stash (*sigh*).  I still have plants to make and doors and windows to do, and I am planning a ceiling fixture for the dining room.  Then it will be time to put the roof/ceiling on and start on the second floor!