

I meant to get this out on Thursday, but life got in the way, so now it's a "Flashback Friday" post. 😊
My
final build before the Sagamore Hill library was Jane Harrop's Camping Coach Kit. Apparently, some railroad cars in the U.K. have
been converted into static accommodations that people can rent as holiday
cabins. Jane has put together a
beautiful kit that comes in both 1:24 and 1:48 scale. It comes with everything, including the kits
for all the bathroom and kitchen fixtures, as well as pages and pages of
instructions with pictures. It is very
well made and went together beautifully.
I,
however, couldn't quite leave it as she designed it. We love trains, and I really wanted to turn
it into a true train car, and a luxury train car at that. I based my
build on the Orient Express, even though the real thing would obviously have
separate dining and kitchen cars.
The
first thing I changed was the compartment configuration. The kit is designed to have two seating
compartments, each with two benches facing each other. I guess these convert to beds at night, or
you just sleep on the benches?

I
really wanted my train to have a day and a night compartment, but that obviously
wasn't going to work with the original door and window configuration. The bed would have almost completely blocked the door!

So
I re-cut the walls using my Silhouette Cameo. It won't cut through wood, so I created each of my walls from a layer of chipboard sandwiched between two layers of wood scrapbook
paper. I used Jane's exact window and
door dimensions, so that the windows and doors she provided would fit. (I know, in the picture below, my window
looks smaller, but it isn't.)

Then
I set about decorating my compartments.
The wood used in the kits was not the best and didn't particularly take
stain well. The woodwork in the real
Orient Express is stunning and has lots of elegant inlays. I ended up printing out wood "paneling,"
with some of the OE's inlays, and decoupaging it onto the walls. I liked the "well polished" look
the decoupage gave the wood.


For
the carpet, I experimented with both printing on velvet paper and embossing
velvet paper with my Cameo. I ended up
going with the embossed version, as some of my little accessories (like my OE
slippers) were hard to see on the printed carpet. I used beige carpet in the passenger compartments, and burgundy carpet in the corridors and in the dining area.
Below
is a real-life OE "day" compartment.

I
used neckties for my upholstery and was able to find some great lace to use for
my antimacassars. The picture below is a test run, as you can tell from the wall
and the carpet.

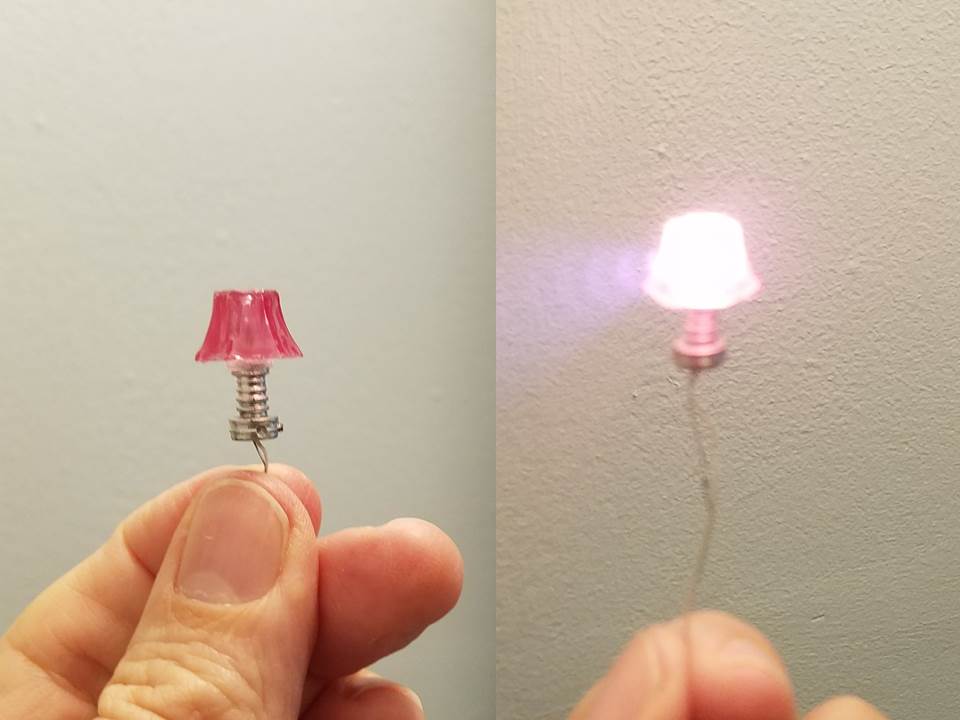
To
recreate the pink-shaded lamps, I took some small, clear lamps I had purchased
from Alpha Stamps, painted the bases silver with Testor's, and used pink
Gallery Glass on the shades.
I
added a hassock, a knitting bag, a book (Agatha Christie's 4:50 from Paddington), and a few travel magazines.

I
also added a coat and shoes (that my traveler slipped off before putting her
feet up on the hassock). The shoes are
made from Origami paper.

In
the night compartment, I ironed beige twill fabric onto freezer paper so I
could print the Venice Simpleon Orient Express logo on it, then added some
ribbon in an attempt to create their signature blankets.


Then
I added a ladder, some complimentary slippers, a nightgown and, of course, Murder on the Orient Express for
nighttime reading.

And
what elegant lady would travel without her train case? This one is made from painted cardstock, with
latches "borrowed" from the Jane Harrop luggage kits (sold separately
from the train kit, but located on the same page as the camping coach kits).

Here
you can see both compartments from above. One of Jane's suitcases is on the luggage rack.

The
kitchen and dining area were fun to do. All
of the appliances came with the kit. I
painted them silver in an effort to give them a high-end, stainless steel
appearance.

The
table was so narrow, I had to stagger the place settings, but I think that's
OK.
The plates are the Etoile du Nord pattern, produced by Villeroy Boch for the Etoile du Nord dining car on the Orient Express. (You'll need to scroll down a bit in the link.) The napkin rings are crimp beads. The champagne bucket is the metal mini I painted and supplemented with miniature plastic "ice." The fire extinguisher is also a painted metal mini. All of the food, except the dinner rolls, was purchased.

To
make the bathroom a bit more elegant, I printed marble tile for the floor and
walls, and painted the fixtures a glossy black.
Again, all the kits for the fixtures (with the exception of the towel
bar and toilet paper holder) came with the main kit.


The
only thing I needed to change on the fixtures was the toilet seat, which seemed
way too narrow to me. I ended up
replacing this one with a chipboard one cut with my Cameo. You can see the new seat in the picture below.

I also added some toiletries and a basket of towels to my sink.

All
of the lighting was affixed to the final wall before I glued it on and connects to battery-operated
switches located under the train carriage.


A
view from the corridor side:

One portion of the roof is glued on. The other is removable, to make it easier to see inside. I really wanted a tin ceiling for my train car, so I once again used my Cameo to emboss sheets of stick-on metal. They call them stippling sheets because the Cameo isn't technically designed to emboss. However, I found that I could use the embossing tool for the Curio, and tell my Cameo it was using the drawing pen. I think it did a great job of embossing!


The kit is designed for the car to be up on blocks. However, the hobby section of our local hardware store gave us an old G-scale freight car! I removed the car portion and fixed my build to the top.

This did require some reworking of the stairs, since they were designed to fit with a much lower car. In real life, the track would generally be sunk down below the pedestrian level of the station, but that was not a possibility for me. I used what I could from the kit, and cut strip wood to add height to the stairs.

The latticework was designed to go along the entire bottom of the train. I made a section of it as a stand-alone structure, both to hold the signs (which came with the kit) and to help obscure the batteries for the lighting.

Here is a top down look at the nearly-completed train car.

And here is the completed train car living on our mantel. The wood bench also comes with the kit, and we have added a Phoenix Models "Bygone Age" ice cream cart, along with some lamp posts and a popcorn stand made from pencil sharpeners.

At Christmas time, it got all dressed up. 🎅 😊

And that's it. You're up to date. Thank you so much for following along as I strolled down memory lane on all my previous builds. Hope to soon have a post on the next project I'd like to do.
Enjoy your weekends! Hope you all get a lot of mini time!
Well, that’s a fun project and I love what you’ve done with it. Train travel has fascinated me ever since my grandmother took my brother and me on a trip from Los Angeles to the San Diego zoo. We flew there in (I think) a DC-3 and returned by train. I was 4 and my brother 5. I have also taken a couple long trips, the one across Canada in a sleeper car. We are hoping to do another trip soon.
ReplyDeleteThanks for describing how you used your Silhouette Cameo. I’ve been thinking about getting a cutting machine and see that Silhouette is about to release a new, more powerful model.
Thank you! Trans-Canada by rail is on our bucket list! Did you do a pre-packaged trip or just go on your own? We have been looking at the one that Road Scholar does. And funnily enough, we're taking the train to San Diego later this month! We love the train.
DeleteWe did our own trip because we had several objectives. I would think Road Scholar would give you a great experience. We went as far east as Quebec City, then got the sleeper car in Toronto. We were concerned we would miss some scenery while we were asleep. Nope! Those plains provinces are pretty flat and pretty empty. But there was a serenity about it and the train itself was pleasant. One bonus was that in Vancouver, BC we transferred from ViaRail to Amtrak, then when we got to Eugene, we walked home!
DeleteI just love this train! Once again you have come up with brilliant ways to recreate the life sized versions and get the detailing down to a perfect half scale replica! Your use of the Cameo was inspired, both with cutting the walls and with embossing the tin! I love your work around, fibbing to the machine!
ReplyDeleteThe accessories that you made and improved just tickle me - what you are able to accomplish so well in this scale is inspiring! You've truly recreated a luxury experience, even for folks who are only 2-1/2" tall! Awesome Deb!
Thank you so much! You know what they say about necessity being the mother of invention. 😊 It was a fun project.
DeleteIt's so beautiful. I love all the details!
ReplyDeleteI didn't even see this until today so does that make it Slowpoke Saturday?
Ha ha! I posted it late on Friday, so it probably should have been a Slowpoke Saturday post. Thank you!
DeleteI haven't ridden a train since I was a little girl in the early 60's. Every summer, my family and I would travel from Vancouver, Canada to Seattle, Washington for an extended visit with my Great Grandmother. Back then, the trains were a ["cheap"] and relaxing mode of transportation for large families, and I found it incredibly EXCITING to arrive at the station with my little brothers and sisters in tow anticipating that thick, distinctive TRAIN SMELL of diesel and hot metal which hung around the platform.
ReplyDeleteAnd although my experience is very limited and can't be compared with The Orient Express; passenger trains will always be linked to my childhood memories of summers at grandma's house.
That being said, after seeing your Customized Coach, I feel as if I've been transported backwards in time once again.
I've only seen the Albert Finney movie version of Murder on the Orient Express and it was full of wealth and privilege. Your half scale version appears to have captured ALL the Romance of being on that Long Distance Luxury Train with all of the comforts of home including a private bath and with its own kitchenette too!
The overhead luggage rack with travel tagged suitcase, monogramed blankets, custom china on a pristine table cloth, tiny table lamps, AMAZING Tin Ceiling, and the Gorgeous exterior painting details of the coach; are Absolutely SUPERB!
You have managed to infuse your stationary coach with a distinct sense of latent energy and pending motion, so all that's lacking are those sudden blasts of hot steam hissing out from the undercarriage and the sound of the station master on the platform shouting "ALL ABOARD! "
Here's my ticket, Deborah! :D
Thank you so much for all your kind comments. I still love taking the train. A couple of years ago, we took the train from Seattle to Vancouver--it was a lovely ride. Amtrak isn't quite as luxurious as the Orient Express, but there's still something about train stations and boarding that train. When we go up to Seattle, we get on the train at 10:00 p.m. Our room is already made up, and we go to the lounge car for a nightcap. So much more civilized than a plane. 😉 I tried to put a little of that feeling into my train car, and you're welcome aboard any time.
DeleteWhat a wonderful OR rail car. The wood paneling is oh so rich and sumptuous, everything so luxurious - right down to that fabulous monogrammed bedding. Who would have thought twill would work so well for bedding? Well you did, clearly :-)
ReplyDeleteAnna x
Thank you! It's all about the illusion. I can't use fleece in half scale, but the twill is just thick enough to look blanket-like.
DeletePrecioso, un trabajo maravilloso. Me encanta todos los detalles, Mucho tiempo invertido pero ha merecido la pena, un trabajo impecable. Un abrazo, Arantza.
ReplyDeleteMuchas gracias por sus amables palabras, y gracias por pasar por aquí. Me divertí mucho trabajando en ello.
Delete