

It’s been a very long time since I posted, but there have been some big life changes in the intervening months. I’ve retired and relocated!
During a visit to my mother in Arizona last fall, we got the opportunity to move near her, which was something we had wanted to do. The opportunity came up a little bit sooner than we had originally anticipated, but the timing was so good in so many respects, it felt like kismet, so we went with it. The house needed renovation, so during the fall and winter we were trying to supervise the work from a distance. Fortunately, Mom was our eyes on the ground and sent us weekly pictures of the progress.
I retired at the beginning of February. My company (a large corporation in northern California) had a hiring freeze, and even though I gave two months’ notice, my manager was not allowed to hire a replacement for me. This meant I had to try to train several people to do parts of my job as a stopgap. I was also writing up all the various aspects of my job, in case they are able to hire someone down the line. When I came on board over 20 years ago, my predecessor had been gone for several weeks, which left me trying to figure out everything on my own. I did not want to put anyone else in that position. Getting ready to retire was an enormous job and left me pretty exhausted at the end of each day. (And don’t even get me started on the number of calls I had to make post-retirement to straighten out pension and health insurance!)
Then it was time to get the house ready to sell. Apparently, things have changed greatly since we bought it over 30 years ago. Now, houses have to look as though they are showrooms with no occupants—no rugs, no window treatments, no books, no knick-knacks, no TVs, no microwave or kitchen appliances. We were downsizing as much as possible (we still should have done more) and packing and storing things in the garage, as well as cleaning (scrubbing the grout back to white on the bathroom floors!), doing touch-up painting, and arranging for minor repairs. Oddly, the only “personal” item our real estate agent allowed (actually, requested) in the house was the Merrimack dollhouse. We had to move into an Airbnb for a week while the house was being shown. Fortunately, we got several excellent offers, and the sale closed quickly. Once we were back in our house, we had to get ready to move. We had the movers pack most of our things, but I had to pack all my dollhouses and minis. People keep asking me how I like retirement, and I tell them I have no idea, because I feel like I’ve worked harder in the past few months than I have in years! 😊
The trip down here included an overnight in a motel with our cat, Penelope. I was very glad that the beds were set up so that she couldn’t go underneath them. She traveled in a special tunnel carrier in the back seat of our car; it was large enough to allow a small litter box and food, and she seemed quite comfortable. In any event, she was incredibly well-behaved and mellow for the whole trip, for which I was truly thankful.
We’ve now been in our new place a little over three weeks and are finally getting settled in. I absolutely love my new craft room/office. It’s very similar to the one I had in Berkeley, but without the large closet. To maximize storage, I got two white bookshelves from Amazon and several decorative storage boxes from Michael’s (and this one) and Joann’s, as well as a storage cabinet from Home Depot, and I am very, very pleased with how it turned out. I can even display most of my miniature homes and room boxes.


And
now, on to miniatures! You may remember from my last post (if you can cast your minds back that far) that I had been challenged to make a hooded sweatshirt for the
little marine gift shop. It took a few tries,
but in the end I was pleased with the result.
I started with a Barbie-sized pattern I found online and scaled down. I chose to make it a pullover style, so I used the back pattern for both the back and the front. The first material I tried was from an old T-shirt of mine. It was an exercise shirt and was made from a relatively thick knit with some Lycra in it. I used some 1/8" grosgrain ribbon for the "ribbing." I didn't finish this one, as I was not super happy with the sleeves. I know that on doll clothing the sleeves often stick out until the clothing is on the doll, but I'm not a fan of that look when clothes will be on display.

For my second try, I used some royal blue t-shirt fabric from a remnant I had purchased. This closely matched the ribbon I had, but the fabric was lighter and didn't have quite the nice heft of the light blue fabric. I also adjusted the cap of the sleeve to make it a little higher and tried gluing it to the sweatshirt body the way I normally do when making half-scale clothing. This caused some difficulty until I inserted one of my dressmaker's forms into the sweatshirt body, thus opening up the armhole and making gluing much easier. However, by the time I thought to do that, I had made kind of a mess of the sleeves. (I didn't even bother taking a picture.)
Now having a decent plan for how I would make the sweatshirt, I tried working on the logo. I have printable transfers for both light and dark fabric. First I tried the dark fabric transfers on the royal blue fabric. When I used the Sunken Treasure logo, whether blue on white or white on blue, it became pretty well indecipherable once I ironed it on. I decided to try the bookstore logo, as I figured that might be easier to see/read. You can see the dark fabric transfers on the dark blue fabric (one ironed for a shorter period of time) and the light blue fabric. Finally, I tried the light fabric transfer, with the bookstore logo, on the light blue fabric. That was my favorite.
Since the light blue fabric felt more like a sweatshirt anyway, I decided to go with that, even though it meant my grosgrain ribbon didn't match. The sweatshirt would just have to have contrasting ribbing. I thought the sweatshirt, with the light blue fabric and the altered sleeve design, was not too bad, so I finished up the bottom ribbing and hood, and put it in the display window. The hood cord is some dark blue flower thread I had on hand.

It's
displayed on a form in the right-hand window.
The beach ball is a painted wooden bead, you've seen the little octopus
and fish before, and the pail is just printed paper. The little shovel, though, is my
favorite. I was trying to think of how
to make one when I remembered I'd purchased an HO-scale coal stove
set
when I was making the Sagamore Hill library.
I needed a tiny coal hod to paint copper and put on the mantel, to
represent the miniature copper coal hod Roosevelt received in gratitude for his
intervention in the coal miners' strike settlement of 1902. I put the remaining pieces of the set in my
stash, and it turns out the HO scale coal shovel made a perfect half-scale sand
shovel. 😊 Some bright
yellow paint, and it was added to my window display.

Next
it was on to the museum side of Sunken Treasure. The display counter is made from some cherry
wood with a mahogany stain and shellac finish.
The stencil was cut from vinyl with my Cameo Silhouette and was based on
a simplified version of the Sunken Treasure logo. The ships on top are a couple of soft metal
ships from the VirtualDollhouse, a couple of charms from a bracelet that used
to belong to my mother, and a charm off a very cheap San Francisco charm bracelet
I have. All were primed with white spray
paint, then painted. It's very hard to
find model ships in half scale, but I thought these gave me a decent
representation of ships/boats from different eras and areas of the world. Each ship has a small printed description
backed with some gold foil. The foil is
supposed to be self-adhesive, but it's not adhering very well. That will need to be fixed.

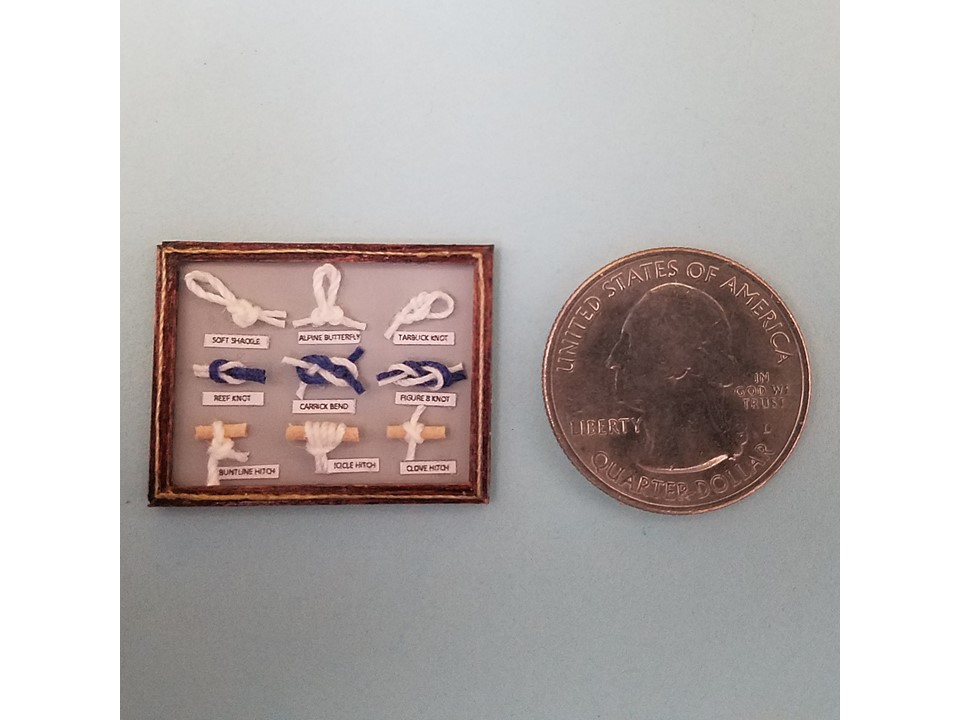
For the wall, I had the diving helmet I had already made, an anchor and sextant I purchased from the VirtualDollhouse, as well as a model ship's wheel that is really a charm. I knew I also wanted a display of nautical knots. Using my jeweler's draw plate, I pared down a dowel to get pieces of wood small enough to use in the display. Using a small dowel or even a toothpick would have been the half-scale equivalent of using a chair leg! Then I experimented with "rope." Size 10 crochet cotton was a bit too thick. I liked Coats & Clark's size 20 crochet cotton, but it is only available in white or natural. Unfortunately, DMC's size 20 crochet cotton was just a bit thinner, and I didn't like it as much. I tried my white thread with some Coats & Clark light blue that had lost its label; it was likely size 10, because it is too thick for my white. I then tried some DMC size 8 perle cotton. It wasn't bad, but the only colors I had on hand were green, black, natural and brown, and they didn't look very nautical to me. I finally ended up using some India ink markers to "dye" a length of my size 20 cotton a nice royal blue. Using my Know your Knots book, as well as some rope tying tutorials I found online, I made a variety of knots. A few of them also required tweezers, a tapestry needle and some magic words to complete. I did my best to show the interweaving of the rope, but I realize some are a little difficult to see. Rest assured, however, that they are properly tied. I painted some card stock gray for the background and made a frame from some mahogany-stained cherry wood and a bit of gold thread, then added tiny labels.
To round out my wall, I added some maps and a nice cut-away picture of a whaler, as well as making a life preserver from some card stock, red electrical tape and crochet cotton.

On the shop side, I made a “glass” display case from mahogany-stained cherry wood and some clear acrylic. In it, I have a shell collection that is a painted metal mini, a painted metal mermaid, jewelry made from extra tiny sea glass from Timber Ridge Studios, a model diving helmet (actually the ¼-scale diver’s helmet from Stewart Dollhouse Creations), my seagull and shell display on driftwood, and some mugs (I need more of those!). The cash register is 3-D printed from Mini Etchers. Unfortunately, I can’t provide a link right now because the store is under new ownership, and she is just starting to relist items.


And, of course, I had to make a souvenir museum guide for $1.00 (with some help from Wikipedia). (The pages below are out of order, but will be in order once I've double-sided printed, cut and folded them.)

Behind
the display counter, I hung my cross-stitched ship and lighthouse, as well as
some of the tiny paintings I’ve purchased.


On the other table, I have the folded t-shirts and an extra “Under the Sea” purse.

At this point, I don’t think there’s much more I can shoehorn into this place, so it’s on to the lighthouse! Lucky I have a wonderful new craft room and (finally!) the time to work on it. 😊
Hello Stranger. You were missed. So happy to see your posts.
ReplyDeleteIt is great to see you back, I was wondering what you’ve been up to. Congratulations on your retirement and relocation to Arizona! I happen to be in Arizona as I type this. I’m excited to see your adventures in half scale again. Enjoy!
ReplyDeleteIt's wonderful to see you working again! So many changes. Moves take so much time. I hope you enjoy your new home.
ReplyDeleteSomehow I'm anonymous. Take care, Debora in NorCal
ReplyDeleteOh wow, you have been busy! I am so glad to hear everything went well woth buying a home, selling a home and moving. Because often it doesn’t! And how lovely to be near your mom. Great work on all those cute souvenirs. Youreally do think of everything! Take are and hope to see you posting again soon!
ReplyDeleteWhat a treat it was to see that you had posted! And then, to have the post packed with such awesome news! Congrats on the retirement and move, and I hope that soon you'll be totally settled and be able to indulge in all of the things you love!
ReplyDeleteThe shop is just marvelous, and the ingenious ways in which you've made the displays is inspiring! Have fun with the lighthouse - I can't wait to see it and hope you'll be back soon with progress to share!
Congrats on your retirement and move Deb.. how wonderful to have all your time to yourself AND be close to your Mum ☺️.. Your pullover is adorable! You really nail the half scale clothing items everytime you make them. I have some lovely teeny shops I can send you if your interested 😁.. DM me on Insta if you are interested .. I can send you some pics. 😁
ReplyDeleteShips not shops 😂
Delete