It’s been a long time since I posted. Sheltering in place has really upended my
schedule. It seems to take more time and
effort now to make sure that I maintain “face-to-face” contact with friends and
co-workers. Every Saturday, we host a
Zoom party, where we play games and take virtual “trips” with our friends. For anyone who enjoys escape rooms, I
strongly recommend the Palace
of Destiny from Palace Games. It’s
free, but, if you are able, a donation would be nice. We’ve been playing it together as a team, and
there are times we need every brain we can get! I also spent several Sundays, early on, making
face masks. All of this was further complicated
by the fact that I have a hereditary problem with my thumb joints, which was
exacerbated by a less-than-optimal set-up for working from home. A
set-up that works for the occasional day of working remotely does not
necessarily work as well over weeks or months.
I have done some tinkering with my set-up, and it is now much more ergonomic,
and my thumbs are feeling much better. We’ve
also been told we will likely be working from home for the rest of the year, so
it’s time I got back in the groove!
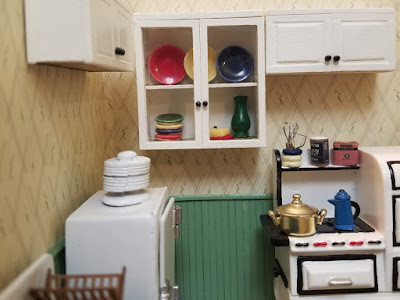
The walls have been papered with a vintage wallpaper from Bradbury & Bradbury. I wanted beadboard on the bottom half of the walls, but the miniature beadboard I had was so thick, I was afraid it would take up too much space, which was already at a premium. To solve the problem, I printed out a beadboard pattern on paper (to ensure that I could keep things straight and to try to maintain even spacing), then glued HO-scale 1x6 lumber strips directly onto it.
I’m
not sure how well you can see the difference between the standard mini beadboard
on the left and my home-made beadboard on the right, but mine is much, much
thinner! The top and bottom were trimmed
with more HO lumber. (The color, by the
way, is Wedgewood Green, lightened with a bit of white. I honestly don’t know why greens always show
up so minty in all my pictures.)
The
refrigerator was a find on eBay. It was
a metal kit in not very good condition. The
metal was extremely uneven. It took a
lot of filing, as well as some Green
Stuff to smooth it out. Here you can
see it partway through the filing process. In addition,
the body was made in two parts—one designed to fit inside the other. More lumpiness inside the exterior portion
had to be filed down so that the interior piece could be glued in straight and
even. You can see the angle it was at
originally. The door, which I didn’t
photograph, was unaccountably painted brown.
After
filing, gluing, filling in the gaps with more Green Stuff, and giving it a
couple of coats of gloss white spray paint, it doesn’t look too bad.
The door still opens, and I intend to put some food items
inside—maybe some milk, eggs and butter.
The stove is an Acme magnet. This is not the exact magnet I got; mine was
missing the cat, but it had the platform underneath and the yellowing around
the joints.
I was able to pry the front two feet off cleanly, but the
back two suffered a bit of damage when I removed the platform. I filled in the missing bits with yet more
Green Stuff, then covered the stove area and gave the entire thing a coat of
gloss white spray paint. I then had to
repaint the black and silver parts. I
don’t have the steadiest hand, but it doesn’t look too bad in person.
The sink is from a kit by Red
Cottage Miniatures. The original
sink I had purchased was too large for the space, but the Red Cottage sink fits
perfectly. The base is painted the same
green as the beadboard. The faucet is
simply wire with some small beads for the handles. I was able to bend the wires at crisp right
angles by using a pliers set I got
from Micro Mark. The drain pipe is a
large paperclip, and the little dish drainer (as well as the clock and the breadbox) are also from a Red Cottage
Miniatures kit.
The small worktable I covered in a previous post. It’s unfortunate that it has to face in, so
that you can’t see the drawers and door, but at least you can see the enamel
top.
There isn’t much room for cupboards, but I put in what I
could. They are made from strip wood and
some thin styrene for the glass. The
kitchen needed a bit more color, so I used the glass-front cupboard to showcase
some “Fiesta Ware” plates I had. (Unfortunately,
I broke the green dinner plate.) I added
a metal vase and a 3-D printed butter dish, painted to match. (The yellow bowl and red-and-white "enamel" saucepan were also 3-D printed.)
Because the cabinets are a bit high, there is a working
stepladder tucked behind the refrigerator.
And that’s the tiny kitchen!
Effie came over from the Fairfield to try it out for
me. She said it was the most efficient
kitchen she’d ever worked in—no more than two steps in any direction to get where
she needed to go. And she was pretty
much guaranteed to be the only cook in the kitchen!
I'll try not to take so long before my next post. I'm already excited to start work on the dining room.
Hope everyone is staying safe, healthy, and (relatively) sane. I'm looking forward to catching up on all the posts I've missed!


