

Roosevelt's
desk chair is a wonderful chair. Forgive
the black and white photo, but it was the clearest picture I could find of it.
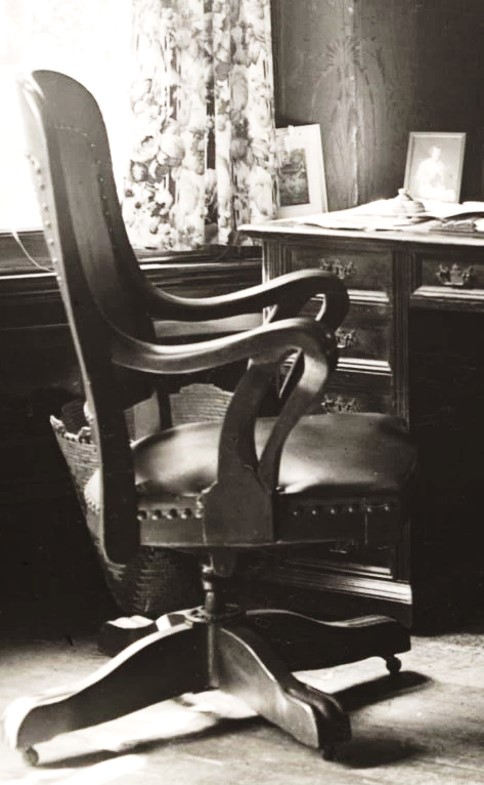
The
obvious challenge on this one is its beautiful arms. I started by using Word's "remove
background" feature to remove all of the picture except for the arm in the
foreground. I then set the picture color
to the heaviest "black and white" color setting I could to turn it
into a solid black image and sized it to fit my chair back.

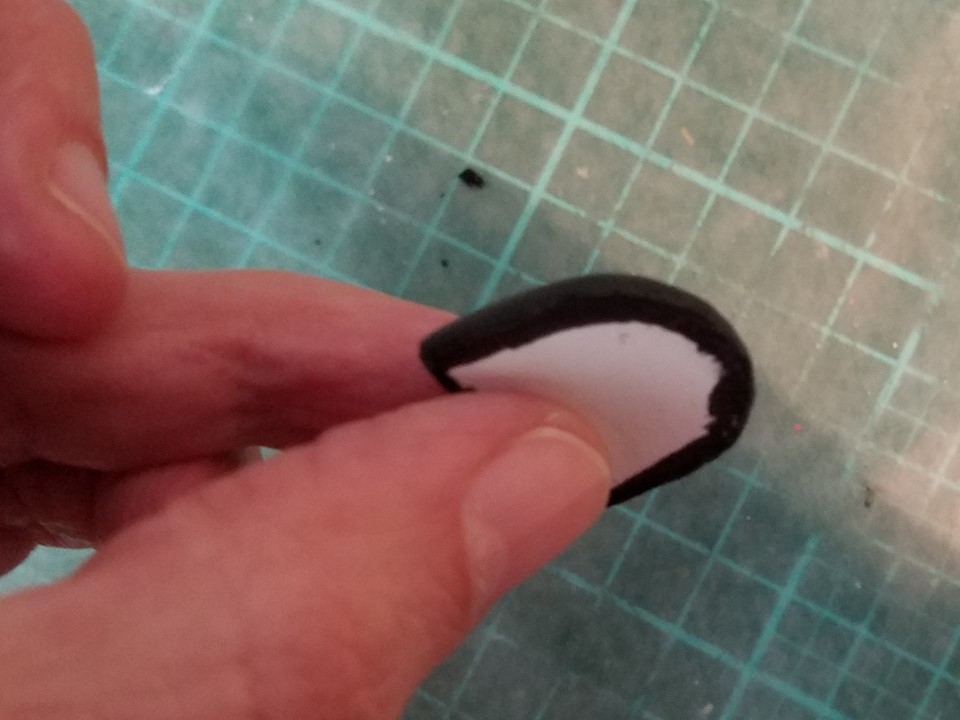
I
had the delightful delusion that I would just cut out the back as one piece. Ha! Failing that, I was going to cut the arms
separately from 1/16" bass wood. Ha!,
again. Below you can see my efforts. The arms are so small and fiddly, and my
skill with a utility knife so lacking, that this was completely
non-workable. The same with my efforts
(on the left) to try to reconstruct the arms out of strip wood.

If
I had a laser cutter, I could probably have done it, but they are too expensive
and would take up too much room in my workspace. What I finally ended up doing for the arms
and the "spokes" of the base was to cut them using my Cameo Silhouette. Since it can't handle bass wood like this, I cut
each piece from two layers of the thin chipboard it likes and two layers of
wood scrapbook paper, then sandwiched them all together with tacky glue and
skim coated the edges with stainable wood putty. When the putty was dry, I sanded to get it as
smooth as possible. This made for some
surprisingly sturdy pieces about the thickness of my original bass wood.


I
did cut the back and seat from bass wood.
The back was soaked in boiling water before being shaped around a glue
stick. The top of the seat was cut from
mat board. I put one layer of batting
on, then glued some fabulous lightweight stretch black vinyl from Joann's around
the edges and trimmed it flush with the bottom of the mat board. I finished with some black marker around the bottom
edge of the mat board, to ensure a unified look. I used the same vinyl on the seat back.
To
make the base, I aligned my legs on the star pattern I had created and glued
them to a piece of pared-down dowel left over from the Windsor chair. That was by far the trickiest part, as the
legs wanted to move around as I was trying to attach them. Although it doesn't look like it from the
picture, that piece of dowel is a nice, tight fit within the piece of hollow
metal tubing I cut. The
"wheels" are size 15 brass beads glued to the bottom of the legs with
some JB Kwik Weld (my favorite glue for gluing metal to wood). To attach the base to the chair seat, I used
my needle-nose pliers to flatten out the edges of a standard metal eyelet. That was then glued to the bottom of the
chair, also with JB Kwik Weld. It fits
perfectly over the metal tubing.

After
I glued the vinyl to the (now stained) seat back, I had to recreate the nail
head trim. I considered micro beads but
was afraid they would stick out too much.
I could have used tiny punched circles shaped on my craft foam, the way
I do buttons, but my tiniest circle punch is way too big. I finally decided to just dot on gold paint
with the tip of a toothpick. Not
perfect, but it will do. I glued the
seat back to the seat, added the arms, and glued my eyelet to the bottom.

When
the chair is in place on top of its base, it can actually swivel! (However, you have to be careful in picking
it up, or you pick up just the chair top without the base. 😊)

Now,
Mr. Roosevelt can sit at his desk and do important government work. (If you look very closely, you can see the
tiny eyeglasses
I added.)

Wow! I'm continually amazed at your inventiveness! It looks wonderful. Very comfortable. I'm certain lots of work will be accomplished by whoever sits in it.
ReplyDeleteThank you so much! I do like to think that he would be comfortable sitting there. The first seat I cut was a little too small, so I redid that, too, to make it roomier. He wasn't nearly as big as Taft, but he was not a small man. :-)
DeleteWoman, you are Incredible! I love that you keep trying methods until you find the ONE that works! There is definitely more than one way to skin cats and to make teeny, tiny, detailed and perfect office chair arms, and I know this now thanks to you!
ReplyDeleteI have also learned for the first time about Office software having the Remove Background feature. A feature that does not exist in Publisher, which is my go-to application. Thank you! I have saved an instructional video and will play with that feature soon!
I love my Cricut too for making difficult cuts for me, and until they can handle better material, laminating is the only solution. Great out of the box thinking!
The legs and the way you've attached them to the seat bottom is ingenious! And the nail head trim done in gold paint is not only clever, but really fools the eye! The cherry on top of this deliciously marvelous desk chair is the fact that it actually swivels! Simply wonderful! Excellent work, and so much fun to see you doing the nearly impossible!
Thank you very much for all your kind words! As I've said before, this is very much a learning experience for me, but glad I was able to share a little of what I've learned, too. I love the remove background feature. It comes in very handy. I've sometimes added people to my miniature scenes, by removing backgrounds and resizing photos. :-) And my Cameo is one of my favorite tools. I have never been good at making precise cuts, and the Cameo has been a lifesaver.
DeleteBeautiful! The final picture in your post really brought it home for me. I can't believe how detailed you are able to get in 1:24 scale.....I think you need to head to guild school, cuz you got mad skillz!!! (my kids will die of embarrassment at that last statement)
ReplyDeleteLOL! Thank you! Guild school is definitely on my bucket list. The Daily Miniature always posts pictures of what people have made, and every time I just drool over them. Someday. . . .
DeleteThis comment has been removed by the author.
ReplyDelete