For
my pattern in Word, I had to use a bunch of different shapes and combine them
in an effort to create something that was pretty close to the shape of the
real-life chair.
I
grouped the various shapes, copied them into Microsoft Paint, erased the lines
I didn’t need, then copied them back into Word.
As you can see, I originally had the bottom of the back as a straight
line. Fortunately, I made up the chair
using mat board first. It quickly became
apparent that the back was too “stiff” looking.
Finally, it dawned on me that in order to get the chair back at a nice
angle, I had to curve the bottom of the back pattern, too. After a bit more experimenting, I got a fit I
liked. Here you can see my mat board
chair, the patterns, and the wood pieces I cut.
I don’t have a laser cutter, so everything is done by hand using a
utility knife. To get the nice curve on
the back, I soaked the wood in boiling water, then wrapped it around a small glue
stick, secured it with rubber bands, and left it to dry overnight.
Here
is the finished frame of the chair. Keep
in mind that the seat will be higher once the cushion is on. I didn’t bother staining most of it, since it
will be covered with upholstery. I am
definitely happier with the way the back looks.
Then
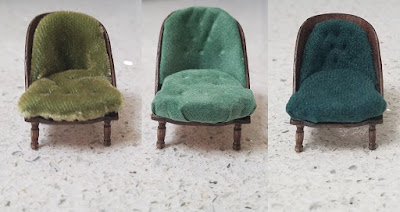
I tried upholstering cushions for it. Ugh! Since the chair is upholstered in velvet, I
had ordered a bunch of velvet swatches from Mood. The swatch I tried was closest in color,
although really too yellow to be a good match.
I thought it was a fairly low nap velvet, but in half scale it
definitely looks . . . hairy. I guess I forgot
that I’ve used velvet to simulate fur in half scale. Next I tried some velvet paper. It has a nice texture. The color still isn’t quite right, but I
think it’s a bit closer. Here I ran into
two problems: I couldn’t make the
indentations for the tufting using thread—there wasn’t enough give in the
paper. I tried using my burnishing tool
to make the indentations. It worked,
kind of, but not well. The other problem
was that the paper was too thick and too stiff to wrap nicely around the foam cushion. For my third try, I used some Alova suede; I’d
picked up a remnant at Joann’s, and thought it was worth a try, even though the
color is way too dark. I honestly think
this fabric works the best. (It looks
better in real life than in extreme close-up).
It wraps and tufts nicely, and the nap isn’t too long.
I
looked online for other color choices, but they only have a neon lime green and
very yellowish sage green. They do,
however, have a plain white. I have
ordered a yard of the white, and I’m going to try my hand at dyeing it. We’ll see how it goes.
In
other news, I completed a little rug to go under the leather chair. This is actually a 1:48 scale rug pattern. I worked it in continental/tent stitch on 40-count
linen. This made up much, much faster
than cross-stitch, because it’s basically half the stitches.
I
also tried working on the barley twist/rope twist for the legs of the side table. Here is an example, before and after
staining. I’m pretty pleased with the
result. Will talk more about the process
in my next post.
And,
finally, on a completely different note, Carrie was kind of enough to send me
some left-over wood veneer that she had. (Some of it is being used on the side
table.) As an extra little surprise, she
threw in an etched metal sheet of 1:24 scale silverware and utensils. I've already made up the little corkscrew/bottle opener,
and here it is on the bar from my Merrimack.
Thanks, Carrie!


It's incredible and inspiring to see your determination and willingness to keep trying until you work out how to make the perfect tufted chair! It's going to be incredible, and I hope the new suede works perfectly!
ReplyDeleteThank you! Fingers crossed.
DeleteAs Jodi already said, your determination is inspiring...I could use some of your grit. (Maybe Teddy R. is helping you along the way?) There is no doubt you will get the chair looking the best it can be. I'm glad you were able to use the utensil sheet.
ReplyDeleteThanks! I would love to think that Teddy is lending his support from the beyond. :-) I would hope I am making him happy.
Delete