Monday, May 25, 2020

A Teeny, Tiny Kitchen


It’s been a long time since I posted.  Sheltering in place has really upended my schedule.  It seems to take more time and effort now to make sure that I maintain “face-to-face” contact with friends and co-workers.   Every Saturday, we host a Zoom party, where we play games and take virtual “trips” with our friends.  For anyone who enjoys escape rooms, I strongly recommend the Palace of Destiny from Palace Games.  It’s free, but, if you are able, a donation would be nice.  We’ve been playing it together as a team, and there are times we need every brain we can get!  I also spent several Sundays, early on, making face masks.  All of this was further complicated by the fact that I have a hereditary problem with my thumb joints, which was exacerbated by a less-than-optimal set-up for working from home.   A set-up that works for the occasional day of working remotely does not necessarily work as well over weeks or months.  I have done some tinkering with my set-up, and it is now much more ergonomic, and my thumbs are feeling much better.  We’ve also been told we will likely be working from home for the rest of the year, so it’s time I got back in the groove!

So, on to something more interesting—miniatures!  Over the past month or so, I have been slowly working on the kitchen in the art deco house.  It is a teeny, tiny kitchen.   I added some space onto the Popular Mechanics’ plans to make the kitchen 4” x 4¼” (which, in real life, would be 8’ x 8½).  I can’t imagine how I could have fit anything in if I had stuck with the original dimensions of 3” by 3”!  As it is, everything is a pretty tight fit.

The walls have been papered with a vintage wallpaper from Bradbury & Bradbury.  I wanted beadboard on the bottom half of the walls, but the miniature beadboard I had was so thick, I was afraid it would take up too much space, which was already at a premium.  To solve the problem, I printed out a beadboard pattern on paper (to ensure that I could keep things straight and to try to maintain even spacing), then glued HO-scale 1x6 lumber strips directly onto it.  
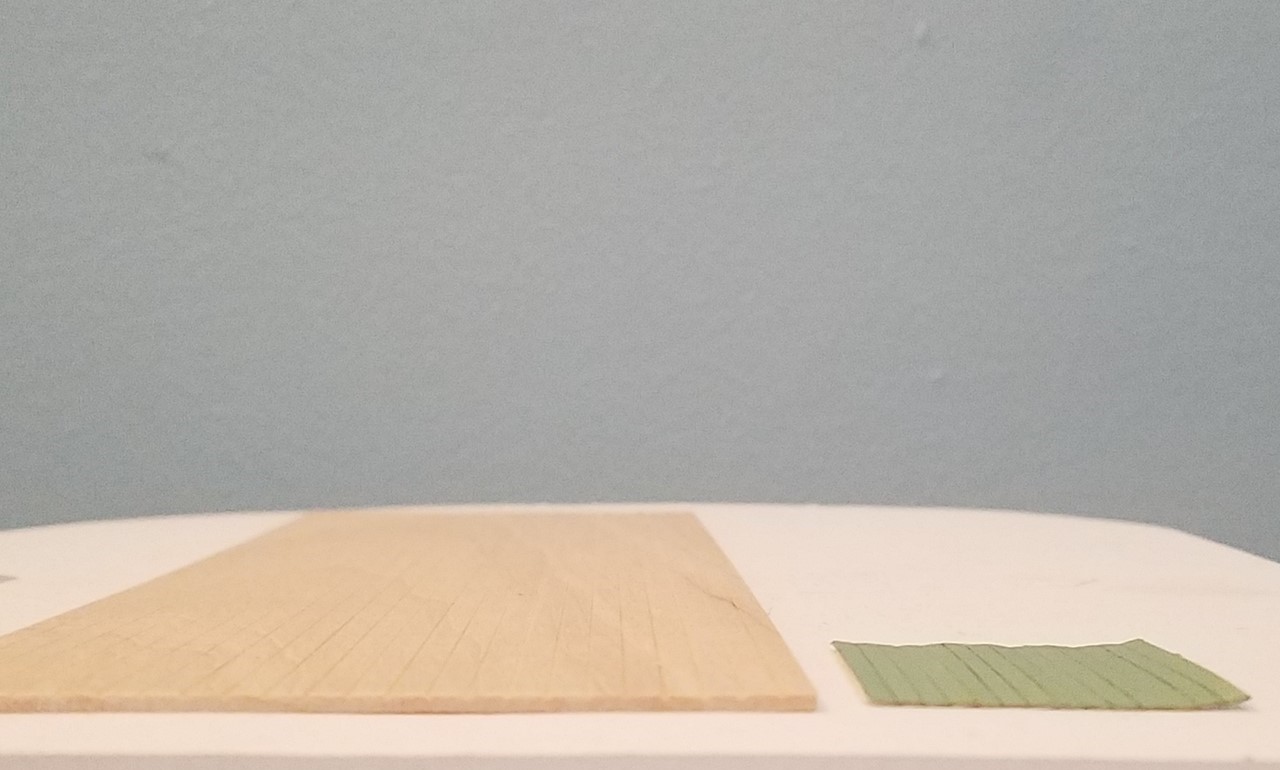

I’m not sure how well you can see the difference between the standard mini beadboard on the left and my home-made beadboard on the right, but mine is much, much thinner!  The top and bottom were trimmed with more HO lumber.  (The color, by the way, is Wedgewood Green, lightened with a bit of white.  I honestly don’t know why greens always show up so minty in all my pictures.)


The refrigerator was a find on eBay.  It was a metal kit in not very good condition.  The metal was extremely uneven.  It took a lot of filing, as well as some Green Stuff to smooth it out.  Here you can see it partway through the filing process.  In addition, the body was made in two parts—one designed to fit inside the other.  More lumpiness inside the exterior portion had to be filed down so that the interior piece could be glued in straight and even.  You can see the angle it was at originally.  The door, which I didn’t photograph, was unaccountably painted brown.


After filing, gluing, filling in the gaps with more Green Stuff, and giving it a couple of coats of gloss white spray paint, it doesn’t look too bad.


The door still opens, and I intend to put some food items inside—maybe some milk, eggs and butter.

The stove is an Acme magnet.  This is not the exact magnet I got; mine was missing the cat, but it had the platform underneath and the yellowing around the joints. 


I was able to pry the front two feet off cleanly, but the back two suffered a bit of damage when I removed the platform.  I filled in the missing bits with yet more Green Stuff, then covered the stove area and gave the entire thing a coat of gloss white spray paint.  I then had to repaint the black and silver parts.  I don’t have the steadiest hand, but it doesn’t look too bad in person.


The sink is from a kit by Red Cottage Miniatures.  The original sink I had purchased was too large for the space, but the Red Cottage sink fits perfectly.   The base is painted the same green as the beadboard.  The faucet is simply wire with some small beads for the handles.  I was able to bend the wires at crisp right angles by using a pliers set I got from Micro Mark.  The drain pipe is a large paperclip, and the little dish drainer (as well as the clock and the breadbox) are also from a Red Cottage Miniatures kit.


The small worktable I covered in a previous post.  It’s unfortunate that it has to face in, so that you can’t see the drawers and door, but at least you can see the enamel top.


There isn’t much room for cupboards, but I put in what I could.  They are made from strip wood and some thin styrene for the glass.  The kitchen needed a bit more color, so I used the glass-front cupboard to showcase some “Fiesta Ware” plates I had.  (Unfortunately, I broke the green dinner plate.)  I added a metal vase and a 3-D printed butter dish, painted to match.  (The yellow bowl and red-and-white "enamel" saucepan were also 3-D printed.)


Because the cabinets are a bit high, there is a working stepladder tucked behind the refrigerator.


And that’s the tiny kitchen!


Effie came over from the Fairfield to try it out for me.  She said it was the most efficient kitchen she’d ever worked in—no more than two steps in any direction to get where she needed to go.  And she was pretty much guaranteed to be the only cook in the kitchen!


I'll try not to take so long before my next post.  I'm already excited to start work on the dining room.

Hope everyone is staying safe, healthy, and (relatively) sane.  I'm looking forward to catching up on all the posts I've missed!

Friday, April 17, 2020

A Staircase


I’ve been trying to get back into working on my art deco house.   I’m still having difficulty finding the energy and inclination to work on it, and I’m not sure why.  Work has been very busy, which I know is a good thing, but I actually seem to have less time for minis, not more, despite the fact that I have eliminated my commute.

Anyway, you may remember from the mock-up that to fit a proper rise and run on the staircase, I decided to have it turn at the bottom.


I took this pattern and cut the stringers from matboard, and the risers and treads from 1/32” thick strip wood.  After consideration, the original turned steps looked too insubstantial to support the remaining stairs, so I broadened them to fit completely beneath the bottom step of the main flight.  It didn’t look right to have a solid white chunk next to the steps, though, so I broadened the treads, and allowed the top of the landing to extend a bit beyond the stringer.  I also added some wood along the side of the bottom step and sanded it into a curve, then curved the edges of the treads, too. 


I contemplated adding some detail to the stringer.  This seems a bit much, and I would want to tone down the color if I add it.


While I debated additional decoration on the stairs, I worked on a stair rail.  The original plans call for dowels with wire strung between them.


This would have been OK, but I felt the living room was heading in a slightly more elegant direction.  I ended up falling in love with an art deco staircase rail from Finelli Ironworks:  https://finelliironworks.com/portfolio-items/art-deco-railing/?portfolioID=4321

I can’t make miniature wrought iron, but I used railroad lumber successfully to make the railings I wanted in the Merrimack, so I tried the same technique for this railing.  The larger circles are made from thicker florists’ wire; the smaller circles are jump rings.  It’s not a perfect match to the original, but I like it in this room.


I’m trying a simple cherry bannister, as in the original, but I’d love to figure out a way to make the bannister curve around like this:  http://photographersdirect.com/buyers/stockphoto.php?image=2233604 


By the way, the railing is not glued in place—it just balances nicely and stays upright for my photos.  😊  It’s too delicate for me to glue in place at this time.

Because it’s easier for me to work on furniture right now, I also made up the art deco cabinet from Red Cottage Miniatures and the art deco sofa and coffee table from SDK Miniatures.

I really like the cabinet, but I am bummed that, with the doors closed, you can’t really see inside.  I have great ideas for using more of my N scale swimmers for art deco bookends.


For some reason, I thought the SDK coffee table was an oval, but it is round.  Oval works better for me, so I cut down the top piece to an oval shape and gave it a faux marble finish.  The book on top is a coffee table version of A Note of Explanation, complete with most of the text and about half the illustrations.


The rug is not quite right.  It is only a print-out at this point, while I try to decide on the colors.  It doesn’t help that I am trying to recreate embroidery floss colors with my printer, but they are fairly close.  I think the purple, in addition to being a bit off, is too much of a muchness.  I think I need another color to warm the room up.  Below you can see the rug printout against the wallcovering with the actual embroidery floss I am contemplating.


I love the purple walls with the upholstery, but the room, while having the elegance I like, is feeling a bit cold.  I know accessories will help, but I think it needs more than that.


By the way, the photo on the left wall is “Chez Mondrian” by André Kertész.  It is from 1926, so perfect for the era of this house, and is one of my favorite pieces by him.  We have a print of it hanging in our bedroom.

Other than that, we are staying safe and relatively sane here.  We have had a birthday party on Zoom (that included an online museum scavenger hunt game).  The unexpected upside was that a friend who moved to another state a few years ago was able to attend, because on Zoom it doesn't matter where you live.  Unsolicited plug for Wicked Good Cupcakes, which got awesomely delicious cupcakes in a jar to all the party attendees in time for us to have birthday cake together while apart.  We are also planning a game night using JackBox games.  We will get through this.

Hope you are all staying safe and healthy, and that you are able to connect with loved ones near and far.


Monday, March 23, 2020

Mini Games to Play Online


Not much new to report.  I am still contemplating the stripe color on the exterior of the house.  I have made a new top for the enamel-top table and am working on the stairs now but haven’t made much progress.  My home office shares space with my craft room, and at the end of a long day of working from home, I don’t want to spend any more time inside those four walls! *sigh*  We've been binge-watching a lot.  We zoomed through all the episodes of "The Repair Shop" on Netflix (I can't recommend this show highly enough), and yesterday watched all eight episodes of "The Stranger."

I know many of us are sheltering in place these days, as we try to stop the spread of the Corona virus.  For those of you going a little crazy shut inside and who want to take a break from making minis (wait—who would want to take a break from making minis??), here are a couple of fun online suggestions.

The first is an old one, but may be new to some of you:  The Game of Thornes on the Chicago Art Institute Web site, https://archive.artic.edu/thorne-game/, which uses several rooms from the Thorne Rooms display.  It plays like one of those old quest games (“You are standing in a room, with a door on the right hand side”), only instead of typing in “go left” or “go right,” you click on areas in the pictures to move around or examine things.  You have to make it through the maze of rooms and collect letters for the password in order to escape.  Although it’s part of the archive, it still works, and I was able to escape.  😉

For those who like scavenger hunts, there is https://www.terraclues.com/?view=home.  Each hunt has a series of clues, the answer for which is always a geographic location.  Type your solution into the Google Maps box and, as needed, zoom in to find it on the map.  If your answer is correct, you’ll be taken to the next clue.  There are around 290 hunts available, and it does help greatly to do the tutorial first.  You don’t have to be signed in to do a hunt.  You can also make your own hunts, so I made one for my mini friends:  https://www.terraclues.com/PlayHunt?HuntID=11673  I think most of you will find it pretty easy, but maybe you’ll also find it a little amusing.  When you make a hunt, you can choose to add information and links on your answers, and I tried to go for sites that had interesting content and good eye candy.  If something doesn’t work correctly, please let me know.

Hope you are all staying safe and healthy, and enjoying plenty of time to work on your minis!

Monday, March 16, 2020

A Long Overdue Post


It's been a long time since I posted, for a couple of reasons.  One is that I was working on another swap.  This one is an anonymous swap.  We all filled out questionnaires, and then we were assigned one person to make for/send to.  We of course got the questionnaire of our swap-ee, and I was so inspired by what my person liked and wanted that I had to start working on it.  Unfortunately, everything remains a secret until the recipient receives the swap, so stay tuned.  😊

The other reason is that I was having some difficulty with the deco house.  I got the texture I wanted with my spackle and put on a nice coat of Wicker White.  I carefully marked off the stripes with painters tape, including some special 1/8" painters tape I had to buy from Amazon, as I could not find it locally.  The blue I choose required a lot of coats to cover, and I ended up letting it dry longer between coats than I should have, I guess.  When I removed the tape, large chunks of the blue came with it.
  

I was pretty horrified.  So horrified, in fact, that I went back to working on my swap (which was going much, much better) for another week.  It is now finished.  Last weekend, I peeled off the loose edges, sanded, reapplied the tape and repainted, removing the tape as soon as my last brush stroke was on.  Because I had already aligned all the stripes, I could do one section at a time, which also prevented things from getting too dry before it was time to pull off the tape.  It still needed some touch up, and I'm not super happy with the result, but it's certainly better than it was.  (The roof and second story are still the foam core versions.)


And now I'm wondering if it will be OK to have those blue stripes with the mauve interior.  I don't usually worry about the exterior vs. the interior, but on most builds, you don't really see the exterior right next to the interior.  What do you think?

At the same time I was having problems with my stripes, I was inspired by a photograph I found online to build a little utility table/cabinet for the kitchen.  I needed a work table anyway, and I liked the additional storage, as space is tight in my tiny kitchen.

My first try was an unmitigated disaster.   My plans called for me to cut a lot of the wood to shape, and I don't do well cutting wood by hand.  So that got put on the back burner, too, until this weekend, when I redrew my plans to rely mostly on standard widths and thicknesses of strip wood.  I don't know why I didn't do that from the start.  This is how it turned out.


Not absolutely identical, but pretty close.  The top is currently not glued down but stuck on with double-sided tape.  (You may notice that the side edges are lifting a little.)  I'm trying to decide if I like it or want to try again.  I put a deco design on the "enamel" top, which is made from matboard and cardstock.  Because I did that, I couldn't paint the top; for now, I used clear nail polish to give it a bit of gloss.  (I have to get some of that Krylon Triple-Thick that Jodi uses!) However, because it hadn't been given a base coat of paint, the black paint around the edges seemed to bleed a lot, and I'm not crazy about that. 

I am happy that the door and drawers work!


I used a vintage linoleum pattern I found online as my drawer liner and to line the bottom shelf.  I turned the left-hand drawer into a silverware drawer and the right-hand drawer into a catch-all drawer.  


Almost all the items are from an etched metal set.  The silverware is a little plain (and the spoons don't really have bowls), but I figure they're going inside a drawer, so they're fine.  The catch-all drawer needs a bit more in it.  So far it has a couple of spatulas, a wooden spoon, scissors, can opener, and meat fork.  What else should I include?

Here is the table against the wallpaper I am testing in the kitchen.  This is not the wall it will be on, but was the easiest wall to photograph.


To leave you all on a happy note, I had a new arrival from the Netherlands.  (Yes, I know you can't take a train across the pond, but let's pretend.)


The tiny little bear on the left is my newest addition from AlexandrasBears, whose bears are positively addicting.


He is absolutely adorable and every bit as detailed as his larger brother.  😊  For the time being, he is sitting on the bed for the deco house.

I started working from home last Friday, and, as of tonight, my city is on lockdown.  Don't know how long this will last.  Hoping we are able to nip this outbreak in the bud, and that our lives can go back to normal soon.  Please stay safe and healthy!

Wednesday, February 19, 2020

The Walls Are Going Up

It was a three-day weekend for me this past weekend, so I got a lot done mini-wise.  First of all, I finally got all my swaps done, and they are on their way to the swap organizer.  Yay!  So nice to have that off my to-do list.  Second, I got the first-floor walls (the ones that get glued down anyway) primed, sanded and up.


I didn't take pictures of all the clamping and weighting as I glued them in, but I did take pictures of doing the curved wall.

For that wall, I used 1/16"-thick matboard.  To prep it for curving, I scored it vertically at roughly 1/8" intervals for its entire width.  The scoring went fairly deep, but not all the way through the matboard.  Before I started, I had marked it at 2" intervals to ensure that I wasn't going too crooked with my scoring.  I also took a break from scoring every so often and gently worked on opening up the "ribs" I had made so that they would curve properly.  When it was completely scored and opened, I wrapped it around a bottle of Aleene's glue to train it.  Once I had it curving the way I wanted it to, I cut out the window.  I discovered when doing the mock-up that it was much harder to get my wall to curve properly once I had removed that large section for the window, so it's curve, then cut.  Here it is fully scored with the window partially cut out.


I then wrapped it around the curved section of the floor and glued it down.  The piece above the window got a bit wibbly as I was fixing it in place, so I cut a temporary half disk and wedged it in to encourage the proper curvature.


Next I cut and curled medium-weight cardstock (again, training it around an Aleene's bottle), removed the window section, and glued it in place.  You can see I needed to trim a little bit around the top after gluing.  The good thing is that gluing the cardstock to the matboard strengthened the upper curve, and I no longer need my temporary ceiling form.


It's reassuring that the foam-core mock-up fits on top. 😊


My intention is to skim coat the exterior with spackle, sand a bit and then paint, to give it more of a stucco texture.  I don't want the exterior too rough, but I also don’t want it to look like wood.  I may put my ceiling form back in place while doing this.

Before gluing in the walls, I cut a groove for my floor lamp, the one non-ceiling fixture I intend to have.  No more tape wire—round wire all the way!  The lamp is made from a kit by Jane Harrop.  She had provided a wood strip for the pole; I replaced it with hollow metal tubing so that I could run a grain-of-rice bulb through it.  I tried several options for the shades:


The first is the original shade that came with the kit.  Fine, but blah.  The second was a similar shade with fringe.  Um, no.  I then found some patterns for stained glass shades online.  Most of the ones labeled Art Deco looked more Prairie to me, but art deco did have some of its roots in the designs of Frank Lloyd Wright.  I tried coloring in the dragon-fly lamp by hand; that didn't work too well, and I wasn't thrilled with its look in the room.  I used Word's shapes to color in more geometric lamp shades.  On the first one I tried for a gold-and-silver look.  It didn't look all that gold when printed out, and I didn't like how narrow the top was.  I modified the design a bit and replaced the "gold" with mauve. I think that's the one I'll go with.  Currently, it's just printed on paper, but I'll be printing it out on vellum for a more translucent look.

Finally, I tried out some options for the walls.  These are some scrapbook papers:  The one on the fireplace wall has a pearl-like embossed finish that I thought looked very art deco with its concentric diamonds. I also like the mauve metallic color, but it might too much for the entire room.


I do like the mauve in the piano alcove.


I looked for art deco wallpaper borders and found this fabulous one that apparently was a Bradbury & Bradbury product, although I can no longer find it on their Web site.  (P.S. for 1:12 scalers:  For those who don't already know it, Bradbury & Bradbury sells many of its wallpapers in miniature, which I think is a marvelous idea.  I wish more wallpaper designers did, and I wish B&B offered theirs in half scale.)  (Ooh, that reminds me of another aside:  Have any of you been following the House Beautiful "Dollhouse Beautiful" challenge, annoying though it may be at times?  Did anyone notice that one of the designers apparently got Kohler to make bathroom fixtures in 1:12 scale just for her?  Whaaaat?  How do the rest of us get that?)


Getting back to the border, it wasn't the right colorway, anyway, so I created my own version using shapes in Word.  This allows me to use whatever colors I want and tweak them at my whim.  I think this design could work in conjunction with one or both of the wallpapers above.  What do you think?  Ideas? Suggestions?  (And, yes, those of you who encouraged me to keep the purple chair fabric, or at least wait before making any decisions—I'm very glad I did. 😊)

Enjoy the week and all the mini time you can get!  Your comments are always welcome and appreciated!